I never thought I’d find a vegan dessert that balances moistness, nuttiness, and luscious frosting so effortlessly—until I discovered this Vegan Sweet Almond Cake Recipe. Just imagine the scent of almond extract gently swirling through your kitchen, teasing your senses while a tender, light cake bakes to perfection. Once layered and crowned with creamy almond-flavored buttercream, this cake is the kind of treat that invites you to pause, savor, and share joyfully with friends and family.
Why You’ll Love This Vegan Sweet Almond Cake Recipe
Delightfully moist and nutty: Thanks to the almond extract and chopped almonds, every bite bursts with a rich, naturally sweet flavor that sets this vegan cake apart.
Simple Ingredients: Using everyday pantry staples like self-raising flour, caster sugar, and sunflower oil, with the magical twist of almond flavoring, makes this recipe approachable for any home baker.
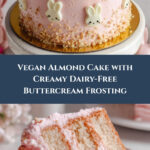
Perfect for special occasions: The elegant layers topped with a smooth, airy almond buttercream decorated with flaked almonds make it ideal for birthdays, gatherings, or just treating yourself.
Inviting texture and presentation: The crunch of chopped almonds combined with the soft crumb and creamy frosting creates a symphony of delightful contrasts.
Customizable decoration: Use colors and piping techniques to add your personal touch, from pastel pink swirls to charming bunny shapes that make this cake as adorable as it is delicious.
Why This Vegan Sweet Almond Cake Recipe Works
The secret to this cake’s success lies mainly in three key techniques: first, curdling dairy-free milk with apple cider vinegar creates a vegan ‘buttermilk’ that lends tang and tenderness to the crumb. Then, the combination of self-raising flour, baking powder, and bicarbonate of soda ensures perfectly risen layers every time. Finally, the almond extract weaves its fragrant magic throughout both the cake and the buttercream, giving a cohesive, irresistible almond flavor that harmonizes beautifully with the crunchy chopped and flaked almonds.
Prepare to bring a lovely mix of textures and flavors into your kitchen with ingredients that celebrate the nutty and sweet essence of almonds, balanced by the freshness of dairy-free alternatives.
480ml of dairy-free milk (soya milk works best): This is the base of our vegan ‘buttermilk’ and keeps the cake moist and tender.
2 teaspoons of apple cider vinegar: Creates acidity to curdle the milk, mimicking the richness of buttermilk.
420g of self raising flour: Provides the necessary lift and light crumb.
300g of caster sugar: For the perfect sweetness without overpowering.
50g of chopped almonds (plus extra for decoration): Adds delightful crunch and texture bursts.
1 teaspoon of baking powder: Supports rise and softness.
1 teaspoon of bicarbonate of soda: Reacts with vinegar to give a fluffy, airy texture.
120ml of sunflower oil: Keeps the crumb tender and moist.
2 teaspoons of almond extract / flavouring: The heart and soul of this cake’s aromatic appeal.
Buttercream Ingredients
530g of dairy-free butter (I used Flora Plant block butter): Provides the creamy, luscious frosting base.
500g of icing sugar: Sweetens and stabilizes the buttercream texture.
2 teaspoons of almond extract / flavouring: Intensifies the nutty flavor in the frosting.
Dairy-free milk (if needed): Adjusts consistency for perfect piping.
Pink food gel: Adds a lovely pastel hue for decoration.
Black food gel: For delicate detail work on piped decorations.
80g of flaked almonds: Ideal for layering between cakes and for decorative crunch on top.
Ingredient Substitutions & Tips
Dairy-free milk: Almond or oat milk can be great alternatives if you want to highlight different subtle flavors.
Sunflower oil: Light olive oil or melted coconut oil can work, but sunflower oil has a neutral flavor that lets the almonds shine.
Almond extract: You can substitute with vanilla extract if almond extract isn’t available—though it won’t have the same nutty intensity.
Dairy-free butter: Choose your favorite plant-based butter; some brands may vary in saltiness, so taste as you go with the frosting.
👨🍳 Pro Tips for Perfect Results
Use fresh almond extract: The quality of your almond extract makes a noticeable difference in flavor intensity.
Let the vegan ‘buttermilk’ sit: Don’t skip the 10-minute resting time after mixing milk and apple cider vinegar; it’s critical for tenderness.
Don’t overmix batter: Mix just enough to combine wet and dry ingredients to keep the cake light.
Tap your tins: After pouring batter, gently tap the tins on the counter to release trapped air bubbles for even baking.
Chill the crumb coat: Chilling after the thin frosting layer firms up the cake for easier and smoother finishing touches.
How to Make Vegan Sweet Almond Cake Recipe
Step 1: Preheat and Prepare Your Tins
First things first: set your oven to 180°C fan and line three 8-inch loose base cake tins with greaseproof paper. If you only have one or two, don’t worry—you can bake the layers separately. Just cover any leftover batter with a damp tea towel to keep it fresh while you bake the others.
💡 Pro Tip: Having all your tins lined before starting makes the process smooth and stress-free.
Step 2: Create Your Vegan ‘Buttermilk’
In a small bowl, whisk together the dairy-free milk with apple cider vinegar. After mixing, let it sit for about 10 minutes until it curdles—this emulates the tangy richness of buttermilk and helps the cake rise beautifully.
💡 Pro Tip: Don’t rush this step! The curdling is essential for that perfect crumb texture.
Step 3: Mix Dry Ingredients
In a large mixing bowl, sift together the self-raising flour, caster sugar, chopped almonds, baking powder, and bicarbonate of soda. Stir well so everything is evenly incorporated, ensuring that nutty bits are spread throughout the mix.
💡 Pro Tip: Sifting prevents lumps and ensures the cake bakes evenly.
Step 4: Combine Wet Ingredients
Pour the sunflower oil into the vegan ‘buttermilk’ along with the almond extract then whisk everything together until fully blended, releasing that mesmerizing almond aroma that will soon fill your kitchen.
💡 Pro Tip: Whisking well helps the oil to emulsify with the acidified milk for a uniform batter.
Step 5: Make the Batter
Gently pour the wet ingredients into the dry and mix until combined. The resulting batter should be smooth but don’t overmix it—this keeps your cake tender and fluffy.
💡 Pro Tip: Use a folding motion rather than vigorous stirring to avoid toughening the batter.
Step 6: Prepare Tins for Baking
Divide the batter evenly into your lined tins. Once filled, tap each tin lightly on the counter to remove any trapped air bubbles; this little trick prevents holes and ensures uniform baking.
💡 Pro Tip: Level the batter with a spatula to create even cake layers.
Step 7: Bake the Cakes
Place the tins in the center of the preheated oven and bake for 25 to 30 minutes. You’ll know the cakes are ready when a knife inserted in the center comes out clean and the cakes spring back when lightly touched.
💡 Pro Tip: Avoid opening the oven door during the first 20 minutes to keep the heat steady.
Step 8: Cool Cakes Completely
Once baked, transfer your cakes to a cooling rack. Let them cool slightly in the tins before removing, then cool fully on the rack. Storing in a sealed container keeps the layers fresh until frosting time.
💡 Pro Tip: Cooling completely prevents the buttercream from melting during assembly.
Step 9: Make the Almond Buttercream
Whip the dairy-free butter in a large bowl until creamy using a stand or hand mixer. Gradually sift in the icing sugar and add the almond extract, continuing to whip at high speed for 5 to 8 minutes. Adjust texture with a splash of dairy-free milk if needed, keeping the frosting fluffy yet pipeable.
💡 Pro Tip: If too thick, add milk carefully; if too soft, add more icing sugar to balance.
Step 10: Color and Prepare Piping Bags
Separate a small portion of buttercream for white, a bit for black coloring, and the largest portion color with pink food gel until you achieve a soft pastel hue. Transfer these to piping bags with appropriate tips for decorating bunnies and swirls.
💡 Pro Tip: Using disposable piping bags simplifies cleanup and precision.
Step 11: Assemble Your Cake
Place one cake layer on your serving plate. Spread or pipe a generous layer of pink buttercream and sprinkle flaked almonds on top. Repeat layering with the second and third cakes, pressing gently to secure them together.
💡 Pro Tip: Use an off-set spatula for an even layer and clean edges.
Step 12: Add a Crumb Coat and Chill
Apply a thin layer of pink buttercream all over the cake to seal in crumbs. Pop the cake in the fridge for about 15 to 20 minutes to let this coat set, ensuring the final decoration layer goes on smoothly.
💡 Pro Tip: This chilling step is key to a neat, professional finish.
Step 13: Final Frosting and Decorations
Remove from the fridge and cover with a thicker, final coat of pink buttercream. Use a cake scraper to smooth the edges. Pipe delicate swirls around the top edge, then use white, black, and pink buttercream to pipe charming bunny shapes with facial details along the sides.
💡 Pro Tip: Take your time with piping for clean, adorable designs.
Step 14: Finishing Touches and Serve
Sprinkle flaked almonds on top and press chopped almonds along the sides for a flavorful and textured finish. Slice and serve this stunning vegan cake that’s sure to impress!
💡 Pro Tip: Use a sharp serrated knife for clean slices without tearing the cake.
Common Mistakes to Avoid
Learn from these common pitfalls:
Skipping the curdling step: Without the apple cider vinegar and rest, your cake will lack the tender crumb and subtle tang.
Overmixing batter: Mixing too long can develop gluten and lead to a dense, tough cake.
Uneven batter distribution: Not dividing batter equally leads to uneven layer thickness and baking inconsistencies.
Not chilling after crumb coat: Skipping chilling can cause the final coating to mix with crumb bits, ruining the smooth finish.
Improper piping technique: Using too large a tip or too much pressure causes uneven decoration shapes.
Ignoring cooling time: Frosting warm cakes melts the buttercream, making it messy and impossible to work with.
Delicious Variations to Try
Once you’ve mastered this classic, why not have some fun with variations to suit your mood or occasion?
Almond and Berry Delight
Fold fresh or frozen berries into the batter for a tart contrast to the sweet almond flavor, or layer fresh raspberries between the buttercream layers for a burst of color and tang.
Citrus Almond Twist
Add the zest of a lemon or orange to the batter and buttercream for a refreshing lift that pairs amazingly with almond extract.
Chocolate Almond Dream
Swirl melted dairy-free dark chocolate into the batter or add cocoa powder for a chocolate-almond fusion that’s utterly decadent.
Spiced Almond Cake
Incorporate warm spices like cinnamon and nutmeg into the dry ingredients for a cozy, comforting twist perfect for cooler months.
Nut-Free Variation
Replace chopped almonds with toasted oat flakes or seeds for texture while keeping the almond extract in the buttercream for flavor. This keeps it nut-free but full of character.
A scattering of toasted flaked almonds on top of the pastel icing adds a welcoming crunch and elegance. For a festive touch, edible flowers or a sprinkle of powdered sugar create a picture-perfect presentation.
Side Dishes
Pair this cake with a light berry coulis or a scoop of vegan vanilla ice cream for added decadence. A fresh fruit salad or a simple warm cup of spiced chai complements the almond and vanilla notes beautifully.
Creative Ways to Present
Serve slices on colorful plates with contrasting berry garnishes or pipe additional almond-flavored buttercream rosettes on the side. For parties, present mini individual cakes using the same recipe in cupcake tins decorated with piped bunny designs.
Another great idea is to serve alongside homemade Valentine Doughnuts: Irresistible Heart-Shaped Treats for a festive and indulgent dessert table.
Make Ahead and Storage
Make-Ahead Instructions
You can bake the cakes and prepare the buttercream a day ahead. Store the unassembled cake layers in an airtight container and keep buttercream chilled in a sealed bowl, allowing you to assemble fresh just before serving.
Storage
Once assembled, store the Vegan Sweet Almond Cake in the refrigerator covered with a cake dome or airtight container to keep it moist. It stays fresh for up to 4 days.
Freezing
This cake freezes beautifully! Wrap individual cake layers tightly in cling film and foil, and freeze for up to 2 months. Thaw overnight in the fridge before frosting and assembling.
Reheating
Enjoy slices chilled or bring to room temperature before serving for the best flavor and texture. Avoid microwaving, as the buttercream may melt.
Expert Tips for Success
Always sift dry ingredients for a light batter.
Use room temperature dairy-free butter for smooth, creamy buttercream.
Keep your mixing speed moderate to avoid incorporating excess air in the batter.
Don’t rush cooling between layers to prevent melty frosting issues.
For piping details, practice on parchment paper before decorating the cake.
Adjust almond extract carefully as it is potent; too much can be overpowering.
Use an offset spatula and cake scraper for a polished, professional look.
Frequently Asked Questions
Can I use almond milk instead of soya milk?
Yes, almond milk works well, although soya milk tends to curdle best with vinegar to form the vegan ‘buttermilk’ for optimal texture.
What if I don’t have almond extract?
You can substitute with vanilla extract, but the cake will have a different, less nutty flavor.
How long will this cake keep?
Stored in the fridge, the cake stays fresh for up to 4 days. Make sure it’s well covered to prevent it from drying out.
Is it necessary to use three cake tins?
Not at all! If you have fewer tins, simply bake the batter in batches, covering the unused batter with a damp tea towel to keep it fresh.
Can I make this cake nut-free?
Yes, omit the chopped and flaked almonds and replace them with seeds or oats for texture, but maintain the almond extract in the buttercream if tolerated.
How do I make the buttercream less sweet?
You can reduce icing sugar slightly or increase the amount of dairy-free butter to balance sweetness, but be cautious to maintain structure for piping.
Can this cake be made gluten-free?
This recipe requires self-raising flour, but you can experiment with gluten-free flour blends designed for baking; just watch for texture differences.
Final Thoughts
This Vegan Sweet Almond Cake Recipe is more than just a dessert; it’s an experience of warmth, flavor, and joyful creativity. From the nutty aroma that greets you in the kitchen to the tender crumb layered lovingly with silky almond buttercream, every step invites you to savor the art of baking. Whether for a special occasion or a simple treat to brighten your day, this cake promises to delight and impress. I encourage you to dive in, enjoy the process, and share the delicious results with those you love.
Related Recipes You’ll Love
If you enjoyed this recipe, you’ll also love these delicious recipes:
This Vegan Sweet Almond Cake is a delightful dairy-free treat featuring moist layers infused with almond flavor and topped with creamy almond buttercream and crunchy flaked almonds, perfect for any celebration or sweet craving.
Ingredients
UnitsScale
For the Cake
480ml of dairy-free milk (soya milk works best)
2 teaspoons of apple cider vinegar
420g of self raising flour
300g of caster sugar
50g of chopped almonds (plus extra for decoration)
1 teaspoon of baking powder
1 teaspoon of bicarbonate of soda
120ml of sunflower oil
2 teaspoons of almond extract / flavouring
For the Frosting
530g of dairy-free butter (I used Flora Plant block butter)
500g of icing sugar
2 teaspoons of almond extract / flavouring
Dairy-free milk (if needed)
Pink food gel
Black food gel
80g of flaked almonds (for layering and decorating)
Instructions
Method (cakes) Preheat your oven to 180°C fan and line three 8 inch loose base / push up cake tins with greaseproof paper. If you don’t have 3 cake tins you will have to bake the cakes separately. Just cover the unused batter with a damp tea towel until you’re ready to use it.
Create vegan buttermilk: In a bowl, combine the dairy-free milk with the apple cider vinegar and whisk until fully combined. Set aside for 10 minutes to curdle. This creates a vegan ‘buttermilk’.
Mix dry ingredients: In a large mixing bowl, sift the flour, sugar, chopped almonds, baking powder and bicarbonate of soda. Mix well to combine.
Mix wet ingredients: Add the oil into the ‘buttermilk’ along with the almond extract and whisk to combine.
Combine wet and dry: Add the wet ingredients into the dry ingredients and mix.
Fill cake tins: Pour equal amounts of batter into the lined cake tins. Make sure to tap the tins on the worktop to remove any air bubbles.
Bake: Pop the cakes into the centre of the preheated oven and bake for around 25-30 minutes. You will know they are done when you put a knife or skewer in to the centre of the cake and it comes out clean and they are springy to the touch.
Cool cakes: Place the cakes on a cooling rack and allow to cool slightly before removing them from the tins. Leave the cakes to cool fully on the cooling rack. Once cool, pop them into a sealed container to keep them fresh before frosting.
Make buttercream: In a large mixing bowl, add in the dairy-free butter, whip until creamy. I use a stand mixer with a balloon whisk attachment, a hand mixer will work great too.
Add icing sugar and almond extract: Sift in the icing sugar and add in the almond extract. Whip on high speed for around 5-8 minutes to incorporate it. Add a splash of dairy-free milk if needed. If the frosting is too thick, add some more chunks of butter. if it’s too soft, add more icing sugar. You want it smooth, creamy and airy.
Colour buttercream: Remove a few tablespoons of buttercream and place into a separate bowl. Colour the large portion of the buttercream with a drop of pink food gel. Whip to combine, you want a pastel pink colour.
Prepare piping bags: Transfer some of the plain white buttercream into a piping bag fitted with a medium round tip nozzle, set aside. Colour a small amount of buttercream (approximately 1-2 teaspoons worth) with black food gel, transfer into a disposable piping bag and snip off a tiny tip, set aside. You can also add some pink buttercream into another piping bag, snip off the tip. This will be for the bunnies ears and nose details so you only need a tiny amount.
Assemble cake layers: Place one of the cakes on a serving plate or cake stand. Dollop or pipe some of the pink buttercream on top and spread out until even using an off-set spatula or pallet knife.
Add almonds and layer cakes: Sprinkle flaked almonds over the top of the buttercream, then place the second cake layer on top. Press it down gently so it sticks, repeat for the third cake. Coat the whole cake with a thin layer of pink buttercream. This creates a crumb coat.
Chill cake: Place the cake into the fridge to set for 15-20 minutes. You want the frosting to be firm, this will make the final coat and applying the decorations easier.
Apply final coat: Remove the cake from the fridge and apply a second/final coat, this time making it thicker, then using a cake scraper to make the edges of cake smooth.
Pipe pink buttercream swirls: Transfer any left over pink buttercream in a piping bag fitted with a star tip nozzle and pipe a swirl around the top edge of the cake.
Decorate with white buttercream: Use the white buttercream to pipe small bunny shapes all around the sides of the cake.
Pipe details: Pipe on two black dots for the eyes. Use more of the pink buttercream for the nose and ears. Refer to video for visual reference.
Final almond decoration: Sprinkle flaked almonds to the top of the cake, and press chopped almonds to the sides of the cake for added flavour and texture.
Serve: Slice and enjoy!
Notes
If you don’t have 3 cake tins you will have to bake the cakes separately. Just cover the unused batter with a damp tea towel until you’re ready to use it.
Use a stand mixer with a balloon whisk attachment or a hand mixer to whip buttercream for best results.
Add splash of dairy-free milk if buttercream is too thick; add more chunks of butter or icing sugar to adjust consistency as needed.
For detailed decoration guidance, refer to video for visual reference.


Your email address will not be published. Required fields are marked *