Description
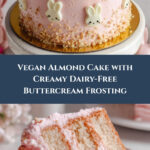
This Vegan Sweet Almond Cake is a delightful dairy-free treat featuring moist layers infused with almond flavor and topped with creamy almond buttercream and crunchy flaked almonds, perfect for any celebration or sweet craving.
Ingredients
Units
Scale
For the Cake
- 480ml of dairy-free milk (soya milk works best)
- 2 teaspoons of apple cider vinegar
- 420g of self raising flour
- 300g of caster sugar
- 50g of chopped almonds (plus extra for decoration)
- 1 teaspoon of baking powder
- 1 teaspoon of bicarbonate of soda
- 120ml of sunflower oil
- 2 teaspoons of almond extract / flavouring
For the Frosting
- 530g of dairy-free butter (I used Flora Plant block butter)
- 500g of icing sugar
- 2 teaspoons of almond extract / flavouring
- Dairy-free milk (if needed)
- Pink food gel
- Black food gel
- 80g of flaked almonds (for layering and decorating)
Instructions
- Method (cakes) Preheat your oven to 180°C fan and line three 8 inch loose base / push up cake tins with greaseproof paper. If you don’t have 3 cake tins you will have to bake the cakes separately. Just cover the unused batter with a damp tea towel until you’re ready to use it.
- Create vegan buttermilk: In a bowl, combine the dairy-free milk with the apple cider vinegar and whisk until fully combined. Set aside for 10 minutes to curdle. This creates a vegan ‘buttermilk’.
- Mix dry ingredients: In a large mixing bowl, sift the flour, sugar, chopped almonds, baking powder and bicarbonate of soda. Mix well to combine.
- Mix wet ingredients: Add the oil into the ‘buttermilk’ along with the almond extract and whisk to combine.
- Combine wet and dry: Add the wet ingredients into the dry ingredients and mix.
- Fill cake tins: Pour equal amounts of batter into the lined cake tins. Make sure to tap the tins on the worktop to remove any air bubbles.
- Bake: Pop the cakes into the centre of the preheated oven and bake for around 25-30 minutes. You will know they are done when you put a knife or skewer in to the centre of the cake and it comes out clean and they are springy to the touch.
- Cool cakes: Place the cakes on a cooling rack and allow to cool slightly before removing them from the tins. Leave the cakes to cool fully on the cooling rack. Once cool, pop them into a sealed container to keep them fresh before frosting.
- Make buttercream: In a large mixing bowl, add in the dairy-free butter, whip until creamy. I use a stand mixer with a balloon whisk attachment, a hand mixer will work great too.
- Add icing sugar and almond extract: Sift in the icing sugar and add in the almond extract. Whip on high speed for around 5-8 minutes to incorporate it. Add a splash of dairy-free milk if needed. If the frosting is too thick, add some more chunks of butter. if it’s too soft, add more icing sugar. You want it smooth, creamy and airy.
- Colour buttercream: Remove a few tablespoons of buttercream and place into a separate bowl. Colour the large portion of the buttercream with a drop of pink food gel. Whip to combine, you want a pastel pink colour.
- Prepare piping bags: Transfer some of the plain white buttercream into a piping bag fitted with a medium round tip nozzle, set aside. Colour a small amount of buttercream (approximately 1-2 teaspoons worth) with black food gel, transfer into a disposable piping bag and snip off a tiny tip, set aside. You can also add some pink buttercream into another piping bag, snip off the tip. This will be for the bunnies ears and nose details so you only need a tiny amount.
- Assemble cake layers: Place one of the cakes on a serving plate or cake stand. Dollop or pipe some of the pink buttercream on top and spread out until even using an off-set spatula or pallet knife.
- Add almonds and layer cakes: Sprinkle flaked almonds over the top of the buttercream, then place the second cake layer on top. Press it down gently so it sticks, repeat for the third cake. Coat the whole cake with a thin layer of pink buttercream. This creates a crumb coat.
- Chill cake: Place the cake into the fridge to set for 15-20 minutes. You want the frosting to be firm, this will make the final coat and applying the decorations easier.
- Apply final coat: Remove the cake from the fridge and apply a second/final coat, this time making it thicker, then using a cake scraper to make the edges of cake smooth.
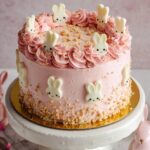
- Pipe pink buttercream swirls: Transfer any left over pink buttercream in a piping bag fitted with a star tip nozzle and pipe a swirl around the top edge of the cake.
- Decorate with white buttercream: Use the white buttercream to pipe small bunny shapes all around the sides of the cake.
- Pipe details: Pipe on two black dots for the eyes. Use more of the pink buttercream for the nose and ears. Refer to video for visual reference.
- Final almond decoration: Sprinkle flaked almonds to the top of the cake, and press chopped almonds to the sides of the cake for added flavour and texture.
- Serve: Slice and enjoy!
Notes
- If you don’t have 3 cake tins you will have to bake the cakes separately. Just cover the unused batter with a damp tea towel until you’re ready to use it.
- Use a stand mixer with a balloon whisk attachment or a hand mixer to whip buttercream for best results.
- Add splash of dairy-free milk if buttercream is too thick; add more chunks of butter or icing sugar to adjust consistency as needed.
- For detailed decoration guidance, refer to video for visual reference.