

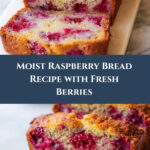
The warm, sweet scent of fresh raspberries mingles with the cozy aroma of baked bread, filling your kitchen with an inviting promise of comfort and delight. Imagine slicing into a loaf that’s tender, moist, and bursting with vibrant raspberry jewels in every bite. This is more than just bread; it’s a little slice of happiness perfect for any time of day.
Why You’ll Love This The Best Raspberry Bread Recipe
- Irresistible flavor: The burst of tangy raspberries blended with a tender crumb creates a perfect balance of sweet and tart, making every bite unforgettable.
- Simple ingredients: You’ll use pantry staples like all-purpose flour, sugars, baking soda, and a touch of vanilla, plus fresh raspberries to elevate the loaf.
- Versatile treat: Whether as a cozy breakfast, afternoon snack, or a sweet addition to tea time, this bread fits seamlessly into any occasion.
- Impressive texture: A moist crumb infused with buttery richness from melted butter and the subtle tang of buttermilk, baked to golden perfection.
- Easy to make: With just 15 minutes of active prep followed by 45 minutes in the oven, plus a brief 15-minute cool-down, this bread is well worth the wait.
Why This The Best Raspberry Bread Recipe Works
This recipe shines because of its careful balance of ingredients and method. The use of both melted butter and canola oil keeps the bread tender and moist, while buttermilk adds a gentle tang that complements the raspberries perfectly. Coating the fresh raspberries lightly with flour before folding them in is a clever trick that prevents them from sinking to the bottom, keeping the bread beautifully studded throughout. Baking in a 350°F oven ensures even cooking, and watching for a slightly domed, springy top tells you the bread is ready to come out, yielding a moist, flavorful loaf every time.
Ingredients You’ll Need

Gather these delightful ingredients: your trusty all-purpose flour, two sugars that add depth and just the right amount of sweetness, and fresh raspberries bursting with tartness to elevate the loaf.
- 2 cups + 4 tablespoons all-purpose flour (divided): The sturdy base for the bread’s tender structure.
- 3/4 cup light brown sugar (packed): Adds warmth and subtle molasses flavor.
- 1/4 cup granulated sugar: Brings balanced sweetness and lightness.
- 1 teaspoon baking soda: Gives a gentle rise for a perfect crumb.
- Pinch salt (optional and to taste): Enhances flavor complexity.
- 1/4 cup unsalted butter (melted): Infuses richness and moistness.
- 1 large egg: Binds ingredients and enriches texture.
- 3/4 cup buttermilk: Adds tang and tenderness.
- 1/4 cup canola or vegetable oil: Keeps the bread moist.
- 2 teaspoons vanilla extract: Provides aromatic warmth.
- 10 to 12 ounces raspberries (about 2 cups*): The star ingredient offering juicy bursts of flavor.
Ingredient Substitutions & Tips
- Unsalted butter: You can swap melted butter for coconut oil for a dairy-free twist without sacrificing moisture.
- Buttermilk: If you don’t have buttermilk, mix 3/4 cup milk with 1 tablespoon lemon juice or vinegar and let it sit for 5 minutes.
- Granulated and brown sugar: Light or dark brown sugar work well; dark brown will give a more intense caramel note.
- Raspberries: Fresh is best, but frozen raspberries can be thawed and gently dabbed dry to use as well.
👨🍳 Pro Tips for Perfect Results
- Prep your pan right: Grease and flour the loaf pan well or use floured cooking spray to prevent sticking.
- Mix gently: Stir your wet and dry ingredients just until combined to avoid tough bread.
- Flour the berries: Toss raspberries in flour before folding them in to keep them evenly distributed.
- Check doneness carefully: Because raspberries add moisture, test with a toothpick in a berry-free spot for a clean or crumbly result.
- Cool properly: Let the bread rest in the pan then cool completely outside for easiest slicing.
How to Make The Best Raspberry Bread Recipe
Step 1: Preheat Oven and Prepare Pan
Get things started by heating your oven to 350°F. Careful preparation of the loaf pan is essential; spray it with floured cooking spray or grease and flour it thoroughly to keep your bread coming out perfectly intact.
💡 Pro Tip: Using floured cooking spray is a foolproof way to avoid sticking and makes cleanup smooth.
Step 2: Mix Dry Ingredients
Combine 2 cups plus 2 tablespoons of flour with both sugars, baking soda, and that optional pinch of salt. Whisk these dry players together so they harmonize beautifully, setting the perfect stage for your loaf’s tender crumb.
💡 Pro Tip: Whisking aerates the flour and blends ingredients evenly for a light texture.
Step 3: Melt Butter
Pop your unsalted butter into a microwave-safe bowl and melt it in bursts of about 45 seconds on high. Let it cool briefly—this step is critical so the eggs won’t scramble when mixed in.
💡 Pro Tip: Allow the butter to cool just enough so it’s warm but not hot, protecting the egg’s integrity.
Step 4: Combine Wet Ingredients
Into the buttery warmth, whisk together the egg, buttermilk, oil, and vanilla extract. This potion is the rich liquid counterpart to your dry mix and forms the delicious heart of the batter.
💡 Pro Tip: A vigorous whisk here helps fully emulsify and blend flavors.
Step 5: Mix Wet and Dry Ingredients
Pour your wet mixture over the dry and gently stir until just combined. The batter will look lumpy—this is exactly right. Resist the urge to overmix to keep your bread tender and light.
💡 Pro Tip: Overmixing activates gluten, which can make the bread dense and less moist.
Step 6: Coat Raspberries with Flour
Give the raspberries a light dusting with 2 tablespoons of flour. This little trick prevents them from sinking to the bottom during baking and keeps their vibrant bursts evenly spread.
💡 Pro Tip: Gently toss so berries stay whole, adding juicy pockets throughout.
Step 7: Fold Raspberries into Batter
Carefully fold the flour-coated raspberries into the batter, gently combining to avoid crushing the berries while still evenly distributing them.
💡 Pro Tip: Use a spatula and a light hand for best berry preservation.
Step 8: Transfer Batter to Pan
Pour the batter into your prepared pan, smoothing the top gently with a spatula. Push the mixture into corners to ensure an even bake and pretty loaf shape.
💡 Pro Tip: Slightly tapping the pan on the counter can help release air bubbles.
Step 9: Bake Bread
Slip your pan into the oven and bake for 45 minutes to an hour. When the bread’s top is set, a little domed, and springy to the touch, it’s a good sign of doneness. A toothpick inserted in a raspberry-free patch should come out clean or with moist crumbs, but no wet batter.
💡 Pro Tip: Start checking around 45 minutes, but keep a close eye afterward to avoid overbaking.
Step 10: Cool Bread
Patience now—allow your bread to rest in the pan for 15 minutes before turning it out onto a wire rack to cool fully. This step ensures clean slicing and prevents crumbling.
💡 Pro Tip: Full cooling is key; warm bread can fall apart when sliced.
Step 11: Storage
Wrap your loaf tightly and it will stay fresh at room temperature for up to one week—or pop it in the freezer for up to six months, perfect for longer-term indulgence.
💡 Pro Tip: Slice before freezing for easy thaw-and-serve convenience.
Common Mistakes to Avoid
Learn from these common pitfalls to always get the best raspberry bread:
- Overmixing the batter: This toughens the bread; mix just until ingredients come together.
- Not coating raspberries with flour: Leads to berries sinking to the bottom instead of remaining throughout.
- Using hot melted butter: Can scramble the egg, ruining the batter texture.
- Opening the oven too often during baking: Causes temperature drops and uneven rising.
- Skipping the cool-down step: Leads to crumbly slices and loss of shape.
- Ignoring fresh versus frozen berries: Frozen berries may add extra moisture, requiring gentle draining.
Delicious Variations to Try
Once you’ve mastered the classic raspberry loaf, you can let your creativity run wild:
Blueberry-Raspberry Medley
Mix fresh blueberries with raspberries for a double-berry delight that adds bursts of sweeter and tangier notes in every bite. For a similar fresh berry experience, you might also enjoy our Lemon Blueberry Bread with Lemon Glaze.
Lemon Zest Twist
Add the zest of one lemon to the batter along with a teaspoon of lemon juice for a bright, citrusy aroma that perfectly complements the raspberries.
Almond Crunch
Sprinkle slivered almonds on top before baking to introduce a delightful crunch and nutty flavor.
Coconut Infusion
Fold in shredded coconut for tropical undertones that enhance the bread’s moistness and sweetness.
Spiced Raspberry Bread
Add 1/2 teaspoon of cinnamon and a pinch of nutmeg to the dry ingredients for a warm spice kick, perfect in cooler months.
Herby Raspberry Bread
For a surprising twist, fold in chopped fresh basil or mint leaves to elevate the raspberry’s fragrance and flavor.
How to Serve The Best Raspberry Bread Recipe

Garnishes
Fresh raspberry halves or a light dusting of powdered sugar on top make a simple yet elegant garnish. A drizzle of honey or a dollop of whipped cream also pairs beautifully.
Side Dishes
This bread pairs wonderfully with creamy Greek yogurt, a spread of cream cheese, or alongside a hot cup of tea or coffee. For a savory contrast, serve with a small cheese plate or fresh fruit salad.
Creative Ways to Present
Slice thick and toast lightly for a crunchy exterior paired with the soft interior. Serve topped with a smear of almond butter or a smear of your favorite nut butter for added richness. For brunch gatherings, arrange slices on a wooden board with fresh berries and edible flowers for a stunning display. Pair the loaf alongside our delightful 2 Ingredient Cottage Cheese Flatbread for a variety of textures at the table.
Make Ahead and Storage
Make-Ahead Instructions
You can prepare the batter up to a day in advance and keep it covered in the refrigerator. Just give it a gentle stir before pouring into the loaf pan and baking.
Storage
Once baked and cooled, store the bread wrapped tightly at room temperature for up to 1 week, preserving its moist texture.
Freezing
Freeze the bread wrapped in plastic wrap and foil for up to 6 months. Slice before freezing to thaw individual portions quickly.
Reheating
Warm slices gently in a toaster oven or microwave for a few seconds to bring back that fresh-baked warmth and softness.
Expert Tips for Success
- Use fresh, ripe raspberries whenever possible for the best natural sweetness and flavor burst.
- Do not overmix the batter; lumps are okay and welcome for tender bread.
- Measure flour carefully — spoon and level it to avoid dense bread.
- Check your oven temperature with an oven thermometer for consistent baking.
- Use unsalted butter to control salt levels precisely.
- Let the bread cool fully before slicing to ensure clean cuts.
- Freeze slices individually to enjoy fresh bread anytime without waste.
Frequently Asked Questions
Can I use frozen raspberries for this bread?
Yes, you can use frozen raspberries. Just thaw and gently pat them dry to reduce extra moisture, then toss in flour before folding into the batter.
Why do I need to coat the raspberries in flour?
Coating prevents the berries from sinking to the bottom of the loaf during baking, ensuring even distribution and a beautiful appearance.
How long does this bread last?
Stored tightly wrapped, it stays fresh at room temperature for up to one week, or frozen for up to six months.
Can I substitute the buttermilk?
Absolutely! You can make a buttermilk substitute by adding 1 tablespoon of lemon juice or vinegar to 3/4 cup milk and letting it sit for 5 minutes.
Is this bread vegetarian?
Yes, this recipe is vegetarian-friendly, using fresh ingredients without any meat or animal gelatin.
Can I add nuts or other fruits?
Yes, nuts like almonds or walnuts add a great crunch, and other fruits such as blueberries can be mixed in for variation.
How do I know when the bread is done?
The bread is ready when the top is slightly domed, springy to the touch, and a toothpick inserted in a raspberry-free area comes out clean or with a few moist crumbs.
Final Thoughts
Making this The Best Raspberry Bread Recipe is like inviting a moment of simple joy into your day. Its luscious balance of sweet and tart, combined with a moist crumb and delightful aromas, makes it a winner for family breakfasts, thoughtful gifts, or anytime treats. I can’t wait for you to experience the warm satisfaction of slicing into this loaf fresh from your oven. Enjoy the journey, and happy baking!
Related Recipes You’ll Love
If you enjoyed this recipe, you’ll also love these delicious recipes:
- Lemon Blueberry Bread with Lemon Glaze | Fresh & Irresistible – A bright and fruity bread bursting with juicy blueberries and a delightful lemon glaze finish that’s perfect for any occasion.

The Best Raspberry Bread Recipe
- Prep Time: 15 minutes
- Cook Time: 45 minutes
- Total Time: 1 hour 15 minutes
- Yield: 1 serving 1x
- Category: Bread
- Method: Baking
- Cuisine: American
- Diet: Vegetarian
Description
This moist and flavorful raspberry bread combines tender crumb with bursts of fresh raspberries, making it a perfect sweet treat for any time of day.
Ingredients
Dry Ingredients
- 2 cups + 4 tablespoons all-purpose flour (divided)
- 3/4 cup light brown sugar (packed)
- 1/4 cup granulated sugar
- 1 teaspoon baking soda
- pinch salt (optional and to taste)
Wet Ingredients
- 1/4 cup unsalted butter (melted)
- 1 large egg
- 3/4 cup buttermilk
- 1/4 cup canola or vegetable oil
- 2 teaspoons vanilla extract
Fruit
- 10 to 12 ounces raspberries (about 2 cups*)
Instructions
- Preheat and Prepare Pan: Preheat oven to 350F. Spray one 9×5-inch loaf pan with floured cooking spray, or grease and flour the pan; set aside.
- Mix Dry Ingredients: In a large bowl, add 2 cups + 2 tablespoons flour, sugars, baking soda, optional salt, and whisk to combine; set aside.
- Melt Butter: In a medium microwave-safe bowl or glass measuring cup, melt the butter, about 45 seconds on high power. Allow butter to cool momentarily so you don’t scramble the egg.
- Combine Wet Ingredients: To the butter, add the egg, buttermilk, oil, vanilla, and whisk to combine.
- Mix Batter: Pour wet over dry and stir until just combined; don’t overmix. Batter will be somewhat lumpy and don’t try to stir the lumps smooth or bread will be tough; set aside.
- Prepare Raspberries: In a medium bowl, add the raspberries, 2 tablespoons flour, and toss lightly to combine (coating berries in flour helps to reduce sinking while baking).
- Incorporate Raspberries: Add the raspberries to the batter and fold very lightly to combine.
- Transfer to Pan: Turn batter out into prepared pan, smoothing the top lightly with a spatula and pushing it into corners and sides as necessary.
- Bake: Bake bread for 45 minutes to an hour. Bread is done when top is set in the middle, slightly domed, springy to the touch, and a toothpick inserted in the center (if you can find a patch without hitting raspberries) comes out clean or with a few moist crumbs, but no batter.**
- Cool: Allow bread to cool in pan for about 15 minutes before turning out on a wire rack to cool completely before slicing and serving.
- Storage: Bread will keep airtight at room temperature for up to 1 week, or in the freezer for up to 6 months.
Notes
- Coating berries in flour helps to reduce sinking while baking.
- Bread will keep airtight at room temperature for up to 1 week, or in the freezer for up to 6 months.
Your email address will not be published. Required fields are marked *