

I never thought I’d find a cheesecake recipe easier than this, but the No-Bake Matcha Oreo Cheesecake Recipe simply blew me away! Imagine the delicate earthiness of matcha blending seamlessly with the creamy richness of cheesecake, all nestled on a crunchy, chocolatey Oreo crust that crunches under your fork. It’s an elegant yet playful dessert that requires no oven and promises pure indulgence in every single bite.
Why You’ll Love This No-Bake Matcha Oreo Cheesecake Recipe
- Decadent flavor combo: The unique pairing of matcha’s vibrant, slightly grassy notes with the sweet, creamy cheesecake and Oreo crunch creates a taste experience that is both refreshing and comforting.
- Simple ingredients: With pantry staples like cream cheese, Oreos, and matcha powder, this recipe is wonderfully straightforward without sacrificing gourmet flair.
- Perfect for individual servings: Crafted as a single-serving dessert, it’s perfect for treating yourself without leftovers or fuss.
- No baking required: Just over 4 hours and 55 minutes including chilling, this is a no-cook masterpiece ideal for when you want to impress without the heat of the oven.
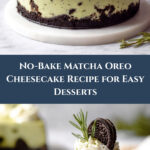
- Eye-catching presentation: Garnished with mini Oreos and sprigs of fresh rosemary, it’s not only delicious but also beautiful on any dessert table.
Why This No-Bake Matcha Oreo Cheesecake Recipe Works
This recipe succeeds by balancing textures and flavors with finesse. The method hinges on transforming crushed Oreos with melted butter into a sturdy crust that holds the creamy filling perfectly. The magic happens with blooming gelatin and incorporating matcha into the smooth cream cheese mixture, ensuring that each bite melts in your mouth without being heavy. By folding in chopped Oreos and whipping heavy cream just until combined, it creates a luscious, light filling with delightful cookie surprises throughout. Using a cake ring lined with parchment allows for neat shaping and an elegant finish every time.
Ingredients You’ll Need

Gather a gorgeous lineup of ingredients that promise both comfort and extraordinary taste. From the beloved chocolatey Oreos to the vibrant, green matcha powder, each element brings its own special character to this cheesecake.
- 18 Oreos: For crafting a crumbly, flavorful base that adds chocolate crunch.
- 1/4 cup unsalted butter: Melted to bind the Oreo crumbs into a firm crust.
- 8.8 oz cream cheese: The velvety heart of this cheesecake, delivering smooth richness.
- 1/2 cup confectioners’ sugar: Sweetens delicately without graininess.
- 1/2 tsp vanilla extract: A hint of warmth and depth to elevate the filling.
- 1 1/2 tsp gelatin powder: The secret to setting this cheesecake gently without baking.
- 1 1/2 tbsp matcha powder: Its grassy, slightly bitter complexity is the star flavor that sets this cheesecake apart.
- 3 1/2 tbsp hot water: To bloom the gelatin and dissolve matcha for an even blend.
- 1/2 cup heavy whipping cream: Whipped in for lightness and a creamy texture.
- 10 Oreos (chopped): Folded into the filling for extra cookie crunch and surprise bites.
- Whipped cream: Used for an elegant topping.
- 5 mini Oreos: For charming decoration.
- Rosemary: Adds a touch of herbal fragrance and visual contrast.
Ingredient Substitutions & Tips
- Oreos: You can swap for any chocolate sandwich cookies if Oreo is unavailable; just ensure the size and texture are similar.
- Cream cheese: Full-fat cream cheese yields the creamiest results, but part-skim works for a lighter version.
- Matcha powder: Choose ceremonial or culinary grade for best flavor; adjust quantity slightly if using a more potent powder.
- Gelatin powder: Agar-agar can substitute for a vegetarian setting agent but may need different handling.
👨🍳 Pro Tips for Perfect Results
- Tip 1: Make sure to crush Oreos finely for a compact crust that holds together well.
- Tip 2: Bloom gelatin properly by letting it sit in cold water before gently warming to avoid lumps.
- Tip 3: Use a cake ring lined with parchment or acetate for smooth edges and easy release.
- Tip 4: Whip heavy cream just until soft peaks to keep the filling light and airy.
- Tip 5: Chill the crust well before adding filling to prevent mixing and ensure structure.
How to Make No-Bake Matcha Oreo Cheesecake Recipe
Step 1: Crust
Let’s start by carefully separating the cream filling from the Oreos into two separate bowls. This division is essential to get that crumbly texture free from excess cream which might soften the crust.
💡 Pro Tip: Use a sturdy plastic bag and rolling pin for the best control when crushing Oreos next.
Step 2: Crush Cookies
Place the cookies into a sealed plastic bag and crush them to fine crumbs with a rolling pin. The finer the crumbs, the better the crust’s hold and texture.
💡 Pro Tip: You’ll notice a satisfying crunch as you break down the cookies—a sign you’re on track!
Step 3: Mix Crust
Mix those velvety crumbs with melted unsalted butter in a medium bowl. This binding mixture will form the foundation of your cheesecake’s base.
💡 Pro Tip: Make sure all crumbs are evenly moistened but not soggy.
Step 4: Prepare Pan
Line the side of a 6-inch cake ring with parchment paper or transparent cake collar. If using a ring, place it on a cake board or flat surface for ease later on.
💡 Pro Tip: Lining the ring prevents sticking and ensures a gorgeous, smooth finish.
Step 5: Press Crust
Pour the crumb mixture into the pan and press it firmly using a flat-bottomed glass. Push the crumbs up roughly one inch along the sides for that classic cheesecake shape.
💡 Pro Tip: Firm, even pressure ensures your crust sets perfectly without crumbling.
Step 6: Chill Crust
Place the crust in the refrigerator to chill for at least 30 minutes. This step is crucial for letting the butter solidify and keeping the crust intact.
💡 Pro Tip: While chilling, you can proceed with the filling prep.
Step 7: Matcha Mix
In a small bowl, combine matcha powder with 2 tablespoons of hot water stirring until smooth and bright green. Setting this aside allows the matcha to fully dissolve for an even flavor.
💡 Pro Tip: Hot, but not boiling water, preserves matcha’s delicate flavors.
Step 8: Dissolve Gelatin
Bloom gelatin powder with 1 1/2 tablespoons of water for 5 minutes, then warm gently to dissolve. Proper gelatin preparation is the backbone of your no-bake set cheesecake.
💡 Pro Tip: Avoid overheating to prevent gelatin losing its setting power.
Step 9: Beat Cream Cheese
Beat cream cheese with confectioners’ sugar and vanilla extract until smooth. This mixture is the luscious core of the cheesecake.
💡 Pro Tip: A stand or hand mixer with a whisk attachment speeds things up beautifully here.
Step 10: Add Gelatin
With the mixer running, slowly pour in dissolved gelatin and continue beating thoroughly to integrate the setting agent seamlessly into the creamy base.
💡 Pro Tip: This keeps the mixture perfectly smooth and avoids lumps.
Step 11: Add Matcha
Pour the vibrant matcha mixture into the cream cheese and beat until fully combined, achieving that signature green tint and rich flavor.
💡 Pro Tip: Don’t overmix—just enough to blend for an even color and taste.
Step 12: Add Cream and Oreos
Slowly mix in heavy whipping cream on low speed until incorporated, then fold in chopped Oreos with a spatula for delightful bits of chocolate crunch.
💡 Pro Tip: Fold gently to keep the cream’s light texture intact.
Step 13: Assemble Cheesecake
Pour the filling onto the chilled crust, spreading it evenly with a spatula. This creates a luscious top layer ready to set in the fridge.
💡 Pro Tip: Smooth the surface carefully for a polished look when unmolding.
Step 14: Chill Cheesecake
Cover tightly and refrigerate for at least 4 hours or ideally overnight. This long chill solidifies the gelatin and melds all the flavors perfectly.
💡 Pro Tip: Overnight chilling results in the best texture and flavor development.
Step 15: Remove from Mold
Carefully release the cheesecake from the mold and peel away the parchment or acetate. You’ll be greeted by a pristine, creamy cake with clean edges.
💡 Pro Tip: Run a warm knife around the edges if the cake sticks slightly.
Step 16: Decorate
Pipe whipped cream on top and adorn with mini Oreos and fresh rosemary for a stunning balance of elegance and whimsy.
💡 Pro Tip: Fresh rosemary adds a beautiful color contrast and subtle aroma.
Step 17: Serve
Enjoy your masterpiece chilled, savoring every bite of this perfect no-bake matcha Oreo cheesecake delight.
Common Mistakes to Avoid
Learn from these common pitfalls:
- Not chilling the crust enough: This causes the crust to crumble when slicing or serving.
- Improper gelatin blooming: Skipping the bloom or overheating gelatin can prevent the cheesecake from setting properly.
- Overmixing whipped cream: This can lead to a dense filling instead of a light, fluffy one.
- Uneven pressing of crust: Leads to inconsistent texture and potential collapse.
- Using boiling water for matcha: Harsh heat can ruin matcha’s flavor, making it bitter.
- Rushing the chilling step: Patience is key for the perfect texture and sliceability.
Delicious Variations to Try
Once you’ve mastered the classic No-Bake Matcha Oreo Cheesecake Recipe, experiment with these fun takes!
Strawberry Swirl Matcha Oreo
Add a swirl of strawberry puree into the cheesecake batter before chilling for a fruity contrast. This complements matcha’s earthy notes beautifully. For more strawberry-inspired desserts, try our Strawberry Cheesecake Cinnabon Rolls – Irresistible & Decadent.
Matcha White Chocolate
Fold in melted white chocolate into the filling for an ultra-creamy texture and a sweet balance to matcha’s bitterness.
Chocolate Ganache Drizzle
Top the cheesecake with a thin layer of rich chocolate ganache for an elegant finish that adds depth and shine.
Coconut & Matcha Crunch
Sprinkle toasted coconut flakes on top with chopped Oreos for added crunch and tropical flair.
Berry Compote Topping
Serve with a vibrant mixed berry compote to add freshness and a pop of color against the pale green cheesecake.
How to Serve No-Bake Matcha Oreo Cheesecake Recipe

Garnishes
Fresh whipped cream piped in pretty swirls, mini Oreos placed artfully, and a sprig of rosemary create striking visual appeal and refreshing herbal notes.
Side Dishes
Pair this cheesecake with light fruit salads or delicate green teas that complement the matcha flavor without overpowering it. For a dessert pairing, a crumbly yet soft Crème Brûlée Cheesecake: Decadent & Easy Elegant Dessert is a sublime choice.
Creative Ways to Present
Serve individual cheesecakes in transparent jars or small glass dishes to showcase the layered crust and filling. Add edible flowers for a whimsical touch, or slice as mini cheesecake bars for parties.
Make Ahead and Storage
Make-Ahead Instructions
Prepare the crust and filling up to 24 hours in advance. Chill assembled cheesecakes overnight to ensure perfect setting and flavor melding before serving.
Storage
Keep refrigerated in an airtight container for up to 3 days to maintain creaminess and freshness.
Freezing
You can freeze this No-Bake Matcha Oreo Cheesecake for up to 1 month. Wrap tightly in plastic wrap and foil to protect from freezer burn. Thaw overnight in the refrigerator.
Reheating
Serve chilled; reheating is not recommended as it alters the texture of this delicate no-bake dessert.
Expert Tips for Success
- Always bloom gelatin properly: It’s essential for the filling’s perfect set.
- Crush Oreos finely: This ensures a crust that binds and slices beautifully.
- Use fresh matcha powder: For the best flavor, avoid stale or clumpy matcha.
- Chill thoroughly: Patience with refrigeration guarantees luscious texture.
- Lightly fold whipped cream: Keep airiness in the filling for a luscious mouthfeel.
- Lining your pan: Prevents sticking and helps you release the cake effortlessly.
- Decorate just before serving: Keeps whipped cream fresh and Oreos crisp.
Frequently Asked Questions
Can I make this cheesecake vegan?
This particular recipe relies on cream cheese and gelatin, which are not vegan. You could try vegan cream cheese alternatives and agar-agar as a gelatin substitute, but setting and texture might vary.
Why do I need to separate the Oreo cream filling?
Removing the filling before making the crust prevents excess moisture and softness, allowing for a firmer, crunchier base.
How do I prevent lumps when adding gelatin?
Bloom gelatin fully and warm gently until dissolved. Pour slowly into the cream cheese mixture while mixing to avoid lumps.
Can I double the recipe for more servings?
Absolutely! Just double all ingredients and use a larger cake ring or springform pan. Remember to extend chilling times accordingly for a perfect set.
Is matcha powder interchangeable with green tea powder?
Matcha is specifically powdered green tea and is the preferred ingredient here for its fine texture and robust flavor. Other green teas won’t work as well in this dessert.
Can I use store-bought whipped cream for decoration?
Yes! Store-bought whipped cream works well if you’re short on time, but fresh whipped cream will deliver richer flavor and better texture.
What’s the best way to serve leftover cheesecake?
Keep it chilled and enjoy within 3 days for maximum freshness and creamy texture. Slice and serve cold straight from the fridge.
Final Thoughts
This No-Bake Matcha Oreo Cheesecake Recipe is a harmonious blend of textures and flavors that feels both indulgent and refreshing. It’s a perfect treat for those special occasions or whenever you crave a luscious dessert without turning on the oven. Sharing this delightful cake feels like sharing a little moment of joy with loved ones, and it really never fails to impress both in taste and presentation. Dive in, savor each bite, and enjoy the wonderful world of matcha and Oreo magic!
Print
No-Bake Matcha Oreo Cheesecake Recipe
- Prep Time: 25 minutes
- Cook Time: 0 minutes
- Total Time: 4 hours 55 minutes
- Yield: 1 serving 1x
- Category: Dessert
- Method: No-Cook
- Cuisine: Western
- Diet: Vegetarian
Description
This No-Bake Matcha Oreo Cheesecake combines the rich creaminess of classic cheesecake with the unique flavor of matcha and the crunchy texture of Oreos, all without turning on your oven. Perfect for a single serving dessert that’s easy to prepare and delightfully refreshing.
Ingredients
Crust
- 18 Oreos
- 1/4 cup unsalted butter
Cheesecake Filling
- 8.8 oz cream cheese
- 1/2 cup confectioners’ sugar
- 1/2 tsp vanilla extract
- 1 1/2 tsp gelatin powder
- 1 1/2 tbsp matcha powder
- 3 1/2 tbsp hot water
- 1/2 cup heavy whipping cream
- 10 Oreos
Topping
- Whipped cream
- 5 mini Oreos
- Rosemary
Instructions
- Crust Separate the cream filling from the Oreos into 2 different bowls.
- Crush Cookies Place the cookies into a plastic bag and crush the cookies into fine crumbs with a rolling pin.
- Mix Crust In a medium bowl, mix the crumbs and melted butter until the crumbs are moistened.
- Prepare Pan Line the side of a 6-inch/15 cm cake ring or springform pan with parchment paper or transparent cake collar. If using a cake ring, line the bottom with a cake board or other flat surface).
- Press Crust Pour the crumbs into the pan. Use a flat-bottom glass to press the crust onto the bottom and up the sides about 1-inch/2.5 cm up the sides of the pan.
- Chill Crust Refrigerate the crust for at least 30 minutes while you make the cheesecake filling.
- Make Matcha Mixture In a small bowl, mix matcha powder and 2 tbsp hot water until well combined. Set aside.
- Bloom Gelatin In a small bowl, bloom gelatin powder with 1 1/2 tbsp water for 5 minutes. Heat in a microwave or over a water bath until the gelatin is dissolved.
- Beat Cream Cheese Mixture Using a hand mixer or stand mixer fitted with the whisk attachment, beat the cream cheese, confectioners’ sugar, and vanilla extract until smooth and well combined.
- Add Gelatin While the mixer is running, pour the dissolved gelatin into the cream cheese mixture and beat until well combined.
- Add Matcha Add matcha mixture and beat until well combined.
- Add Cream and Oreos Add heavy whipping cream and mix on low speed with your mixer just until well combined. Fold in the chopped Oreos.
- Assemble Pour the cheesecake batter onto the chilled crust. Carefully spread it around into one even layer. Use a spatula to smooth the top.
- Chill Cheesecake Cover tightly and transfer back to the refrigerator to chill for at least 4 hours or overnight.
- Release and Decorate Release the cheesecake from the mold. Peel the parchment paper/acetate sheet.
- Serve Pipe whipped cream on top and decorate with mini Oreos and rosemary.
- Enjoy Serve chilled.
Notes
- Refrigerate the crust for at least 30 minutes before adding the filling to ensure it sets well.
- Chill the assembled cheesecake for at least 4 hours or overnight for best results.
- Use a cake ring or springform pan lined properly to easily release the cheesecake.
- Bloom your gelatin properly to avoid lumps in the filling.
Your email address will not be published. Required fields are marked *