

I never thought I’d find a S’mores Cheesecake recipe easier than this, but here it is—a dreamy dessert that captures the nostalgic joy of campfire s’mores with a rich twist. As the aroma of toasted marshmallows and melted chocolate fills your kitchen, you’ll be swept away to cozy evenings and sweet memories. This cheesecake combines a crisp graham cracker crust, gooey marshmallows, and luscious chocolate layers with a creamy, silky filling that’s truly irresistible.
Why You’ll Love This S’Mores Cheesecake Recipe
- Decadent layers of flavor: Each bite delivers the perfect balance of crunchy graham crackers, melty chocolate morsels, and fluffy marshmallows paired with a smooth cheesecake filling.
- Simple yet gourmet: Crafted from readily available ingredients like cream cheese, sour cream, and marshmallows, it’s a dessert you can create with staples from your pantry.
- Perfect for special occasions: Whether it’s a family gathering or a birthday, this cheesecake adds a wow factor with its toasted marshmallow topping and hot fudge drizzle.
- Impressive but approachable: The baking method using a water bath ensures a silky texture, making it approachable for both beginner and experienced bakers.
- Customizable indulgence: Easily swap in mini chocolate morsels or play with the marshmallow amounts to suit your perfect s’mores craving.
Why This S’Mores Cheesecake Recipe Works
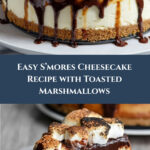
The magic behind this S’mores Cheesecake recipe lies in its clever layering and baking technique. The graham cracker crust, bolstered with brown sugar and vanilla, sets a crunchy foundation that captures the essence of a classic s’more. By baking the cheesecake in a water bath, moisture gently surrounds the springform, preventing cracks and creating an ultra-smooth texture. Finally, the broiled marshmallow topping, paired with warm hot fudge, delivers that irresistible toasted sweetness on top, finishing this dessert with a beautiful, toasted golden glow.
Ingredients You’ll Need

Get ready to gather the stars of this dessert: crumbly graham crackers, sweet mini chocolate morsels, gooey marshmallows, and creamy dairy—all coming together for a crowd-pleasing treat.
- 1 ½ cups graham cracker crumbs: The buttery, crunchy base that’s essential for that iconic s’mores flavor.
- ½ cup brown sugar: Adds a caramel-like sweetness that enhances the crust’s richness.
- 1 tsp vanilla extract: A fragrant boost to both crust and filling.
- 5 Tbsp melted unsalted butter: Binds the crust ingredients with golden richness.
- ¾ cup mini chocolate morsels: Bursts of melty chocolate layered under the cheesecake.
- 1 cup marshmallows: Soft pillows tucked into the crust for that gooey surprise.
- 32 oz cream cheese, softened: The luscious, creamy heart of the cheesecake.
- ½ cup sour cream: Adds tang and velvety moisture to the filling.
- 2 eggs: Provide structure and richness to the cheesecake batter.
- ¾ cup heavy cream: Elevates the filling’s creaminess to indulgent levels.
- ¾ cup white granulated sugar: Sweetens the cheesecake delicately.
- 2 Tbsp corn starch: Helps achieve the perfect firm yet creamy texture.
- 10 oz hot fudge topping, warmed: Glazed on top for an indulgent chocolate finish.
- 2 cups marshmallows: Toasted on the surface for that classic campfire look and taste.
Ingredient Substitutions & Tips
- Graham cracker crumbs: Substitute with digestive biscuits or crushed vanilla wafers if unavailable.
- Mini chocolate morsels: Use semi-sweet or dark chocolate chips depending on your sweetness preference.
- Heavy cream: Can be replaced with full-fat coconut cream for a dairy-free twist (note: texture will be slightly different).
- Hot fudge topping: Try a homemade chocolate ganache or caramel sauce as a delicious alternative.
👨🍳 Pro Tips for Perfect Results
- Wrap your springform tightly: If you’re worried about water leaking during the bath, wrap it in heavy-duty foil from bottom to sides to keep it protected.
- Don’t rush the bake: Baking slowly in a water bath at 325°F creates that creamy, crack-free cheesecake we all love.
- Watch marshmallows carefully: Toast them under the broiler for just 30-35 seconds; they brown quickly and can burn in a snap.
- Use room temperature cream cheese: It whips up silky smooth, with no lumps and perfect batter consistency.
- Let it chill fully: The cheesecake needs at least 4 hours in the fridge to set properly and develop its flavors.
How to Make S’Mores Cheesecake Recipe
Step 1: Preheat and Prepare the Pan
Set your oven to 325°F and grease a 9-inch springform pan. You’ll also need a larger roasting pan, ideally aluminum foil disposable, to hold the springform during the water bath. This setup lets your cheesecake bake evenly and stay moist.
💡 Pro Tip: Greasing the pan well ensures your cheesecake will release easily after baking.
Step 2: Make the Crust Mixture
In a small bowl, combine your graham cracker crumbs with melted butter, vanilla, and brown sugar. Mix thoroughly until your blend looks like wet sand and smells delightfully sweet.
💡 Pro Tip: Press this mixture firmly for a crust that holds together beautifully.
Step 3: Form the Crust
Evenly spread the crumbly mix into the bottom of the springform pan, extending it halfway up the sides. This sturdy base is what’ll hold all the luscious filling you’re about to add.
💡 Pro Tip: Use the bottom of a glass to pack it tightly and evenly.
Step 4: Add Chocolate and Marshmallows
Sprinkle the mini chocolate morsels and 1 cup of marshmallows evenly over your crust layer. These pockets of chocolate and gooey marshmallow add that authentic s’mores texture.
💡 Pro Tip: Ensure the marshmallows are evenly spread to get that warm melt in every slice.
Step 5: Beat the Cream Cheese
Using an electric mixer on medium-high speed, whip your softened cream cheese until it’s smooth and fluffy, scraping the bowl’s sides occasionally. This step creates the smoothest base for your cheesecake filling.
💡 Pro Tip: Properly whipped cream cheese prevents lumps in the batter.
Step 6: Add Corn Starch and Sugar
Mix in the corn starch and granulated sugar until everything blends seamlessly. These ingredients will thicken and sweeten your filling just right.
💡 Pro Tip: Combine slowly to maintain that airy texture.
Step 7: Add Eggs
Beat in the eggs one at a time, ensuring they’re fully incorporated before adding the next. This step builds richness and structure for the cheesecake.
💡 Pro Tip: Use room temperature eggs for smoother blending.
Step 8: Add Sour Cream, Vanilla, and Heavy Cream
Mix in sour cream, vanilla extract, and heavy cream until the batter is silky and uniform. This rich combination delivers the creamy texture that melts on your tongue.
💡 Pro Tip: Don’t overmix – just enough to combine for a smooth batter.
Step 9: Transfer Batter to Springform
Pour your decadent batter over the crust and smooth out gently. If you’re concerned about leaks during the water bath, go ahead and wrap the springform tightly with heavy-duty aluminum foil for extra protection.
💡 Pro Tip: Distribute batter evenly to ensure uniform baking.
Step 10: Prepare Water Bath and Bake
Place your roasting pan with the springform inside the oven, then carefully pour water into the roasting pan until it’s about halfway up the sides of the springform. Bake for 90 to 95 minutes. Once done, turn off the oven and crack the door open halfway to let the cheesecake rest inside for 10 minutes.
💡 Pro Tip: The water bath helps prevent cracks and keeps the filling creamy and moist.
Step 11: Rest and Loosen Cheesecake
Take the cheesecake out of the oven and let it rest on the counter for 10 minutes. Then carefully run a butter knife around the edges to loosen it from the pan, which helps prevent cracking as it cools.
💡 Pro Tip: Don’t rush – gentle handling preserves your cheesecake’s perfect shape.
Step 12: Cool Cheesecake
Allow your cheesecake to cool completely for about an hour before moving to the next step. This cooling phase firms up the texture just right.
💡 Pro Tip: Cooling on a wire rack promotes even air circulation.
Step 13: Broil Topping
Spread warm hot fudge over the top of the cheesecake, then scatter the remaining 2 cups of marshmallows evenly. Place the cheesecake back under the broiler for 30 to 35 seconds, watching closely until the marshmallows become lightly golden and toasted.
💡 Pro Tip: Stay attentive here; marshmallows can burn quickly under the broiler.
Step 14: Chill Cheesecake
Once topped and toasted, let your cheesecake cool completely before covering gently and refrigerating for at least 4 hours. This final chill is what sets the texture and makes every slice perfect.
💡 Pro Tip: For best flavor, make this a day ahead and allow the flavors to meld beautifully.
Common Mistakes to Avoid
Learn from these common pitfalls:
- Skipping the water bath: This can cause cracks and a dry texture.
- Overbaking: Leads to a cracked or rubbery cheesecake texture.
- Not softening cream cheese properly: Results in lumpy batter and an uneven bake.
- Forgetting to loosen the edges after baking: Can cause a cracked top when the cheesecake cools.
- Broiling marshmallows for too long: Marshmallows burn in seconds, so keep an eye on them.
- Cutting cheesecake before chilling fully: May cause slices to fall apart or look messy.
Delicious Variations to Try
Once you’ve mastered the classic version, spice things up with these tasty twists:
Peanut Butter S’Mores Cheesecake
Swirl creamy peanut butter into your cheesecake filling for a nutty edge that pairs perfectly with the chocolate and marshmallows.
Salted Caramel S’Mores Cheesecake
Add a layer of salted caramel sauce beneath the marshmallows for a sweet and salty surprise that elevates this recipe to new heights.
Mint Chocolate S’Mores Cheesecake
Mix in some chopped peppermint or add a drop of mint extract to the filling for a refreshing, cool twist.
White Chocolate S’Mores Cheesecake
Swap out the mini chocolate morsels for white chocolate chips and drizzle white chocolate ganache on top to change the flavor profile completely.
Chocolate Hazelnut S’Mores Cheesecake
Incorporate chocolate hazelnut spread into the crust or topping for a decadent, nutty flair.
Try a Brown Butter Sugar Cookies side
For a cookie pairing that’s just as luscious, serve alongside our Brown Butter Sugar Cookies for complementary buttery sweetness and delightful texture contrast.
How to Serve S’Mores Cheesecake Recipe

Garnishes
Top with extra toasted marshmallows, a drizzle of hot fudge, or a sprinkle of crushed graham crackers for an irresistible presentation.
Side Dishes
Serve with fresh berries or a scoop of vanilla bean ice cream to balance richness and add a refreshing touch. Pair with our Lemon Blueberry White Chocolate Cookies for a combo that delights on multiple dessert fronts.
Creative Ways to Present
Cut into neat slices and serve on rustic wooden boards or individual glass jars layered with extra marshmallows for a charming, shareable dessert experience.
Make Ahead and Storage
Make-Ahead Instructions
You can prepare this cheesecake up to a day in advance. After chilling for at least 4 hours, cover tightly with plastic wrap or foil and keep refrigerated until ready to serve.
Storage
Store leftovers covered in the refrigerator for up to 4 days to maintain freshness and texture.
Freezing
This cheesecake freezes well for up to one month. Wrap tightly in plastic wrap and foil to prevent freezer burn. Thaw overnight in the fridge before serving.
Reheating
Enjoy this cheesecake chilled; however, if preferred slightly warmed, let slices sit at room temperature for 20 minutes or warm gently in a low oven for a few minutes.
Expert Tips for Success
- Always use full-fat cream cheese for the richest results.
- Mix batter just until combined to avoid excess air bubbles.
- Use room temperature ingredients to ensure smooth blending.
- Don’t skip the water bath to keep the cheesecake moist and crack-free.
- Broil marshmallows only briefly; they toast quickly.
- Allow proper chilling time for clean slicing.
- Wrap the springform pan in foil if there’s any doubt about leaks.
Frequently Asked Questions
Can I use a regular pan instead of a springform pan?
Springform pans are best for cheesecakes because their removable sides make releasing the cake easier and prevent damage. A deep-dish pie pan can work, but it will be harder to remove the cheesecake intact.
Why is a water bath necessary?
The water bath creates a moist oven environment that prevents the cheesecake from cracking and ensures an even, smooth texture.
Can I prepare this cheesecake ahead of time?
Absolutely! The cheesecake tastes even better after chilling overnight because the flavors meld beautifully.
What if I don’t have mini chocolate morsels?
You can chop up your favorite chocolate bar into small pieces as a great alternative.
How do I prevent marshmallows from burning under the broiler?
Stay close and broil the marshmallows for only 30-35 seconds, watching carefully to pull them out once they lightly brown.
Can I make this cheesecake gluten-free?
Yes, just use gluten-free graham cracker crumbs or substitute with gluten-free cookie crumbs for the crust.
How should leftovers be stored?
Keep leftovers well covered in the refrigerator for up to 4 days to preserve moisture and flavor.
Final Thoughts
This S’mores Cheesecake recipe is a beautiful marriage of nostalgic campfire flavors and classic cheesecake luxury. It’s a joyful dessert to bake for celebrations or cozy nights at home, offering delight in every bite with its layers of chocolate, marshmallow, and creamy filling. With careful steps and a little patience, you’ll impress family and friends with a dessert that tastes as magical as a toasted s’more by the fire. So, grab your ingredients, warm up the oven, and create a memorable treat!
Related Recipes You’ll Love
If you enjoyed this recipe, you’ll also love these delicious recipes:
- Strawberry Cheesecake Cinnabon Rolls – Irresistible & Decadent – Soft, tangy cream cheese swirls baked in fluffy rolls, perfect for a decadent breakfast or dessert treat.

S’Mores Cheesecake Recipe
- Prep Time: 25 minutes
- Cook Time: 1 hour 35 minutes
- Total Time: 7 hours 20 minutes
- Yield: 9 inch springform cheesecake 1x
- Category: Dessert
- Method: Baking
- Cuisine: American
- Diet: Vegetarian
Description
This indulgent S’mores Cheesecake combines a graham cracker crust loaded with chocolate morsels and marshmallows, a creamy cheesecake filling, and a toasted marshmallow and hot fudge topping for a delightful twist on the classic campfire treat.
Ingredients
Crust:
- 1 1/2 cups graham cracker crumbs
- 1/2 cup brown sugar
- 1 tsp vanilla extract
- 5 Tbsp melted unsalted butter
- 3/4 cup mini chocolate morsels
- 1 cup marshmallows
Cheesecake:
- 32 oz cream cheese softened
- 1/2 cup sour cream
- 2 eggs
- 3/4 cup heavy cream
- 3/4 cup white granulated sugar
- 2 Tbsp corn starch
- 2 tsp vanilla extract
Topping:
- 10 oz hot fudge topping warmed
- 2 cups marshmallows
Instructions
- Preheat and prepare: Preheat the oven to 325 and grease a 9 inch spring form. You will need a large roasting pan (one that’s bigger and longer than the spring form. I use the aluminum foil disposable ones.)
- Make crust mixture: In a small bowl, combine graham cracker crumbs, melted butter, vanilla extract and brown sugar. Mix very well.
- Form crust: Spread crumb mixture in the bottom on the spring form, evenly, pressing it over the bottom and half way up the sides.
- Add chocolate and marshmallows: Spread mini chocolate morsels and marshmallows over the bottom, evenly.
- Prepare cheesecake batter: In a bowl of an electric mixer, beat cream cheese on medium-high speed until smooth and fluffy. Scrape sides and bottom on the bowl and beat for another minute.
- Add dry ingredients and eggs: Add corn starch and sugar and mix until combined. Beat in eggs until well incorporated.
- Mix remaining wet ingredients: Add sour cream, vanilla extract, and heavy cream and beat until all mixed very well.
- Assemble cheesecake: Transfer batter into the spring form and spread in evenly. (If you are not sure about your springform holding up in water, you can wrap the springform in heavy duty aluminum foil from bottom up to the sides.)
- Prepare water bath: Place roasting pan into the oven and place cheesecake spring form inside the roasting pan. Carefully add water to the roasting pan, about half way up the side of the spring form.
- Bake cheesecake: Bake for 90-95 minutes. Turn off the oven and open the oven door half way. Let cheesecake rest for 10 minutes and take it out of the oven.
- Rest on counter: Let it rest for 10 minutes on the counter and then gently run a butter knife between sides of the cheesecakes and the springform to carefully separate it. (You don’t actually have to take the cheesecake out of the pan until ready to serve.)
- Cool cheesecake: Cool cheesecake for an hour.
- Broil topping: Turn on the broiler in the oven. Spread warm hot fudge over the top of the cheesecake and spread marshmallows evenly on top.
- Toast marshmallows: Place cheesecake back in the center of the oven, under the broiler. Let marshmallow toast for only 30-35 seconds. Watch it because they toast very quickly. Take out the cheesecake once marshmallows are lightly browned.
- Chill cheesecake: Cool cheesecake completely, cover gently and refrigerate for at least 4 hours.
Notes
- You can wrap the springform pan in heavy duty aluminum foil from bottom up to the sides if you are unsure about it holding up in the water bath.
- Watch the marshmallows carefully under the broiler as they toast very quickly (30-35 seconds).
- You don’t have to take the cheesecake out of the pan until ready to serve.
Your email address will not be published. Required fields are marked *