

I never thought I’d find a Seed Crackers Recipe easier than this, yet here we are with a crunchy, nutrient-packed snack that fills your kitchen with the welcoming aroma of toasty seeds and a hint of honey sweetness. These crackers boast a golden finish that crackles delightfully under your teeth, making every bite a delightful experience of wholesome goodness and texture.
Why You’ll Love This Seed Crackers Recipe
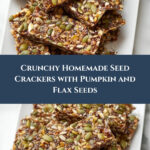
- Wholesome Crunch with Every Bite: This recipe combines flax, pepitas, sunflower, sesame, and chia seeds to create a cracker that’s satisfyingly crisp and bursting with nutty flavor.
- Simple Ingredients: Using pantry staples like seeds, olive or avocado oil, and a touch of honey, this Seed Crackers Recipe comes together with ingredients you likely already have at home.
- Perfect for Anytime Snacking: Whether it’s a quick nibble between meals or part of a cheese board, these crackers fit seamlessly into any occasion.
- Impressive Presentation: The golden, toasted edges and sprinkled flakey salt make these crackers look as good as they taste, great for sharing when guests arrive.
- Customizable Flavor: Add your own flair with a pinch of flavored salt or dried cranberries, making the recipe adaptable to your favorite tastes.
Why This Seed Crackers Recipe Works
This Seed Crackers Recipe shines thanks to its clever use of boiling water to hydrate the seeds, allowing them to meld together into a cohesive dough without any flour, keeping it gluten free and packed with fiber. Baking at 350 degrees lets the crackers turn a perfect golden brown—crispy on the edges and delightfully toasted throughout. Pressing the mixture firmly into a rectangle ensures even thickness, so every bite shares the same satisfying crunch. Finally, letting the crackers sit in the warm oven after cutting intensifies the crispiness without risk of burning.
Ingredients You’ll Need

Let’s gather a vibrant mix of seeds and simple oils that bring this Seed Crackers Recipe to life, offering both nutrition and flavor in each crunchy piece.
- 1/2 cup flax seeds: Adds a rich source of omega-3s and helps bind the cracker dough together.
- 1/2 cup pepitas (pumpkin seeds, shelled): These bring a lively crunch and subtle nutty flavor.
- 1/2 cup sunflower seeds (shelled): Offer a mild, buttery taste complementing the other seeds.
- 1 TBS sesame seeds: Impart a delicate, toasty aroma.
- 1/2 TBS chia seeds: Enhance texture and add nutritional punch.
- Kosher, Celtic or sea salt (to taste): Balances flavors, especially if your seeds aren’t pre-salted.
- 1/2cups plus 1 TBS boiling water: Hydrates and activates the seeds into a dough-like state.
- 1 TBS avocado or olive oil: Brings a smooth richness, helping with texture and flavor.
- Drizzle of honey (optional): Adds a gentle sweetness that turns these crackers into a tantalizing treat.
Ingredient Substitutions & Tips
- Flax Seeds: Swap for chia seeds if you prefer, but note the texture might be slightly different.
- Avocado or Olive Oil: Any mild-tasting oil like grapeseed can be used without overpowering the seed flavors.
- Honey: For a vegan twist, replace with maple syrup or simply omit for a savory cracker.
- Salt: If avoiding sodium, reduce or omit and add herbs like rosemary or thyme instead for seasoning.
👨🍳 Pro Tips for Perfect Results
- Use boiling water: It’s critical for activating the seeds and creating that perfect dough texture.
- Press firmly: Patting the seed mixture down tightly ensures crackers hold together and bake evenly.
- Brush the parchment paper: Lightly oil it and the underside of the paper to keep everything from sliding during baking.
- Cut immediately after first baking: This helps get clean edges before the mixture cools and hardens.
- Let residual heat crisp them: Don’t rush the second baking step; the crackers finish perfectly this way.
How to Make Seed Crackers Recipe
Step 1: Preheat your oven
Begin by warming your oven to 350 degrees Fahrenheit, so it’s ready to toast the seeds to golden perfection.
💡 Pro Tip: Use the middle rack for even heat circulation.
Step 2: Combine the seeds
Pour all those vibrant seeds from flax to chia into a bowl, then pour in the boiling water to wake them up and start the magic.
💡 Pro Tip: Use a big enough bowl to stir comfortably without spillage.
Step 3: Mix and let sit
Give the mixture a thorough stir, then let it rest for 5 minutes, gently mixing a few more times to ensure every seed soaks up the warmth.
💡 Pro Tip: This resting hydrates the seeds fully, forming that perfect sticky base.
Step 4: Prepare the baking pan
Lay down parchment paper on your baking pan—remember, no wax paper! Brush the paper lightly with olive oil, even a stroke underneath to keep it from shifting.
💡 Pro Tip: This prevents sticking and helps the crackers come off cleanly after baking.
Step 5: Add oil and extras
Now toss in a teaspoon or less of avocado or olive oil into the seed bowl along with your chosen salt or any extras like dried cranberries to make the crackers uniquely yours.
💡 Pro Tip: Decide if you want the salt inside or sprinkled on top later for different flavor bursts.
Step 6: Spread the seed mixture
Scrape the mixture onto the prepared baking sheet, then use a spatula or the back of a spoon to spread it into a neat rectangle. For a single batch, don’t expect a full pan coverage—just a nicely packed shape.
💡 Pro Tip: Keep thickness even for uniform baking throughout.
Step 7: Press the mixture firmly
Press down hard as you spread, especially around the edges, holding everything in a tight formation that bakes into a firm cracker.
💡 Pro Tip: Firm pressure means less crumbly crackers.
Step 8: Brush with oil
Gently brush a little more of your chosen oil across the top, giving it a subtle shine and helping with that irresistible golden brown finish.
💡 Pro Tip: Use a silicone brush for an even coat.
Step 9: Salt topping and honey drizzle
Sprinkle with flakes of salt if you love that extra crunch, and drizzle just a hint of honey for a beautiful glaze contrast between sweet and savory.
💡 Pro Tip: Honey is optional but adds a lovely depth, especially for those who enjoy a touch of sweetness.
Step 10: Bake first round
Slide the pan into the oven on the middle rack and bake for 30 minutes, watching for the edges to start turning that golden, toasty color.
💡 Pro Tip: Keep an eye to prevent burning, every oven behaves a bit differently.
Step 11: Cut into crackers
Take the pan out and carefully slide the parchment atop a cutting board. With a sharp chef’s knife, quickly and firmly cut into your desired cracker shapes while still warm and pliable.
💡 Pro Tip: Work swiftly to avoid cracking edges.
Step 12: Bake again for crispiness
Put the parchment with the sliced crackers back in the oven for another 30 minutes. The residual heat crisps them up beautifully without any risk of burning.
💡 Pro Tip: This step is key for achieving that perfect crunch.
Step 13: Cool completely
Remove from the oven and lift the parchment onto a cooling rack if you have one, letting the crackers cool fully before storage—patience pays off here!
💡 Pro Tip: Fully cooled crackers store better and remain crisp longer.
Step 14: Store and enjoy
Once cooled, tuck your crackers away in a glass jar or sealed container and prepare to be amazed by how long they last—though, let’s be honest, they rarely last beyond a few days!
💡 Pro Tip: Store in a cool, dry place for best freshness.
Common Mistakes to Avoid
Learn from these common pitfalls:
- Using wax paper instead of parchment: This causes sticking and uneven baking.
- Not pressing the seed mixture firmly enough: Leads to crumbly crackers that fall apart.
- Skipping the second baking step: Results in softer crackers that lack that desired crunch.
- Baking at too high a temperature: Can burn the crackers before they crisp through.
- Cutting after crackers cool down: Causes jagged edges and more crumble.
- Omitting salt entirely: Can make crackers taste flat; seasoning is key.
Delicious Variations to Try
Once you’ve mastered the classic Seed Crackers Recipe, feel free to experiment with flavors and textures to make it your own.
Herb & Garlic Seed Crackers
Add dried rosemary, thyme, and a teaspoon of garlic powder to the seed mixture before baking for a fragrant, savory twist.
Spiced Seed Crackers
Incorporate smoked paprika, cumin, or chili flakes to add warmth and subtle heat, perfect for those who love a little kick.
Dried Cranberry & Cinnamon Seed Crackers
Mix in minced dried cranberries and a dash of cinnamon for a sweet and savory combo that pairs wonderfully with cream cheese or nut butters.
Cheesy Seed Crackers
Sprinkle nutritional yeast or finely grated Parmesan on top before the final bake for a cheesy flavor boost.
Multi-Seed Energy Bites
Try out our Homemade Cookie Dough Protein Bars: Healthy & Delicious Snack for a similar nutrient-dense, seed-rich treat perfect for on-the-go snacking.
How to Serve Seed Crackers Recipe

Garnishes
Sprinkle with additional flakey sea salt, a drizzle of honey, or a dash of smoked paprika right before serving to elevate the taste and appearance.
Side Dishes
These crackers pair beautifully with spreads like hummus, guacamole, or your favorite soft cheeses for a light and satisfying snack.
Creative Ways to Present
Line a rustic wooden board with your seed crackers, add a few small bowls of olives, nuts, and sliced fruits, plus a selection of dips. For a fun twist, serve alongside warm soft pretzel bites for variety and textural contrast, like in our Soft Pretzel Bites Recipe: Chewy, Crispy Snack You’ll Love.
Make Ahead and Storage
Make-Ahead Instructions
Prepare the seed mixture and bake the crackers a day in advance. Store them properly, and they’ll be ready whenever you need a wholesome snack.
Storage
Keep fully cooled Seed Crackers in an airtight container or glass jar at room temperature for up to 3 weeks, preserving their crunch and flavor.
Freezing
While you can freeze them, it’s best to enjoy these crackers fresh due to their delicate crispness. However, if needed, freeze in a sealed bag for up to a month.
Reheating
Warm gently in a low oven (around 300°F) for a few minutes to restore any lost crispness before serving.
Expert Tips for Success
- Use high-quality seeds for the best flavor and crunch.
- Ensure water is boiling to activate the seeds properly.
- Do not skip the resting period to let seeds hydrate fully.
- Press seeds firmly and evenly to avoid crumbly crackers.
- Cut immediately after first bake for clean edges.
- Let the crackers finish drying in the residual heat for perfect texture.
- Store in a dry, airtight container to maintain freshness.
Frequently Asked Questions
Can I make these seed crackers without honey?
Absolutely! The honey is optional and mainly adds a touch of sweetness. You can omit it for a purely savory snack or swap it for maple syrup if you prefer.
Are these seed crackers gluten free?
Yes, they are naturally gluten free since they contain no flour and rely on seeds for their structure.
Can I add other seeds or nuts?
Definitely. Feel free to mix in sesame seeds, poppy seeds, or even finely chopped nuts to vary texture and flavor.
How long do these crackers stay fresh?
Stored in an airtight container, they maintain their crispness and flavor for up to three weeks.
Is it necessary to cut the crackers before the second bake?
Yes, cutting them while warm helps create clean edges and ensures the crackers crisp up evenly.
Can I make a larger batch and freeze them?
You can freeze the crackers, though they’re best enjoyed fresh. If freezing, use an airtight bag and consume within a month.
What oil works best for this Seed Crackers Recipe?
Olive and avocado oils are great choices because of their mild flavors and healthy fats, but any neutral oil will work.
Final Thoughts
Sharing this Seed Crackers Recipe feels like passing along a little secret to elevate your snacking game. The balance of crunchy seeds toasted to perfection, the subtle hints of honey, and the ease of preparation make this a go-to recipe that delights every time. Whether you’re nourishing yourself between meals or impressing friends at a gathering, these homemade crackers bring warmth and wholesome flavor straight to your table. Dive in, have fun baking, and enjoy the crunchy, nutty goodness in every bite!
Related Recipes You’ll Love
If you enjoyed this recipe, you’ll also love these delicious recipes:
- Homemade Cookie Dough Protein Bars: Healthy & Delicious Snack – A nutrient-packed, no-bake bar bursting with sweet, nutty flavors and perfect for on-the-go energy.
- Soft Pretzel Bites Recipe: Chewy, Crispy Snack You’ll Love – These warm, chewy bites with a golden crust make a fantastic companion to crunchy seed crackers for variety in your snack spread.
Related Recipes You’ll Love
If you enjoyed this recipe, you’ll also love these delicious recipes:
- Crispy Baked Keto Zucchini Fries – Irresistibly Crunchy and Guilt-Free – These baked zucchini fries are wonderfully crunchy and make a guilt-free, savory snack or side dish to complement your seed crackers.

Seed Crackers Recipe
- Prep Time: 10 minutes
- Cook Time: 1 hour
- Total Time: 1 hour 15 minutes
- Yield: 8 servings 1x
- Category: Snack
- Method: Baking
- Cuisine: General
- Diet: Gluten Free, Vegetarian
Description
These Seed Crackers are a delicious, crunchy snack made from a blend of flax, pepitas, sunflower, sesame, and chia seeds, lightly seasoned and baked to golden perfection. Perfect for a healthy, satisfying treat that stores well for up to three weeks.
Ingredients
Seed Crackers Ingredients
- 1/2 cup flax seeds
- 1/2 cup pepitas (pumpkin seeds, shelled)
- 1/2 cup sunflower seeds (shelled)
- 1 TBS sesame seeds
- 1/2 TBS chia seeds
- kosher, Celtic or sea salt (to taste, if your pepitas and sunflower seeds are salted, add less than if not salted.)
- 1/2 cups plus 1 TBS boiling water
- 1 TBS avocado or olive oil
- drizzle of honey (optional but I love a little)
Instructions
- Preheat oven: Preheat oven to 350.
- Combine seeds and water: Combine all seeds in a bowl and pour in the boiling water.
- Mix and rest: Mix well, allow to sit for 5 minutes, mixing a couple more times as it does.
- Prepare baking pan: Prepare a baking pan by placing a piece of parchment paper onto it (not wax paper, parchment paper). Brush the parchment paper with just a bit of olive oil (you may want to brush a stroke of it under the paper onto the baking sheet to help keep it in place).
- Add oil and additional ingredients: Add in 1 tsp or less of your olive oil/avocado oil and any additional things here (such as salt, flavored salt, minced dried cranberries, etc). NOTE: Choose to add salt IN now or ON after crackers are formed before baking.
- Spread seed mixture: Scrape seed mixture onto your prepared pan and using the back of a spoon or a spatula, spread the mixture into a rectangle. If making a single batch, this will not fill up a regular sized pan. If making a double batch it should.
- Press mixture firmly: Press down firmly as you spread mixture, packing it into place. Go along edges to pat them in to give it a uniformed shape.
- Brush with oil: Brush just a bit of your oil gently overtop mixture.
- Sprinkle salt: Sprinkle with flakey salt or kosher salt (as little or as much as you wish).
- Drizzle honey: Drizzle with a small amount of honey (optional).
- Bake first time: Bake on middle rack for 30 minutes. Look for crackers to become a little golden. Being careful to not burn.
- Cut crackers: As soon as you remove tray from oven, pull/slide parchment off tray onto counter or cutting board. Using a sharp chefs knife, quick & firmly, cut into crackers.
- Bake second time: Put tray back in the oven and allow it to sit there for another 30 minutes, the residual heat of the oven will ensure crispiness without burning.
- Cool crackers: Once you remove the seed crackers, allow them to cool. If you have a cooling rack, carefully lift parchment with cut crackers onto that to finish cooling.
- Store: Once completely cool, store in glass jar or sealed container for up to 3 weeks (however they won’t last that long because they are so yummy, lol!).
Notes
- Use parchment paper, not wax paper.
- Brush a stroke of oil under the parchment paper to keep it in place.
- Salt can be added either into the mixture before baking or sprinkled on after forming the crackers but before baking.
- Drizzling honey is optional but adds a nice touch.
- After cutting, the crackers are baked again using residual oven heat to ensure crispiness without burning.
- Store crackers in a glass jar or sealed container for up to three weeks.
Your email address will not be published. Required fields are marked *