

Picture this: a warm kitchen filled with the intoxicating aroma of roasted garlic slowly caramelizing in the oven. As you unwrap the foil, tender golden cloves beckon you to taste their creamy, sweet, and slightly nutty magic. This homemade roasted garlic aioli feels like a secret weapon—a luscious, velvety sauce that elevates everything it touches, from crispy fries to fresh veggies. It’s quick enough to whip up any day, yet impressive enough to make guests wonder if you spent hours perfecting it.
Why You’ll Love This Roasted Garlic Aioli Recipe
- Rich Roasted Flavor: The slow oven roasting transforms raw garlic into soft, mellow cloves bursting with sweet umami richness.
- Simple Ingredients: Crafted from basics like mayonnaise, lemon juice, and just a few pantry staples you likely already have.
- Ready in 45 Minutes: Most of that time is hands-off roasting, so you can prep other dishes while the magic happens.
- Versatile Condiment: Perfect for sandwiches, dipping sauces, salad dressings, or even drizzled over grilled veggies.
- Customizable Creaminess: Adjust thickness and tang with variations of mayo and mustard to fit your cravings.
Why This Roasted Garlic Aioli Recipe Works
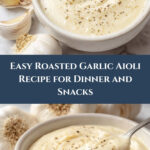
This Roasted Garlic Aioli Recipe shines because of a few key elements. Roasting garlic at a precise 400 degrees for 40 minutes softens the cloves into a buttery texture while mellowing the pungency common in raw garlic. Combining roasted cloves with mayonnaise and a touch of Dijon mustard creates an aioli that balances brightness, creaminess, and that unmistakable garlicky warmth. The lemon juice cuts through the richness, while parmesan cheese adds a subtle depth and savory note, rounding out the flavors perfectly. The result is a smooth, luscious sauce that feels indulgent yet approachable.

Ingredients You’ll Need
Gathering simple yet transformative ingredients is what makes this recipe so accessible. These staples come together to create an irresistibly creamy, flavorful aioli that’s sure to become your new go-to.
- Garlic bulbs (2-3): Roasted to sweet perfection, they’re the heart of the aioli’s flavor.
- Olive oil (3 teaspoons): Adds richness and helps caramelize the garlic.
- Mayonnaise (1/2 cup): Creates the creamy base with mild flavor.
- Dijon mustard (1 teaspoon): Contributes a subtle tangy kick and depth.
- Lemon juice (1 tablespoon): Lifts the aioli with fresh acidity.
- Grated parmesan cheese (1 tablespoon): Adds savory umami and texture.
- Salt (1/4 teaspoon): Enhances all the lovely flavors.
- Ground black pepper (1/4 teaspoon): Gives a gentle spicy warmth.
Ingredient Substitutions & Tips
- Garlic bulbs: If unavailable, use pre-roasted garlic or garlic powder with caution, adjusting amounts for flavor intensity.
- Mayonnaise: Substitute with Greek yogurt or vegan mayo for a lighter or plant-based option.
- Dijon mustard: Yellow mustard can work in a pinch, though the flavor will be milder.
- Parmesan cheese: Try nutritional yeast for a dairy-free twist that keeps the umami punch.
👨🍳 Pro Tips for Perfect Results
- Use fresh garlic bulbs: Fresher bulbs give sweeter, creamier cloves when roasted.
- Don’t skip roasting time: The 40 minutes at 400°F coax out that mellow, caramelized garlic flavor.
- Let the garlic cool: Handling hot cloves can be tricky and may cause bitterness if over-mashed.
- Adjust seasoning after blending: Taste and tweak salt, lemon, or mustard to balance your preferred tanginess.
- Blend until smooth: Patience here ensures a luxuriously creamy texture without lumps.
How to Make Roasted Garlic Aioli Recipe
Step 1: Prepare Your Garlic for Roasting
Preheat your oven to 400°F. Tear off aluminum foil squares roughly 5 inches by 5 inches—each square will cradle one garlic bulb. Peel away the flaky outer layers from the garlic bulb but keep the bulb intact with all cloves in place. Slice about 1/4 inch off the top of the bulb to expose the tips of the cloves, allowing the olive oil to seep in and the garlic to roast evenly.
💡 Pro Tip: Be gentle peeling the layers so the bulb stays intact—it’s easier to squeeze the roasted cloves out later.
Step 2: Roast the Garlic
Place each prepared garlic bulb in the center of its foil square. Drizzle one teaspoon of olive oil evenly over the exposed cloves. Wrap the garlic tightly in foil and lay it on a baking pan. Roast for about 40 minutes. You’ll know it’s ready when the cloves are golden brown and soft to the touch.
💡 Pro Tip: Use a clean kitchen towel or oven mitts to gently squeeze a clove—it should feel tender and buttery inside.
Step 3: Cool and Extract Roasted Cloves
Remove the bulbs from the oven and allow them to cool completely. This step is important for safety and flavor balance. Once cool, squeeze or peel the cloves out carefully and transfer them to your food processor or blender.
💡 Pro Tip: If peeling is tricky, gently scoop out cloves with a small spoon to avoid bitterness.
Step 4: Blend the Aioli Ingredients
Add mayonnaise, Dijon mustard, lemon juice, grated parmesan, salt, and pepper to the blender with the roasted garlic cloves. Blend everything until the mixture is completely smooth and creamy. Taste and adjust seasoning as you see fit.
💡 Pro Tip: For a thinner aioli, add a splash of water or more lemon juice to reach your desired consistency.
Step 5: Serve or Store
Serve immediately alongside your favorite dishes, or store your Roasted Garlic Aioli in an airtight container in the refrigerator for up to a week. The flavors deepen beautifully overnight!
💡 Pro Tip: Remember to give your aioli a quick stir before serving if refrigerated.
Common Mistakes to Avoid
Learn from these common pitfalls:
- Under roasting the garlic: Leads to harsh, overpowering flavors instead of creamy sweetness.
- Not allowing garlic to cool: Warm cloves can create a bitter taste and make blending uneven.
- Skipping oil in roasting step: Oil helps soften garlic and prevents drying out.
- Overblending: Can break the emulsion and make the aioli watery.
- Failing to taste and adjust: Without balancing salt and lemon, the aioli can taste flat or too sharp.
- Using bottled garlic paste instead: It lacks the complex flavor depth that roasting fresh bulbs builds.
Delicious Variations to Try
Once you’ve mastered the classic Roasted Garlic Aioli Recipe, feel free to experiment with these flavorful twists to keep your dips exciting and fresh.
Herbed Roasted Garlic Aioli
Stir in finely chopped fresh herbs like parsley, chives, or basil after blending. These add a burst of color and aromatic freshness, perfect for grilled chicken or veggie sandwiches.
Spicy Roasted Garlic Aioli
Add a pinch of smoked paprika or cayenne pepper for a smoky heat that’s irresistible on crispy fries or roasted potatoes.
Lemon-Thyme Roasted Garlic Aioli
Infuse the aioli with lemon zest and fresh thyme leaves to brighten the sauce with citrus notes and earthy undertones, perfect with seafood dishes.
Avocado Roasted Garlic Aioli
Blend half a ripe avocado into the mixture for a creamy, nutrient-rich sauce that’s wonderful on tacos or veggie wraps.
Roasted Red Pepper Roasted Garlic Aioli
Add a tablespoon of finely chopped roasted red pepper for a subtle sweetness and stunning color contrast.
How to Serve Roasted Garlic Aioli Recipe

Garnishes
Sprinkle chopped fresh parsley, cracked black pepper, or a few parmesan shavings over the aioli for a pretty presentation and extra bursts of flavor.
Side Dishes
This Roasted Garlic Aioli Recipe pairs beautifully with crispy oven fries, fresh crudités, grilled vegetables, roasted chicken, fish, or as a zingy spread on crusty bread and sandwiches.
Creative Ways to Present
Serve the aioli in a rustic ceramic bowl topped with a drizzle of olive oil and a roasted garlic clove on the side for visual appeal. Use mini ramekins for dipping sauces at parties or dollop over warm, roasted potatoes for a gourmet twist.
Make Ahead and Storage
Storing Leftovers
Store the aioli in an airtight container in the refrigerator for up to 5-7 days. Keep it chilled until ready to serve to maintain its creamy texture and freshness.
Freezing
Freezing is not recommended for this aioli as the texture of mayonnaise may separate and become grainy upon thawing.
Reheating
Aioli is best served cold or at room temperature. Avoid reheating as heat can break the emulsion and alter flavor.
FAQs
Can I make this Roasted Garlic Aioli Recipe vegan?
Absolutely! Swap the mayonnaise for a vegan alternative and use nutritional yeast instead of parmesan to keep it creamy and flavorful.
How long does the roasted garlic aioli last in the fridge?
Stored properly in an airtight container, it will stay fresh for up to one week.
Can I use pre-roasted garlic to save time?
Yes, but freshly roasted cloves offer a richer, more complex flavor. Pre-roasted garlic is a fine shortcut though.
Is this recipe spicy?
No, this version is mild and creamy. You can easily add spices if you want a little heat.
Can I use fresh lemon juice from a bottle?
Freshly squeezed lemon juice is best for brightness, though bottled can work in a pinch.
What dishes pair best with this aioli?
It’s fantastic with grilled meats, roasted veggies, sandwiches, fries, and as a dip for fresh vegetables.
How do I make the aioli thicker or thinner?
Add more mayonnaise for thickness or a splash of water/lemon juice for a thinner consistency.
Can I double or halve the recipe?
Yes, simply adjust the ingredients proportionally to suit your needs.
Final Thoughts
Roasting garlic takes an everyday ingredient and transforms it into liquid gold that’s creamy, rich, and packed with flavor. This Roasted Garlic Aioli Recipe is a testament to simple ingredients coming together in harmony to delight your taste buds and elevate your meals. Whether you’re serving it up for a casual snack or an impressive dinner party, it’s sure to become a kitchen staple you reach for again and again.
Have you tried this Roasted Garlic Aioli Recipe? I’d love to hear how it turned out! Leave a comment below. If you loved this recipe, please share it with friends and family. Happy cooking! 😊
Print
Roasted Garlic Aioli Recipe
- Prep Time: 5 minutes
- Cook Time: 40 minutes
- Total Time: 45 minutes
- Yield: 2 servings 1x
- Category: Sauce
- Method: Baking
- Cuisine: French
- Diet: Vegetarian
Description
This Roasted Garlic Aioli is a rich and creamy sauce bursting with the sweet, mellow flavor of slow-roasted garlic. Perfect as a dip, sandwich spread, or drizzle, this easy-to-make aioli combines roasted garlic with mayonnaise, Dijon mustard, lemon juice, and Parmesan cheese for a delightful, savory condiment that elevates any dish.
Ingredients
Roasted Garlic
- 2–3 bulbs of garlic (2 bulbs if medium size, 3 if small)
- 3 teaspoons olive oil (divided)
Aioli
- 1/2 cup mayonnaise
- 1 teaspoon Dijon mustard
- 1 tablespoon lemon juice
- 1 tablespoon grated Parmesan cheese
- 1/4 teaspoon salt
- 1/4 teaspoon ground black pepper
Instructions
- Preheat and Prepare Garlic Bulbs: Preheat your oven to 400°F. Tear off aluminum foil sheets roughly 5 inches square to individually wrap the garlic bulbs.
- Prep Garlic Bulbs: Remove the sheer outer layers of each garlic bulb carefully to keep the bulb intact. Slice about 1/4 inch off the top side of the garlic bulbs to expose the individual cloves.
- Season and Wrap: Place each garlic bulb at the center of a foil square. Drizzle about 1 teaspoon of olive oil over the exposed cloves, then tightly wrap the garlic bulb in the foil.
- Roast Garlic: Place the foil-wrapped garlic bulbs on a baking dish and roast in the oven for 40 minutes. After roasting, allow the bulbs to cool completely before handling.
- Extract Roasted Garlic: Once cooled, either gently squeeze the roasted cloves out of their skins or peel each clove individually to prepare for blending.
- Make Aioli: In a small food processor or blender, combine the roasted garlic cloves, mayonnaise, Dijon mustard, lemon juice, grated Parmesan cheese, salt, and black pepper.
- Blend to Smoothness: Blend all the ingredients together until you reach a smooth, creamy consistency.
- Serve or Store: You can serve the aioli immediately or store it in the refrigerator for later use. It pairs wonderfully as a dip, sandwich spread, or sauce.
Notes
- The quality and size of garlic bulbs affect how much you need; smaller bulbs require more for sufficient roasted garlic flavor.
- Roasting garlic mellows the sharpness and adds a subtle sweetness.
- Use fresh lemon juice for the best tangy flavor in your aioli.
- This aioli will keep refrigerated for up to 1 week in an airtight container.
- For a dairy-free option, omit the Parmesan cheese or substitute with a suitable vegan alternative.
- If you prefer a thinner aioli, add a small amount of water or olive oil when blending to achieve your desired consistency.
Your email address will not be published. Required fields are marked *