

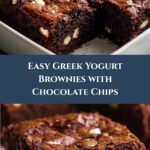
Picture this: the rich scent of cocoa swirling through your kitchen while you whip up a batch of brownies that are as wholesome as they are indulgent. These Low-Calorie Greek Yogurt Brownies Recipe brings the deep, velvety goodness of chocolate together with the creamy tang of non-fat Greek yogurt, making every bite a moist, tender delight packed with a subtle nutty crunch. It’s like slipping into a cozy chocolate hug without any of the usual guilt. Trust me, you’re going to want to make these again and again.
Why You’ll Love This Low-Calorie Greek Yogurt Brownies Recipe
- Guilt-Free Decadence: Enjoy the luxurious taste of classic brownies with a healthful twist, thanks to the protein-rich non-fat Greek yogurt that keeps these treats moist without extra fat.
- Simple Ingredients, Big Flavor: Pantry staples like all-purpose flour or oat flour, unsweetened cocoa powder, and a touch of natural sweetness from maple syrup come together effortlessly, making this recipe easy to pull off.
- Perfectly Balanced Texture: Thanks to a pinch of baking soda and just the right amount of mixing, these brownies come out tender and cakey, never dense or dry.
- Customizable Crunch: Fold in toasted walnuts, almonds, or pecans for that crave-worthy nutty bite—plus optional chocolate chips for melty chocolate pockets that elevate every forkful.
- Impressive but Easy: Whether it’s a casual family dessert or a special occasion treat, the Low-Calorie Greek Yogurt Brownies Recipe delivers classic charm with minimal fuss, baking in exactly 25 minutes after 15 minutes of prep.
Why This Low-Calorie Greek Yogurt Brownies Recipe Works
What makes this recipe truly shine is the clever use of non-fat Greek yogurt which infuses the batter with moisture and a subtle tang, balancing the rich cocoa for a unique flavor profile. The gentle folding technique keeps the batter light, avoiding overmixing which can make brownies tough. And that pinch of instant coffee powder quietly deepens the chocolate notes without overpowering, creating a harmonious balance of flavors. All these little touches come together through baking—an American classic method—for those perfectly chewy edges and a tender crumb inside.
Ingredients You’ll Need

Dive into a blend of richly chocolatey and wholesome ingredients that come together to create magic in your mixing bowl. From velvety cocoa to the protein-packed charm of Greek yogurt, each component plays its part in this delicious story.
- All-purpose flour or oat flour: The base that gives structure and keeps these brownies tender.
- Unsweetened cocoa powder: Deepens the chocolate flavor with that intense, earthy richness.
- Salt: A pinch to enhance and balance the sweetness.
- Baking soda: Helps the brownies rise beautifully and get that perfect cakey texture.
- Non-fat Greek yogurt: Adds moisture and protein without weighing down the batter.
- Maple syrup or honey: Natural sweetness that gently infuses the brownies with a subtle caramel undertone.
- Large egg: Binds ingredients and provides richness.
- Vanilla extract: A warm subtle note that rounds out the flavors perfectly.
- Chocolate chips: Melty little bursts of indulgence nestled throughout.
- Chopped walnuts, almonds, or pecans: Toasted to bring out their nutty aroma and crunchy texture.
- Instant coffee or espresso powder: Just a pinch to heighten the chocolate experience.
- Nut butter: For swirling on top and adding creamy richness.
- Sea salt: Sprinkled atop the finished brownies to balance sweetness with a hint of savory magic.
Ingredient Substitutions & Tips
- Flour: Use oat flour for a gluten-free option or whole wheat pastry flour for a nuttier texture.
- Sweetener: Maple syrup can be swapped with honey or agave nectar but be mindful it may add slight floral notes.
- Nut choice: Pecans, almonds, or walnuts all work beautifully—toast them gently to deepen flavor.
- Chocolate chips: Dark, semi-sweet, or even dairy-free chips can be used depending on your preferences.
👨🍳 Pro Tips for Perfect Results
- Prep Ahead: Toast your nuts and let the Greek yogurt come to room temperature before mixing for the best texture.
- Mix Gently: Fold the dry ingredients gradually to avoid overworking the batter, ensuring tender brownies.
- Check Doneness Carefully: Insert a toothpick in the center—look for a few moist crumbs for perfect fudginess.
- Parchment Paper Magic: Lining your pan saves cleanup and keeps brownies from sticking.
- Add Instant Coffee: Don’t skip the coffee powder—it subtly enhances the depth of chocolate flavor.
How to Make Low-Calorie Greek Yogurt Brownies Recipe
Step 1: Preheat the Oven
Set your oven to a cozy 350°F (175°C) and line an 8×8-inch baking pan with parchment paper. This little setup trick ensures your brownies come out with clean edges and makes cleanup a breeze.
💡 Pro Tip: Let the parchment overhang on the sides—it’s your handy handle for lifting the brownies out later!
Step 2: Mix the Dry Ingredients
In a medium bowl, whisk together the flour, cocoa powder, salt, and baking soda until the mixture looks uniform and deliciously chocolatey. This step is crucial for an even bake.
💡 Pro Tip: Sifting your cocoa powder here helps avoid any lumps and keeps the batter smooth.
Step 3: Combine the Wet Ingredients
Whisk your non-fat Greek yogurt, maple syrup or honey, egg, and vanilla extract together in a separate bowl until the mixture is silky and consistent. This creamy blend is the secret to moist brownies.
💡 Pro Tip: Using room temperature egg helps everything blend more smoothly.
Step 4: Incorporate Dry Into Wet
Gradually stir the dry ingredients into the wet, mixing gently just until combined. Handle the batter with care here—overmixing can lead to tough brownies rather than tender ones.
💡 Pro Tip: Stop stirring as soon as you no longer see dry streaks for the perfect texture.
Step 5: Fold in the Chocolate Chips
Toss in your chocolate chips (if using) and fold them in to disperse melty little pockets of chocolate throughout every bite. Yum!
💡 Pro Tip: Reserve a few chips to sprinkle on top for an extra pretty finish.
Step 6: Transfer to Pan and Bake
Pour your luscious batter into the prepared pan, smoothing the surface with a spatula. Slide it into the oven for 20 to 25 minutes. Keep an eye on it—you want a toothpick inserted in the middle to come out with a few moist crumbs clinging on.
💡 Pro Tip: Start checking at 20 minutes to avoid overbaking your tender brownies.
Step 7: Cool and Slice
Allow the brownies to cool in the pan for 10 minutes, then gently lift them out with the parchment paper and transfer to a wire rack to cool completely. Once fully cooled, slice into 9 perfect squares ready to enjoy.
💡 Pro Tip: For cleaner cuts, chill the brownies and use a sharp knife wiped between slices.
Common Mistakes to Avoid
Learn from these common pitfalls:
- Overmixing the Batter: Leads to tough brownies, so mix just until combined.
- Skipping Parchment Paper: Makes cleanup harder and brownies harder to remove cleanly.
- Baking Too Long: Results in dry texture—check at the 20-minute mark for moist crumbs.
- Cold Ingredients: Using cold egg or yogurt can cause uneven mixing, affecting texture.
- Forgetting Salt: Even a pinch balances sweetness and enhances chocolate flavor.
- Ignoring Nut Toasting: Untoasted nuts can taste flat and lack crunch.
Delicious Variations to Try
Once you’ve mastered this Low-Calorie Greek Yogurt Brownies Recipe, it’s time to get creative:
Peanut Butter Swirl
Before baking, swirl in your favorite nut butter across the batter’s surface for a luscious, creamy twist.
Berry Infusion
Add fresh or freeze-dried raspberries or chopped strawberries, which pair beautifully with the cocoa. For a light fruity contrast, try our Strawberry Kiss Cookies: Irresistible Strawberry & White Chocolate Delights as a complementary dessert.
Espresso Boost
Increase the instant coffee powder slightly for a mocha-inspired brownie with a deep coffee kick.
Nut-Free Version
Simply omit the nuts and add sunflower seeds or pumpkin seeds for a crunchy alternative safe for nut allergies.
Chocolate Chip Variation
Swap standard chocolate chips for dark or white chocolate for different flavor profiles or a colorful look.
How to Serve Low-Calorie Greek Yogurt Brownies Recipe

Garnishes
Sprinkle a pinch of flaky sea salt or dust with powdered sugar for a simple finishing touch. For an elegant touch, drizzle with melted dark chocolate or a swirl of nut butter.
Side Dishes
Serve alongside fresh berries or a dollop of whipped cream for a fresh contrast. A scoop of light vanilla frozen yogurt pairs beautifully too. For a complementary treat, set out our Homemade Valentine Doughnuts: Irresistible Heart-Shaped Treats for an impressive dessert spread.
Creative Ways to Present
Arrange brownie squares on a rustic wooden board with nuts, chocolate chips, and a small pot of nut butter for dipping. Or layer them in a dessert trifle with Greek yogurt and berries for a dazzling centerpiece.
Make Ahead and Storage
Make-Ahead Instructions
You can prepare the batter a day in advance and keep it refrigerated, then bake fresh the next day for optimally tender brownies.
Storage
Store the cooled brownies in an airtight container at room temperature for up to 3 days or refrigerate for up to a week.
Freezing
Wrap individual brownie squares tightly in plastic wrap and freeze in a sealed bag for up to 2 months. Thaw overnight in the fridge for best texture.
Reheating
Warm brownies gently in the microwave for 10-15 seconds or in a low-temperature oven—just enough to bring back that fresh-out-of-the-oven softness.
Expert Tips for Success
- Always use room temperature ingredients to ensure smooth blending and even texture.
- Don’t skip the instant coffee powder; it intensifies chocolate beautifully without adding a coffee taste.
- Toast nuts lightly to unlock their full flavor potential before folding in.
- Monitor baking closely to avoid overbaking and drying out the brownies.
- Use parchment paper in your pan for easy removal and neat edges.
Frequently Asked Questions
Can I make this recipe gluten-free?
Absolutely! Simply swap the all-purpose flour for oat flour, and you’ll have a delicious gluten-free version that keeps the same moist texture.
Is it necessary to use Greek yogurt?
Yes, non-fat Greek yogurt adds moisture and protein while keeping the calorie count low. Regular yogurt can work, but Greek yogurt yields the best texture.
Can I use a different sweetener?
Maple syrup or honey works perfectly here, but you can try agave nectar if you prefer. Just keep the same quantity to maintain the batter’s consistency.
How do I know when the brownies are done?
Insert a toothpick in the center after 20 minutes of baking. If it comes out with a few slightly moist crumbs, your brownies are perfectly baked.
Can I add other mix-ins besides nuts and chocolate chips?
Yes! Dried fruit like cranberries or shredded coconut can be great additions. Just be sure to keep the mix-ins at about a ¼ to ⅓ cup total so as not to affect the batter balance.
Do these brownies freeze well?
Definitely! Freeze sliced brownies tightly wrapped and thaw overnight for a convenient treat whenever the craving hits.
What if I want my brownies fudgier?
Reduce the baking time slightly and keep them a bit underdone for that rich, fudgy center. Just watch carefully to avoid undercooking.
Final Thoughts
These Low-Calorie Greek Yogurt Brownies Recipe offer a wonderful harmony between indulgence and nutrition, showing you don’t have to sacrifice flavor to eat healthier. The luscious cocoa, the tender crumb, and that subtle nutty crunch come together in a way that feels both comforting and exciting. I can’t wait for you to try this recipe and make it your own, sharing each bite with friends and family who appreciate a sweet treat without the guilt. Enjoy baking, savoring, and repeating!
Print
Low-Calorie Greek Yogurt Brownies Recipe
- Prep Time: 15 minutes
- Cook Time: 25 minutes
- Total Time: 1 hour 50 minutes
- Yield: 9 servings 1x
- Category: Dessert
- Method: Baking
- Cuisine: American
- Diet: Low Fat, Gluten Free (if oat flour used), Vegetarian
Description
These low-calorie Greek Yogurt Brownies are a healthier twist on a classic dessert, combining the richness of cocoa with the protein-packed creaminess of non-fat Greek yogurt for a moist, tender treat.
Ingredients
Ingredients
- 1/2 cup all-purpose flour (or oat flour for gluten-free)
- 1/4 cup unsweetened cocoa powder
- 1/4 tsp salt
- 1/2 tsp baking soda
- 1/2 cup non-fat Greek yogurt
- 1/4 cup maple syrup or honey
- 1 large egg
- 1 tsp vanilla extract
- 1/4 to 1/3 cup chocolate chips
- 1/4 to 1/3 cup chopped walnuts, almonds, or pecans (toasted if preferred)
- Pinch of instant coffee or espresso powder
- Nut butter for swirling
- Sea salt for sprinkling on top
Instructions
- Preheat the Oven Set your oven to 350°F (175°C). Line an 8×8-inch baking pan with parchment paper, ensuring easy removal and minimal cleanup.
- Mix the Dry Ingredients In a medium bowl, whisk together the flour, cocoa powder, salt, and baking soda until evenly combined.
- Combine the Wet Ingredients In a separate bowl, whisk the non-fat Greek yogurt, maple syrup or honey, egg, and vanilla extract together until smooth and fully blended.
- Incorporate Dry Into Wet Gradually add the dry mixture to the wet ingredients, stirring gently until just combined. Avoid overmixing to keep the brownies tender.
- Fold in the Chocolate Chips If using, fold in the chocolate chips to create melty pockets of rich flavor throughout the batter.
- Transfer to Pan and Bake Pour the batter into the prepared baking pan and smooth out evenly. Bake for 20 to 25 minutes, or until a toothpick inserted in the center comes out with a few slightly damp crumbs.
- Cool and Slice Let the brownies cool in the pan for 10 minutes before transferring to a wire rack to cool completely. Once cooled, slice into 9 squares and serve.
Notes
- Use parchment paper in the baking pan for easy removal and minimal cleanup.
- Do not overmix the batter to keep brownies tender.
- Let brownies cool completely on a wire rack before slicing.
Your email address will not be published. Required fields are marked *