

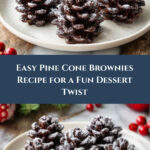
If you’re ready to wow your friends and family with a dessert that looks as impressive as it tastes, look no further than the Viral Pine Cone Brownies Recipe. This delightful treat combines fudgy brownies shaped into charming pine cones, adorned with almond slices for texture and a touch of elegance. It’s a playful twist on a classic favorite, perfect for holidays or any time you want to bring a bit of festive magic to your table. The combination of rich chocolate, crunchy almonds, and a dusting of powdered sugar creates an irresistible treat that’s as fun to make as it is to enjoy.

Ingredients You’ll Need
The beauty of the Viral Pine Cone Brownies Recipe lies in its simple, yet thoughtfully chosen ingredients. Each item plays a key role in achieving that perfect balance of fudgy texture, nutty crunch, and glossy finish that makes these brownies stand out.
- GF/Grain free boxed brownie mix: Using a mix like Simple Mills ensures a moist, flavorful base that’s easy to work with.
- Sliced almonds: These create the pine cone “scales” and add a satisfying crunch; cereal flakes work well as a substitute if needed.
- Chocolate chips: Melted chocolate forms the glossy coating that holds the pine cone together and adds an extra layer of richness.
- Coconut oil: Helps melt the chocolate smoothly and achieves a shiny finish on the coating.
- Powdered sugar or monk fruit: A light dusting mimics the look of frost and adds a sweet finishing touch.
How to Make Viral Pine Cone Brownies Recipe
Step 1: Prepare and Bake the Brownies
Start by preparing your boxed brownie mix according to the package instructions. Keep an eye on the baking time, as you want the brownies slightly underbaked to stay gooey and pliable for shaping. After baking, allow them to cool for about 10 minutes—just enough so they’re firm but not hardened.
Step 2: Shape the Brownie Cones
Once cooled slightly, carefully form the brownie mixture into approximately 12 cone shapes. Think of it like working with cake pops: gently molding the brownie so it keeps its shape but stays soft and easy to handle.
Step 3: Add the Pine Cone Scales
Begin layering sliced almonds or cereal flakes around the brownie cones. Place them thoughtfully to mimic the overlapping scales of a pine cone. This step requires a gentle touch since the cones can be fragile, but the visual payoff is worth the patience.
Step 4: Freeze the Pine Cones
Line a baking sheet with parchment paper, arrange your pine cones carefully, and pop them into the freezer for 30 minutes. This step firms them up so the chocolate coating sets nicely.
Step 5: Melt the Chocolate Coating
In a microwave-safe bowl, combine chocolate chips and coconut oil, heating in 30-second intervals and stirring in between until silky smooth. You can also use a double boiler if preferred for more control.
Step 6: Coat the Pine Cones
Remove the pine cones from the freezer and, using a fork or your fingers, carefully dip or drizzle the melted chocolate over them. Return them to the parchment-lined sheet to set. This glossy chocolate shell seals the look and enhances the flavor.
Step 7: Add the Final Touch
Just before serving, sprinkle powdered sugar or powdered monk fruit lightly on top to create a frosted, wintry effect that makes these brownies even more irresistible.
How to Serve Viral Pine Cone Brownies Recipe

Garnishes
A simple dusting of powdered sugar is classic, but feel free to add a few mini chocolate chips or a drizzle of white chocolate for contrast. Edible glitter or a tiny sprinkle of sea salt can elevate the presentation and flavor as well.
Side Dishes
These brownies shine perfectly alongside a scoop of vanilla bean ice cream or a dollop of whipped cream. For a cozy gathering, serve them with a warm cup of coffee, hot chocolate, or a spiced chai latte to complement their rich, nutty flavor.
Creative Ways to Present
Arrange your Viral Pine Cone Brownies Recipe on a rustic wooden board for a woodland vibe or nestle them among sprigs of fresh pine and cranberries for an instant holiday centerpiece. Individual clear boxes tied with ribbon also make delightful gifts or party favors.
Make Ahead and Storage
Storing Leftovers
Keep your pine cone brownies in an airtight container at room temperature for up to three days to maintain their texture and freshness. Avoid refrigerating unless your kitchen is very warm, as this could dry them out.
Freezing
If you want to prepare ahead, freeze the fully assembled and coated pine cones on a parchment-lined tray, then transfer them to a freezer-safe container. They’ll stay fresh for up to two months. Thaw at room temperature before serving.
Reheating
These brownies are best enjoyed at room temperature or slightly chilled. If desired, gently warm them for a few seconds in the microwave to soften the center without melting the chocolate shell.
FAQs
Can I use regular brownie mix instead of a grain-free option?
Absolutely! While the recipe highlights a grain-free mix like Simple Mills, any brownie mix you prefer will work; just be mindful of the texture so your cones hold together well.
What if my brownie mixture is too crumbly to shape?
If you find the brownies crumbly, mixing in a small amount of chocolate or cream cheese frosting can help bind the mixture, making it easier to form into the pine cone shapes.
Can I use different nuts instead of almonds?
Almond slices best mimic pine cone scales, but you can experiment with chopped pecans or walnuts. Just make sure they are thin enough to layer easily around the cones.
Is it necessary to freeze the pine cones before coating?
Freezing helps firm up the cones, preventing them from falling apart during the chocolate coating process. It’s a crucial step for maintaining the intricate pine cone look.
How can I thin out the melted chocolate if it’s too thick?
Add a little more coconut oil, one teaspoon at a time, to reach a pourable consistency that’s easier to work with for coating your pine cones.
Final Thoughts
There’s nothing quite like the joy of creating a dessert that feels special and looks stunning, yet is surprisingly simple to make. This Viral Pine Cone Brownies Recipe brings together beautiful presentation and delicious flavor in a way that will have everyone asking for seconds. So roll up your sleeves, gather your ingredients, and enjoy the process of making these charming, chocolatey pine cone treats that are sure to become a beloved staple in your dessert repertoire.
Print
Viral Pine Cone Brownies Recipe
- Prep Time: 20 minutes
- Cook Time: 25 minutes
- Total Time: 1 hour 15 minutes
- Yield: 12 pine cone brownies 1x
- Category: Dessert
- Method: Baking
- Cuisine: American
- Diet: Gluten Free
Description
These Viral Pine Cone Brownies combine gluten-free, grain-free brownie bites shaped like pine cones, adorned with almond slices that mimic pine cone scales. The brownies are coated with rich melted chocolate and dusted with powdered sugar for a festive, frosted look. Perfect for holiday gatherings or a fun dessert treat, these brownies offer a gooey, chocolatey center with a crunchy texture from sliced almonds or cereal flakes.
Ingredients
Brownie Base
- 1 box gluten-free/grain-free brownie mix (such as Simple Mills) and ingredients required by the mix
- 1 cup sliced almonds (or substitute cereal flakes)
Chocolate Coating
- 9 oz chocolate chips
- 1 tsp coconut oil
Garnish
- Powdered sugar or powdered monk fruit
Instructions
- Prepare Brownie Mix: Follow the instructions on your gluten-free/grain-free brownie mix package carefully to prepare the batter. Bake the brownies ensuring not to overbake, so they remain somewhat gooey and easy to work with in the center.
- Cool Slightly: Let the baked brownies cool down for about 10 minutes. They should be cool enough to handle but still soft and pliable.
- Shape Pine Cones: Using your hands, carefully shape the brownie mixture into approximately 12 cone shapes, mimicking the form of cake pops.
- Apply Almond Scales: Gently press the sliced almonds (or cereal flakes) into and around the cones to create the appearance of pine cone scales. Handle carefully as the shapes are fragile.
- Freeze Pine Cones: Place the shaped and decorated pine cones on a parchment paper-lined sheet pan. Freeze them for 30 minutes to firm up before coating.
- Melt Chocolate Coating: In a microwave-safe bowl, melt the chocolate chips together with the coconut oil in 30-second increments, stirring between each until smooth. Alternatively, melt using a double boiler.
- Coat Pine Cones: Remove the pine cones from the freezer and carefully dip or spoon the melted chocolate over each cone, fully coating them. Return the chocolate-coated pine cones to the parchment paper to let the chocolate set.
- Garnish and Serve: Once set, sprinkle powdered sugar or powdered monk fruit over the top to create a frosted effect. Serve and enjoy!
Notes
- Every brownie mix behaves differently. The results may vary depending on the mix brand and ingredients.
- If your melted chocolate is too thick for coating, add more coconut oil gradually to thin it out.
- Semi-sweet or dark chocolate work better for coating than milk chocolate.
- If the brownie mixture is crumbly, adding some chocolate or cream cheese frosting can help bind it together for shaping.
Your email address will not be published. Required fields are marked *