

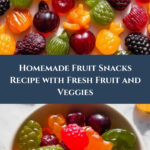
I never thought I’d find a homemade fruit snack recipe easier and more rewarding than this one! The bright, natural colors of fresh fruits and vegetables swirl together in a luscious, jelly-like treat that’s not only a feast for the eyes but an energizing snack bursting with flavor. As you blend the juicy strawberries, tangy peaches, earthy beets, and crisp spinach, your kitchen will fill with a fresh, inviting aroma that promises pure, wholesome goodness in every bite. These Homemade Fruit Snacks with Vegetables and Collagen Recipe are a guilt-free delight you’ll want to make again and again.
Why You’ll Love This Homemade Fruit Snacks with Vegetables and Collagen Recipe
- Wholesome and Delicious: Combining vibrant fruits and nourishing vegetables, these snacks provide a naturally sweet, refreshing taste without any added sugars.
- Simple Ingredients: With just a handful of fresh produce, pure apple juice, raw honey, and grass-fed collagen gelatin, you’re crafting a snack straight from nature’s best.
- Perfect for Anytime Snacking: Whether midday or post-workout, this recipe fits smoothly into your routine and provides a nourishing boost.
- Impressive Presentation: Using silicone molds or a baking dish, you create perfect bite-sized gems that look as good as they taste.
- Customizable Goodness: Easy to adjust based on your favorite fruits or veggies — try swapping peaches for mango or spinach for kale to make it uniquely yours.
Why This Homemade Fruit Snacks with Vegetables and Collagen Recipe Works
This recipe shines due to its clever blending method and the use of gelatin, preferably collagen, to create that satisfying gummy texture that’s both pliable and nourishing. The medium heat dissolves the gelatin just right, so the mixture sets perfectly without boiling and losing its smoothness—an essential step to get that glossy finish and ideal chew. Plus, incorporating pure apple juice offers natural sweetness and the right consistency to help blend the fruits and vegetables seamlessly while keeping the flavor bright and fresh.
Ingredients You’ll Need

Gather an array of colorful fruits and vegetables along with natural sweeteners and collagen to make your homemade fruit snacks a vibrant, healthy treat.
- 1 cup fruit chopped: A medley of sweet and tasty fruits to provide vibrant flavor and natural sugars.
- ¼ cup vegetables chopped (and peeled if necessary): Adds nutrition and subtle earthiness to balance the sweetness.
- ¼ to ½ cup pure apple juice no added sugar: The liquid base that brings it all together with natural sweetness.
- 2 Tablespoons raw honey: For gentle, natural sweetness and rich depth.
- ¼ teaspoon pure vanilla extract: Adds warmth and complexity to the flavor profile.
- 3 Tablespoons gelatin preferably collagen, grass-fed: The magic ingredient that turns the blend into chewy, delightful fruit snacks.
- 1 cup green grapes: Juicy and refreshing to enhance sweetness and texture.
- ¼ cup spinach: Mild and nutrient-rich, blending smoothly without overpowering flavor.
- 1 cup strawberries diced: Vibrant and packed with vitamin C, adding fresh brightness.
- ¼ cup beets: Earthy and colorful, perfect for a nutritional boost and deep hue.
- 1 cup peaches chopped: Naturally sweet and succulent, offering a soft texture.
- ¼ cup carrots: Sweet and crunchy, adding subtle flavor and rich beta carotene.
- 1 cup blueberries: Tart and sweet, packed with antioxidants.
- ¼ cup zucchini: Mild and hydrating, helping create a smooth blend.
Ingredient Substitutions & Tips
- Fruit medley: Substitute with mango, pineapple, or blackberries for variety.
- Vegetables: Kale or cucumber make excellent alternatives to spinach or zucchini.
- Sweeteners: Maple syrup can replace raw honey for a vegan twist, though the flavor will differ.
- Gelatin: Use grass-fed collagen powder specifically, for added protein and health benefits.
👨🍳 Pro Tips for Perfect Results
- Use fresh and ripe fruits: They ensure maximum flavor and natural sweetness.
- Don’t boil the gelatin: Heating gently prevents clumping and preserves texture.
- Gradually add juice: Blend until perfectly smooth, adding more juice teaspoon by teaspoon if needed.
- Keep molds warm while filling: This helps the liquid set evenly without premature cooling.
- Adjust sweetness last: Taste before setting to achieve your perfect balance.
How to Make Homemade Fruit Snacks with Vegetables and Collagen Recipe
Step 1: Prepare molds
Grab your silicone molds and place them on a sturdy baking sheet for easy handling, or line an 8×8 inch square dish with wax paper and lightly grease it. This set-up ensures your homemade fruit snacks come out perfectly shaped and ready to enjoy.
💡 Pro Tip: Silicone molds are easiest for popping out individual snacks without sticking.
Step 2: Blend ingredients
Load your high-powered blender with the chopped fruits, vegetables, and start with ¼ cup of pure apple juice. Secure the lid tightly for a thorough blend.
💡 Pro Tip: Use a Vitamix or similar blender to achieve the silkiest smoothness.
Step 3: Blend mixture
Begin blending on low speed, gradually ramping up to high. Watch as colorful chunks transform into a luscious, smooth liquid. Add extra apple juice by the tablespoon if the blend feels too thick.
💡 Pro Tip: Don’t rush here—the smoother the base, the more enjoyable the final snack texture.
Step 4: Add sweeteners
Pour in the raw honey and vanilla extract, then blend again to perfectly incorporate their sweet, aromatic notes.
💡 Pro Tip: This step brings warmth and offsets any subtle vegetable earthiness.
Step 5: Taste and adjust
Pause to savor your creation. Add more honey if you want it sweeter. This tasting moment lets you customize the flavor just right!
💡 Pro Tip: Remember, chilling will slightly dull sweetness — so err on the side of a little extra honey.
Step 6: Add gelatin
Transfer the mixture to a small saucepan and whisk in the collagen gelatin thoroughly, ensuring it’s evenly distributed before heating.
💡 Pro Tip: Use grass-fed collagen for extra nutrition and a cleaner taste.
Step 7: Heat mixture
Warm the saucepan over medium heat, whisking continuously until the gelatin dissolves fully and the mixture loses its grainy texture—this should take around 3 minutes. Avoid boiling to keep that perfect gummy consistency.
💡 Pro Tip: Watch closely—boiling breaks down gelatin and ruins texture.
Step 8: Fill molds
Use a dropper or carefully pour the warm mixture into your prepared molds or baking pan. Keep the saucepan warm by turning off the heat but leaving it on the stove, so the mixture stays fluid as you fill.
💡 Pro Tip: Filling molds quickly and evenly helps them set uniformly.
Step 9: Refrigerate
Pop the filled molds into the refrigerator for at least 2 hours to firm up. This passive time lets the gelatin work its magic, turning liquid into delightful, chewy snacks.
💡 Pro Tip: Patience here is key for perfect texture!
Step 10: Serve
Once set, gently pop your homemade fruit snacks out of the molds or slice them if you used a baking dish. Enjoy these chewy, flavor-packed bites as a healthy treat anytime.
💡 Pro Tip: Store extras in an airtight container in the fridge to keep fresh.
Common Mistakes to Avoid
Learn from these common pitfalls:
- Boiling gelatin: It destroys its setting properties; heat gently instead.
- Using too little liquid: Leads to overly thick blends that won’t fill molds smoothly.
- Not blending enough: Chunky mixtures result in uneven snacks with off textures.
- Skimping on gelatin: Causes snacks that stay too soft or don’t hold together.
- Adding sweetener too early: Can mask natural flavors; save tasting and adjusting for later.
- Rushing refrigeration: Under-set snacks can stick or fall apart when removed.
Delicious Variations to Try
Once you’ve mastered the classic, try these exciting twists to keep your snack game fresh and flavorful:
Tropical Bliss
Replace peaches with ripe mango and swap spinach for coconut water instead of apple juice for a sunny, island-inspired flavor.
Berry Beet Power
Increase the amount of beets and blueberries for a rich antioxidant-packed treat that’s as nutritious as it is stunning in color. Pair this with our Creamy Vegetable Soup: Cozy & Delicious Comfort in Minutes for a wholesome snack and meal combo.
Green Glow
Boost the nutrition by adding more spinach and zucchini while keeping the green grapes prominent for a fresh and earthy snack.
Carrot-Orange Sunshine
Introduce fresh carrot juice instead of apple juice and add a touch of orange zest to elevate brightness and complexity.
Vanilla Honey Delight
Enhance the vanilla extract by doubling the dose and using local wildflower honey for a sweeter, aromatic experience.
How to Serve Homemade Fruit Snacks with Vegetables and Collagen Recipe

Garnishes
Sprinkle your homemade fruit snacks on a bed of shredded coconut or pair with chopped nuts for contrasting textures and added flavor.
Side Dishes
These snacks make a fantastic companion to light soups, such as the High Protein Broccoli Cheddar Soup: Cozy & Nutritious Delight, balancing hearty warmth with refreshing bites.
Creative Ways to Present
Serve your fruit snacks in small glass jars as grab-and-go treats or artistically arrange them on vibrant platters for parties or lunchboxes, delighting both kids and adults alike.
Make Ahead and Storage
Make-Ahead Instructions
Prepare the mixture and set in molds a day ahead for stress-free snacking. Simply keep refrigerated until ready to remove and serve.
Storage
Store in an airtight container in the refrigerator, where they will stay fresh and chewy for up to 5 days.
Freezing
You can freeze these fruit snacks in a sealed container to extend their shelf life up to 2 months. Thaw in the refrigerator before serving to retain texture.
Reheating
Reheating is not recommended as it affects the gelatin structure; enjoy them chilled or at room temperature instead.
Expert Tips for Success
Always use fresh fruits and vegetables for the brightest flavors and best texture.
Do not rush the gelatin heating; gentle warming ensures smooth, uniform setting.
Keep your molds or dish lightly greased to make removal effortless.
Blend gradually, increasing speed to avoid overheating the mixture prematurely.
Taste and adjust sweetness right before adding gelatin for perfect flavor.
If you don’t have silicone molds, cutting set jelly from a baking dish works beautifully too.
Store fruit snacks in a cool place to prevent melting and stickiness.
Frequently Asked Questions
Can I use flavored gelatin instead of plain collagen gelatin?
Flavored gelatin may add unwanted artificial flavors and sugars, so plain collagen gelatin is preferred for control over taste and health benefits.
Are these fruit snacks suitable for kids?
Absolutely! These snacks are natural, sweetened with honey, and packed with fruits and veggies, making them a fun and healthy option for kids.
What if I don’t have silicone molds?
No problem—use a lined baking dish to pour the mixture, chill, then cut into squares or fun shapes with cookie cutters.
Can I make these vegan?
Traditional gelatin comes from animals, but you can try agar-agar as a plant-based substitute, though texture and setting times will differ.
How long do these homemade fruit snacks last?
Refrigerated properly, they stay fresh for about 5 days. Freezing can extend this up to 2 months.
Can I add more vegetables without affecting taste?
Yes, but keep them mild like spinach or zucchini to maintain a tasty, balanced flavor that won’t overpower the fruit’s natural sweetness.
Is collagen gelatin different from regular gelatin?
Yes, collagen gelatin usually contains higher protein content and is often grass-fed, making it a healthier option with additional benefits for skin and joints.
Final Thoughts
These Homemade Fruit Snacks with Vegetables and Collagen Recipe are more than just a treat—they are a vibrant, nourishing experience that brings together the best of nature’s sweetness and healthful ingredients. Sharing these snacks with family or friends fills the kitchen with joy and a sense of accomplishment. Whether for a quick energizing bite or a delightful party favor, these chewy, colorful gems are sure to become a beloved staple in your recipe collection. Give them a try—you’ll love every luscious bite!
Related Recipes You’ll Love
If you enjoyed this recipe, you’ll also love these delicious recipes:
- Creamy Vegetable Soup: Cozy & Delicious Comfort in Minutes – A warm, velvety soup packed with garden vegetables that complement your healthy snacking routine.
- High Protein Broccoli Cheddar Soup: Cozy & Nutritious Delight – A creamy, nourishing soup featuring broccoli and rich cheddar, perfect for pairing with refreshing fruit snacks.
Related Recipes You’ll Love
If you enjoyed this recipe, you’ll also love these delicious recipes:
- Instant Pot Creamy Chicken and Rice: Quick & Cozy Dinner – A comforting, one-pot meal that’s perfect for busy evenings when you want something wholesome and comforting.

Homemade Fruit Snacks with Vegetables and Collagen Recipe
- Prep Time: 20 minutes
- Cook Time: 3 minutes
- Total Time: 2 hours 23 minutes
- Yield: 6 servings 1x
- Category: Snack
- Method: Stovetop
- Cuisine: American
- Diet: Gluten Free, Low Fat
Description
These homemade fruit snacks are a healthy and delicious treat made from fresh fruits, vegetables, and natural sweeteners. Perfect for a guilt-free snack that’s easy to prepare and fun to eat.
Ingredients
Ingredients
- 1 cup fruit chopped
- 1/4 cup vegetables chopped (and peeled if necessary)
- 1/4 to 1/2 cup pure apple juice no added sugar
- 2 Tablespoons raw honey
- 1/4 teaspoon pure vanilla extract
- 3 Tablespoons gelatin preferably collagen, grass-fed
- 1 cup green grapes
- 1/4 cup spinach
- 1 cup strawberries diced
- 1/4 cup beets
- 1 cup peaches chopped
- 1/4 cup carrots
- 1 cup blueberries
- 1/4 cup zucchini
Instructions
- Prepare molds: Place silicone molds on a large baking sheet or line an 8×8’ square dish with wax paper and lightly grease, set aside.
- Blend ingredients: Place fruit, vegetable and ¼ cup apple juice in the container of a high powered blender (Vitamix) and secure the lid.
- Blend smooth: Turn the machine on and slowly increase the speed to high. Blend on high until the mixture is smooth. (add more juice 1 Tablespoon at a time if necessary, until the mixture reaches a smooth consistency).
- Add honey and vanilla: Add honey and vanilla and blend until smooth
- Taste mixture: Taste mixture and add more honey, if desired.
- Add gelatin: Transfer the mixture to a small saucepan and whisk in gelatin.
- Heat mixture: Heat on medium heat until gelatin is dissolved and mixture is no longer grainy (about 3 minutes).* Make sure it does not boil.
- Fill molds: Using a dropper, fill the silicone molds. Or pour your mixture into your prepared baking pan. (I suggest keeping the saucepan on the warm burner (with the heat source turned off) as you fill the molds. That way the mixture remains slightly warm and cools more slowly).
- Chill to set: Transfer to the refrigerator to set for at least 2 hours.
- Remove and serve: Once set remove from molds and enjoy. If using a baking dish, remove from the dish, cut and serve or store.
Notes
- Make sure the gelatin mixture does not boil while heating.
- Keep the saucepan warm but off heat while filling molds to keep mixture smooth.
- Adjust the sweetness by adding more honey as desired.
Your email address will not be published. Required fields are marked *