

“`html
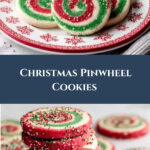
If you’re looking for a festive, colorful, and irresistibly tasty treat this holiday season, look no further than this Christmas Pinwheel Cookies Recipe. These charming cookies are a perfect blend of buttery, vanilla-rich dough shaped into delightful spirals of red, green, and white, making each bite as joyful as unwrapping presents on Christmas morning. Sweetly decorated with holiday nonpareils, they’re the ultimate cookie to share with friends, family, or to brighten up your cookie tray at any seasonal gathering.

Ingredients You’ll Need
The beauty of this Christmas Pinwheel Cookies Recipe lies in its simple yet thoughtfully chosen ingredients. Each component plays a vital role, from the velvety butter creating the perfect base to the vibrant gel food coloring bringing those festive hues to life, making these cookies both delicious and visually stunning.
- 3/4 cup salted butter (softened): Provides a rich, creamy foundation essential for tender cookies.
- 3/4 cup granulated sugar: Adds sweetness and helps with cookie structure and browning.
- 3/4 cup powdered sugar: Contributes to a delicate texture and subtle sweetness.
- 2 large eggs: Bind the ingredients and add moisture for a perfect dough consistency.
- 2 teaspoons vanilla extract: Infuses the dough with warm, comforting flavor.
- 2 1/2 cups all-purpose flour: The base of the dough, creating structure and chew.
- 1/2 teaspoon baking powder: Helps the cookies rise just enough for a soft bite.
- 1/2 teaspoon salt: Balances out sweetness and enhances other flavors.
- Red & green gel food coloring: Key for creating those signature holiday spirals without altering dough texture.
- Holiday colored nonpareils: Adds festive sparkle and a slight crunch to the cookie edges.
- Optional: 1/2-1 teaspoon additional flavoring extracts or lemon zest: Customize your cookies with a unique twist to suit your taste.
How to Make Christmas Pinwheel Cookies Recipe
Step 1: Cream the Butter and Sugars
Start by combining the softened butter with both the granulated and powdered sugars in your mixer. Beat them together until the mixture is light and fluffy—this step is crucial because it creates a smooth base that gives your cookies a tender crumb and slight lift. The fluffy texture you achieve here determines how your cookies will turn out, so don’t rush it!
Step 2: Add Eggs, Vanilla, and Optional Flavorings
Next, add in your eggs and vanilla extract. If you want to personalize your cookies, this is the perfect moment to add in additional flavorings like almond or peppermint extracts or some fresh lemon zest. Make sure to scrape down the sides of the bowl to fully incorporate everything for an even flavor throughout the dough.
Step 3: Mix in Dry Ingredients
In a separate bowl, whisk together the flour, baking powder, and salt. Slowly add these dry ingredients into your wet mixture until just combined. Overmixing here can make your cookies tough, so stir gently until you have a smooth dough that holds together nicely.
Step 4: Divide and Color the Dough
Divide your dough into three equal parts. Leave one portion plain (this will be your white dough) and add red gel food coloring to one portion, mixing until it’s an even, vibrant red. Do the same with the third portion using green gel food coloring. This colorful step is what makes these cookies so eye-catching!
Step 5: Chill the Dough Discs
Flatten each colored dough portion into a disc shape, wrap them tightly in plastic wrap, and chill. You can freeze them for 20 minutes or refrigerate for about an hour. Chilling firms up the dough and makes rolling easier, while helping flavors to meld beautifully.
Step 6: Roll and Stack the Dough
Roll each disc out on parchment paper into rectangles of roughly equal size and thickness. Stack the dough layers with the white in the middle and the colored doughs on top and bottom. Trim the sides so the layers line up perfectly. This layered combination forms the iconic pinwheel design once rolled.
Step 7: Roll the Dough into a Log
Using the parchment paper to lift and help you, carefully roll the stacked dough into a tight log, which is essential to get those lovely swirls. Wrap it tightly in plastic wrap and chill in the fridge for at least 1-2 hours—this resting period not only sets the shape but also enhances flavor and texture.
Step 8: Coat with Nonpareils and Slice
Remove the dough log from the fridge and roll it on a baking sheet covered with holiday colored nonpareils. Press gently but firmly to make sure the tiny sprinkles stick all around the dough. Then unwrap and cut off uneven ends before slicing the log into thin 1/4-inch rounds with a sharp knife. These little discs will bake into perfect pinwheels bursting with color and crunch.
Step 9: Bake to Perfection
Preheat your oven to 350°F and line a baking sheet with parchment paper. Arrange your cut cookies about 1-2 inches apart to allow for slight spreading. Bake for 10-12 minutes until the edges set but the cookies remain soft and tender in the center. Once baked, transfer to a wire rack to cool completely. Your Christmas Pinwheel Cookies Recipe is now ready to enjoy!
How to Serve Christmas Pinwheel Cookies Recipe

Garnishes
While these cookies look festive all on their own, you can add a touch more whimsy with a light dusting of powdered sugar just before serving, adding a snowy effect. Alternatively, drizzle a delicate white chocolate glaze for added indulgence and visual interest.
Side Dishes
These cookies pair wonderfully with warm holiday beverages such as spiced hot chocolate, creamy eggnog, or a robust cup of coffee. Their sweetness and festive colors make them ideal companions to drinks that bring comfort and cheer.
Creative Ways to Present
Serve your Christmas Pinwheel Cookies Recipe on a tiered platter surrounded by holly leaves and cranberries for a stunning holiday centerpiece. You can also package them in clear cellophane bags tied with red and green ribbons to gift to neighbors or co-workers – a thoughtful, handmade holiday delight!
Make Ahead and Storage
Storing Leftovers
If you find yourself with leftover cookies, keep them fresh by storing in an airtight container at room temperature. Properly stored, they stay soft and flavorful for up to one week, perfect for nibbling through the holiday rush.
Freezing
You can freeze the rolled cookie log wrapped in plastic wrap for up to one month. When you want to bake, simply thaw in the fridge overnight, slice, and bake as directed. This method is a lifesaver for busy holiday planners eager to prepare in advance.
Reheating
Cookies are best enjoyed fresh, but if you want to warm them slightly, pop a few in a low oven or microwave for just a few seconds. This returns a touch of that fresh-baked softness and aroma without drying them out.
FAQs
Can I substitute the butter with margarine or shortening?
While margarine or shortening can be used, the flavor and texture of butter is unmatched in this Christmas Pinwheel Cookies Recipe. Butter gives a rich taste and tender crumb that make these cookies so indulgent and festive.
What is the best way to get clean pinwheel shapes?
Rolling the dough tightly into a log and chilling it thoroughly before slicing are the keys to neat pinwheel spirals. Also, using a sharp knife and cutting evenly helps maintain smooth edges.
Can I use natural food coloring instead of gel?
Gel food coloring is recommended because it provides vibrant colors without changing the dough’s consistency. Natural colorings may yield less vivid results and sometimes alter texture, so for the classic look and feel, stick with gels.
Is it okay to add other spices like cinnamon or nutmeg?
Absolutely! Adding warm spices like cinnamon or nutmeg can give these cookies an extra festive twist. Just add about 1/2 teaspoon to the dry ingredients and enjoy the cozy aromas.
How long will these cookies stay fresh?
Stored in an airtight container at room temperature, these delightful treats stay fresh for up to one week, making them perfect for baking ahead of holiday festivities and enjoying throughout the season.
Final Thoughts
With their charming swirl design, festive colors, and buttery, melt-in-your-mouth texture, this Christmas Pinwheel Cookies Recipe truly captures the spirit of the holidays. They’re not just cookies; they’re little bites of joy that bring warmth and smiles to any gathering. I can’t wait for you to try making them and share the magic with your loved ones!
“`
Print
Christmas Pinwheel Cookies Recipe
- Prep Time: 45 minutes
- Cook Time: 12 minutes
- Total Time: 2 hours 25 minutes
- Yield: 30 servings 1x
- Category: Dessert
- Method: Baking
- Cuisine: American
Description
These Christmas Pinwheel Cookies are festive, colorful, and delicious treats perfect for holiday celebrations. Made with a buttery sugar cookie dough divided into three layers—plain, red, and green—they are rolled into a log, coated in holiday nonpareils, and baked to a delightful crisp. The vibrant pinwheel pattern inside each cookie adds charm and a touch of holiday spirit to your dessert table.
Ingredients
Cookie Dough
- 3/4 cup salted butter (softened to room temperature)
- 3/4 cup (150g) granulated sugar
- 3/4 cup (150g) powdered sugar
- 2 large eggs
- 2 teaspoons vanilla extract
- 2 1/2 cups (353g) all-purpose flour
- 1/2 teaspoon baking powder
- 1/2 teaspoon salt
- Optional: 1/2-1 teaspoon additional flavoring extracts or lemon zest
Coloring & Decoration
- Red gel food coloring
- Green gel food coloring
- Holiday colored nonpareils
Instructions
- Prepare the dough base: Combine butter, granulated sugar, and powdered sugar in a mixer and beat well until the mixture is light and fluffy, providing a smooth and creamy base for your dough.
- Add eggs and flavorings: Incorporate the eggs, vanilla extract, and any additional flavorings like lemon zest or other extracts. Scrape the sides and bottom of the bowl to ensure everything is evenly mixed.
- Mix dry ingredients in: Gradually add the flour, baking powder, and salt into the wet mixture. Mix until just combined to form the cookie dough. Divide the dough evenly into three balls.
- Color the dough: Place one-third of the dough back in the mixer bowl and add 5-10 drops of red gel food coloring. Mix until the dough is evenly colored. Repeat with another third of the dough using green gel food coloring. Leave the last third plain for the white layer.
- Chill dough discs: Flatten each colored dough ball into a disc, wrap each in plastic wrap, and chill either in the freezer for 20 minutes or in the fridge for 1 hour to firm up for easier rolling.
- Roll out dough layers: Roll out each chilled dough disc on parchment paper into rectangles of similar size and shape. Stack the layers with the white dough in the middle, the red dough on one side, and the green dough on the other.
- Trim and roll into log: Trim the long edges of the stacked dough to make them even. Carefully roll the stacked rectangle into a tight log using the parchment paper to help lift and roll without cracks. Wrap in plastic and chill in the fridge for 1-2 hours.
- Coat with nonpareils: Remove the chilled dough log and roll it on a baking sheet covered with holiday-colored nonpareils. Press to ensure good coverage so the sprinkles stick firmly to the log’s surface.
- Preheat oven and prepare baking sheet: When ready to bake, preheat your oven to 350°F (175°C) and line a baking sheet with parchment paper.
- Slice the cookies: Unwrap the dough log and cut off the uneven ends. Using a sharp knife, slice the log into 1/4-inch thick rounds. Place the cookie slices 1-2 inches apart on the prepared baking sheet.
- Bake and cool: Bake the cookies in the preheated oven for 10-12 minutes until they are set but not browned. Allow the cookies to cool completely on a wire rack before serving or storing.
Notes
- For best results, chill the dough thoroughly as this helps keep the layers distinct and the dough easier to handle.
- You can add your favorite extracts (almond, peppermint) or citrus zest to customize flavors.
- Use a sharp knife to slice cleanly without squashing the dough log.
- Store unbaked dough logs wrapped tightly in the fridge for up to 1 week for fresh baking later.
- Be careful when rolling the dough into a log to avoid cracks; use parchment paper to help.
Your email address will not be published. Required fields are marked *