I never thought I’d find a dessert as whimsically charming and delectably creamy as this No Bake Frosted Animal Cookie Cheesecake Recipe. Imagine vibrant pink cheesecake filling nestled atop a buttery, crunchy crust made from frosted animal cookies, all coming together in a colorful celebration of texture and flavor. Every bite invites playful nostalgia and indulgent creaminess, making it a dessert that’s as delightful to look at as it is to savor.
Why You’ll Love This No Bake Frosted Animal Cookie Cheesecake Recipe
Delightfully Fun Textures: The crunchy frosted animal cookie crust perfectly complements the silky smooth cheesecake filling for a magical contrast in each bite.
Simple Ingredients: This recipe uses everyday pantry staples combined with fun, accessible ingredients like cream cheese and pink candy melts to create something truly special.
Easy No-Cook Method: With no baking required, you simply mix, press, and chill—making this dessert ideal for those looking to impress without spending hours in the kitchen.
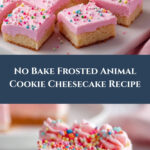
Visually Stunning Presentation: The soft pink hue of the filling paired with colorful sprinkles and extra frosted animal cookies on top turns this cheesecake into a party centerpiece.
Customizable to Your Taste: Optional pink food coloring and rainbow sprinkles allow you to add your own creative spin and brighten your dessert plate.
Why This No Bake Frosted Animal Cookie Cheesecake Recipe Works
The magic behind this recipe lies in its clever layering of textures and flavors, starting with a crust made by finely crushing frosted animal cookies and mixing them with melted butter and sugar to form a sturdy yet flavorful base. The filling is blended in a stand mixer until perfectly smooth, enriched by pink candy melts that add both color and a luscious sweetness. The no-cook method ensures a tender, creamy cheesecake that sets beautifully in the refrigerator, capturing that irresistible balance between firmness and melt-in-your-mouth softness. Using room temperature cream cheese is key for a silky blend, while chilling for 2-3 hours guarantees the perfect slice.
Gather bright, playful ingredients that transform ordinary staples into a dessert full of charm and flavor.
Frosted animal cookies (11 ounces): These colorful cookies bring a crunchy sweetness and nostalgic fun to the crust and topping.
Unsalted butter (½ cup, melted): Adds richness and holds the crust together with a silky binding.
Granulated sugar (1 tablespoon): Just enough to enhance sweetness in the crust mixture.
Cream cheese (16 ounces, room temperature): The creamy heart of the filling that provides velvety texture.
Powdered sugar (1 cup): Sweetens and smooths out the cheesecake base perfectly.
Pure vanilla extract (1 teaspoon): A fragrant hint that deepens flavor complexity.
Pink candy melts (1 cup): These add vivid color and a touch of candy sweetness to the filling.
Pink food coloring (optional): Amplifies the cheesecake’s rosy appearance.
Rainbow sprinkles (optional): For that extra pop of color and festive finish.
Ingredient Substitutions & Tips
Frosted animal cookies: Gluten-free cookie crumbs or graham cracker crumbs can be used for a different crust texture.
Cream cheese: Neufchâtel cheese is a lighter alternative with a similar consistency.
Pink candy melts: White chocolate chips with a few drops of red food coloring work well as a substitute.
Butter: Salted butter can be used but reduce the added granulated sugar slightly.
👨🍳 Pro Tips for Perfect Results
Use room temperature cream cheese: This ensures a silky, lump-free filling.
Press the crust firmly: To avoid crumbling when slicing, compact the crust well into every corner of the pan.
Melt candy melts gently: Use short bursts in the microwave to avoid scorching and achieve a smooth texture.
Line your pan carefully: Parchment paper with overlapping ends makes removing the cheesecake a breeze.
Allow full chilling time: The cheesecake needs at least 2-3 hours in the fridge for the filling to firm up perfectly.
How to Make No Bake Frosted Animal Cookie Cheesecake Recipe
Step 1: Prepare the Baking Pan
Picture this: you line an 8×8-inch pan with parchment paper, letting the ends overlap to create handy handles for lifting out your cheesecake after it sets. This simple prep trick makes serving a breeze later on.
💡 Pro Tip: Make sure the parchment hangs over all sides evenly to avoid tearing when you remove the cheesecake.
Step 2: Crush the Cookies
Here’s my secret to an ultra-crisp crust: blitz the frosted animal cookies in a food processor until they’re powdered fine like cookie dust. Alternatively, bash them in a large Ziplock bag—this step sets the base for that satisfying crunch.
💡 Pro Tip: Crushing finely helps add structure to the crust that holds together nicely after chilling.
Step 3: Combine the Crust Ingredients
Next, stir the cookie crumbs together with melted butter and sugar. Stirring until it transforms into a dough-like mixture feels oddly satisfying—the aroma of butter and sweet cookies fills your kitchen.
💡 Pro Tip: After mixing, taste the crumb—it should be buttery and sweet but not greasy.
Step 4: Press the Crust into the Pan
Firmly press this buttery mixture across the bottom of the parchment-lined pan, packing it into the corners and smoothing it out evenly. This ensures your crust won’t fall apart once chilled.
💡 Pro Tip: Use the bottom of a glass to press dough tightly and evenly.
Step 5: Chill the Crust
Place the crust in the refrigerator to set while you prepare the luscious filling. This chilling step gives the crust time to firm up beautifully.
💡 Pro Tip: Don’t skip chilling! A well-set crust holds the cheesecake perfectly intact.
Step 6: Beat the Cream Cheese Mixture
Using your stand mixer fitted with the paddle attachment, blend the cream cheese, powdered sugar, and vanilla until fully smooth and creamy. This ensures a dreamy, lump-free filling ready for the next step.
💡 Pro Tip: Scrape the bowl once to avoid any cream cheese sticking to the sides.
Step 7: Melt the Pink Candy Melts
While the cream cheese blends, gently melt the pink candy melts in short microwave bursts, stirring often until velvety smooth. The bright pink color hints at the cheesecake’s playful personality.
💡 Pro Tip: Avoid overheating to keep the melts glossy and pourable.
Step 8: Incorporate the Candy Melts
Slowly pour the melted candies into the mixing bowl while the mixer is on low speed, folding them into the cream cheese mixture. Add a few drops of pink food coloring if you want an extra vibrant hue!
💡 Pro Tip: Mix until fully blended for a uniform pink color and richness.
Step 9: Pour and Spread the Filling
Pour the luscious pink cheesecake filling evenly over the chilled crust, spreading it smoothly with an offset spatula or back of a spoon.
💡 Pro Tip: Smooth the top carefully to create a beautiful, even surface for your cheesecake masterpiece.
Step 10: Chill until Set
Place the cheesecake back into the refrigerator and let it chill until fully set, about 2-3 hours. This wait rewards you with a firm yet creamy slice every time.
💡 Pro Tip: For extra fun, sprinkle rainbow confetti and decorate with additional frosted animal cookies before cutting.
Common Mistakes to Avoid
Learn from these common pitfalls:
Skipping parchment lining: Makes it a nightmare to remove the cheesecake in one piece.
Not chilling long enough: Leads to a runny, unset filling that is hard to slice.
Over-mixing the cream cheese: Can cause the filling to become too soft or grainy.
Crushing cookies unevenly: Large chunks in the crust may break apart when serving.
Overheating candy melts: Results in clumpy texture instead of smooth pour.
Using cold cream cheese: Causes lumps and a bumpy filling texture.
Delicious Variations to Try
Once you’ve mastered the classic No Bake Frosted Animal Cookie Cheesecake Recipe, why not get creative?
Chocolate Swirl
Swirl melted dark chocolate into the pink filling before chilling for a marbled effect adding depth to each bite.
Fruit-Infused
Add a layer of fresh berries or crushed pineapple atop the crust before pouring the filling for a refreshing fruity twist.
Vanilla Bean Upgrade
Use vanilla bean paste instead of extract to give an even richer vanilla aroma and luxurious texture.
Sprinkle Explosion
Mix extra sprinkles directly into the filling for a funfetti-style cheesecake bursting with color in every slice.
Cookie Crumble Topping
Top with crushed frosted animal cookies combined with mini marshmallows to add a playful crunch and sweetness.
How to Serve No Bake Frosted Animal Cookie Cheesecake Recipe
Garnishes
Bright rainbow sprinkles and extra frosted animal cookies add both festive color and crunchy texture, making your cheesecake shine on any dessert table.
Side Dishes
Pair slices with fresh berries or a scoop of vanilla ice cream for an indulgent complement that balances sweetness with fresh acidity.
Creative Ways to Present
Serve in individual clear cups for a fun party-ready portion, layering the crust and filling for a visually stunning dessert shot. Or drizzle with a berry sauce for an elegant finish.
This cheesecake is perfect for prepping in advance. Once assembled, chill it for 2-3 hours or overnight in the fridge, allowing the flavors to meld and the filling to completely set.
Storage
Store cheesecake covered in the refrigerator for up to 3 days. Keep it tightly wrapped to protect it from absorbing any other fridge odors.
Freezing
This cheesecake can be frozen for up to 1 month. Wrap it tightly in plastic wrap and then foil to preserve flavor and texture. Thaw overnight in the refrigerator before serving.
Reheating
Since this is a no-bake cheesecake, it is best served chilled. Simply let any thawed cheesecake reach room temperature for 15-20 minutes before slicing, if desired.
Expert Tips for Success
Always use fresh frosted animal cookies to ensure maximum crunch and flavor in the crust.
Room temperature ingredients blend more smoothly for a creamier filling without lumps.
Don’t rush the chilling step — proper set time makes a huge difference in texture.
Crush cookies finely but not powder dry for the perfect crust consistency.
Add food coloring gradually to reach your preferred shade without overpowering the candy melt flavor.
Use an offset spatula for spreading to achieve a perfectly smooth cheesecake surface.
Decorate just before serving to keep sprinkles and cookies fresh and colorful.
Frequently Asked Questions
Can I use a different type of cookie for the crust?
Yes! Graham cracker crumbs or gluten-free cookie crumbs can replace frosted animal cookies, but your texture and flavor will vary slightly.
Is this recipe suitable for vegetarians?
Absolutely! It uses no gelatin or animal-derived thickeners, making it vegetarian-friendly.
How long does the cheesecake need to chill?
Chill the cheesecake for about 2-3 hours until firm for clean slicing and the best creamy texture.
Can I make this ahead for a party?
Definitely. This cheesecake holds well in the fridge for up to 3 days and can also be frozen for longer storage.
What if I don’t have pink candy melts?
Try substituting with white chocolate chips and add pink food coloring to achieve a similar look and taste.
Can I add other mix-ins to the filling?
Yes, small additions like sprinkles or crushed cookies can be folded in to add fun texture and bursts of flavor.
How should I store leftover cheesecake?
Keep leftovers tightly wrapped in the refrigerator and consume within 3 days for the best flavor and freshness.
Final Thoughts
Bringing together the crunchy whimsy of frosted animal cookies and the creamy, dreamy texture of cheesecake, this No Bake Frosted Animal Cookie Cheesecake Recipe is more than just a dessert — it’s a joyful experience. It’s perfect for celebrations, family gatherings, or any day that calls for a touch of sweet magic. I can’t wait for you to make this recipe and share it with your loved ones. Trust me, those vibrant colors and playful crunches will light up your table and your heart.
Related Recipes You’ll Love
If you enjoyed this recipe, you’ll also love these delicious recipes:
This no-bake frosted animal cookie cheesecake combines the playful crunch of frosted animal cookies with a creamy, pink-hued cream cheese filling, making it a fun and effortless dessert perfect for any occasion.
Ingredients
UnitsScale
Crust
11ounces frosted animal cookies ((1 1/4 bags) – plus more for topping!*)
1/2cup unsalted butter (melted (1 stick))
1 tablespoon granulated sugar
Filling
16ounces cream cheese (room temperature (2 bricks))
1cup powdered sugar
1 teaspoon pure vanilla extract
1cup pink candy melts (**)
Pink food coloring (optional)
Rainbow sprinkles (optional, for topping)
Instructions
For the Crust Prepare an 8×8-inch baking pan by lining it with parchment paper, having the ends overlap the pan by about an inch on the sides. (This will allow for easy lifting and removal of the cheesecake once it sets)
Crush Using a food processor or large Ziplock bag, crush the cookies until they are a fine powder.
Stir Stir together with the melted butter and sugar, until the crumble becomes dough-like.
Press Press the mixture into the bottom of the prepared pan, pushing into every corner and covering the entire bottom of the pan. Place the crust in the refrigerator to set while preparing the filling.
For the Filling While the crust sets, in the bowl of a stand mixer fitted with the paddle attachment, beat the cream cheese, powdered sugar, and vanilla together.
Melt While the cream cheese mixture beats, melt the pink chocolates in a small, microwave-safe bowl.
Pour While mixing the cream cheese mixture on slow speed, pour in the melted pink candies or white chocolate chips. Add pink food coloring, if desired.
Combine Once it is well combined, pour over the prepared crust, spreading evenly until the entire bottom crust is covered.
Chill Place in the refrigerator until the cheesecake sets, about 2-3 hours. Top with rainbow sprinkles and circus cookies, if desired. Cut and serve.
Notes
Line the pan with parchment paper overlapping the sides for easy removal.
Use a food processor or Ziplock bag to crush cookies finely.
Chill the crust before adding the filling to ensure it sets properly.
Pink food coloring is optional to enhance the color of the cheesecake.
Top with additional sprinkles and cookies for decoration.


Your email address will not be published. Required fields are marked *