

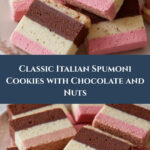
If you have been searching for a delightful treat that combines rich flavor, charming color, and a nostalgic touch, this Italian Spumoni Cookies Recipe is exactly what you need. These tri-colored cookies blend layers of chocolate, nuts, and a whisper of rum flavoring into a tender, buttery dough that melts in your mouth. Perfect for sharing with loved ones or enjoying with a warm cup of coffee, this recipe brings a playful and elegant twist to traditional cookie baking that is sure to impress and satisfy.

Ingredients You’ll Need
The beauty of the Italian Spumoni Cookies Recipe lies in its simplicity and how each ingredient plays a vital role in crafting those iconic colors and flavors. Together, they create a harmonious dough that is both textured and tasty, making the baking experience straightforward yet rewarding.
- 1 cup butter, softened: Provides the rich, creamy base that keeps the cookies tender and flavorful.
- 1 1/2 cups powdered sugar: Adds sweetness and a delicate texture that helps the cookies remain soft.
- 1 large egg: Binds all the ingredients together, adding structure and moisture.
- 1 tsp vanilla extract: Offers a warm, inviting aroma that enhances the overall flavor.
- 2 1/2 cups all-purpose flour: The essential framework for your cookies, giving them the perfect bite.
- 2 oz. unsweetened chocolate, melted: Infuses the chocolate layer with deep, rich flavor and an attractive dark tone.
- 1/2 cup nuts (pecans, walnuts, pistachio), chopped: Adds crunch and natural earthiness, plus a lovely green hint with pistachios.
- Few drops green food coloring: Brings the distinctive green layer to life, making it visually stunning.
- 2 tsp rum extract: Delivers that classic spumoni flavor with just the right hint of warmth and complexity.
- Few drops red food coloring: Gives the rum layer its inviting red hue that contrasts beautifully with the other layers.
How to Make Italian Spumoni Cookies Recipe
Step 1: Prepare the Basic Dough
Start by creaming together your softened butter and powdered sugar until light and fluffy. This is the secret to a tender cookie. Then, beat in the egg and vanilla extract until everything is well combined. Gradually add the all-purpose flour, mixing thoroughly to create a smooth dough. This base dough will be split into three parts to craft your tri-colored masterpiece.
Step 2: Create the Chocolate Layer
Take one-third of the dough and gently fold in the melted unsweetened chocolate to transform it into the rich chocolate layer. The smooth chocolate not only provides a luscious flavor but also adds depth and contrast to the cookie’s appearance. Set this portion aside while you move on.
Step 3: Make the Green Nutty Layer
In the next third of your dough, stir in the chopped nuts along with a few drops of green food coloring. This layer brings crunch and a festive shade that’s reminiscent of pistachio spumoni ice cream. The nuts offer varying textures and a natural flavor that balances the richness of the chocolate.
Step 4: Mix the Rum-Flavored Red Layer
Finally, add the rum extract and red food coloring to the last dough portion. This adds a subtle boozy warmth and a visually appealing red tint that perfectly complements the other layers. The rum flavor is what makes these cookies uniquely “spumoni.”
Step 5: Assemble the Layers
Shape each colored dough into an 8 by 3-inch rectangle on waxed paper. Lay the green nut layer in the center and stack the chocolate and rum-flavored rectangles on the bottom and top, pressing gently to fuse the layers. Wrap the combined dough tightly and chill it in the refrigerator for two hours. Chilling makes it easier to slice thin cookies that hold their beautiful tri-colored appearance.
Step 6: Bake to Perfection
Preheat your oven to 375°F (190°C). Slice the chilled layered dough into 1/4-inch thick cookies. Place the cookies on an ungreased baking sheet and bake for 9 to 11 minutes. You’ll know they’re ready when you lightly touch the surface and it springs back without leaving an imprint—a classic tip passed down from generations.
How to Serve Italian Spumoni Cookies Recipe

Garnishes
These cookies already shine with their bold colors, so a simple dusting of powdered sugar adds a delicate finishing touch without overshadowing their charm. For a festive occasion, garnish with finely chopped nuts or edible flower petals for a pop of extra elegance.
Side Dishes
Pair these cookies with a scoop of creamy vanilla or pistachio ice cream to echo their spumoni inspiration. They also work beautifully alongside a cup of espresso or a glass of sweet dessert wine, transforming your snack into a gourmet experience.
Creative Ways to Present
Arrange the Italian Spumoni Cookies on a tiered serving platter to showcase their vivid layers, or package them in a clear gift box tied with a ribbon for a heartfelt homemade gift. If you’re hosting a party, line them up rainbow-style on a decorative tray to add color and creativity to your dessert table.
Make Ahead and Storage
Storing Leftovers
Leftover Italian Spumoni Cookies keep well in an airtight container at room temperature for up to a week. Keeping them sealed preserves their fresh texture and prevents the layers from drying out.
Freezing
You can freeze these cookies either baked or unbaked. For baked cookies, place them in a freezer-safe container with parchment paper between layers and freeze for up to three months. For unbaked dough, wrap tightly in plastic wrap and foil, then freeze. When ready, thaw in the refrigerator before slicing and baking.
Reheating
For best flavor and texture, gently warm the cookies in a preheated 300°F oven for about 5 minutes. Avoid microwaving as it can make them lose their crispness. The warmth releases aromatic oils, making each bite even more enjoyable.
FAQs
What makes these cookies “spumoni”?
The Italian Spumoni Cookies Recipe takes inspiration from the classic spumoni ice cream, featuring three vibrant layers flavored with chocolate, nuts, and rum. This playful combination delivers a flavor and color experience reminiscent of the beloved dessert.
Can I substitute the rum extract?
Yes, if you prefer to avoid alcohol flavor, vanilla extract or almond extract can be used as substitutes. However, rum extract contributes to the signature taste that makes these cookies unique, so try to include it if possible.
Are these cookies gluten-free?
This recipe calls for all-purpose flour, which contains gluten. To make gluten-free versions, experiment with gluten-free flour blends, but keep in mind the texture and baking time might vary slightly.
What types of nuts work best?
Pecans, walnuts, and pistachios are all excellent choices for the green layer. Pistachios will also naturally enhance the green color and add authentic spumoni character. Feel free to mix or substitute based on your taste and availability.
How thin should I slice the dough for baking?
Slicing the dough into 1/4-inch thick cookies ensures they bake evenly and maintain a tender texture. Thicker slices may result in a drier cookie and thinner slices could become too crispy or break easily.
Final Thoughts
If you’re ready to bring a burst of color, flavor, and joyful nostalgia into your kitchen, I wholeheartedly encourage you to try this Italian Spumoni Cookies Recipe. These charming treats are not only a feast for the eyes but also a celebration of classic flavors made new, perfect for every occasion. Baking these cookies is a wonderful way to share a slice of tradition and delight with family and friends.
Print
Italian Spumoni Cookies Recipe
- Prep Time: 15 minutes
- Cook Time: 10 minutes
- Total Time: 2 hours 25 minutes
- Yield: Approximately 24 cookies 1x
- Category: Dessert
- Method: Baking
- Cuisine: Italian
- Diet: Halal
Description
Italian Spumoni Cookies are a delightful tri-colored treat combining three distinct flavors: rich chocolate, crunchy nuts, and a hint of rum. These layered cookies are molded into colorful rectangles, chilled to perfection, and then sliced and baked to golden crispness, making them a festive and flavorful addition to any cookie platter.
Ingredients
Basic Dough:
- 1 cup butter, softened
- 1 1/2 cups powdered sugar
- 1 large egg
- 1 tsp. vanilla extract
- 2 1/2 cups all-purpose flour
Chocolate Layer:
- 2 oz. unsweetened chocolate, melted
Green Layer:
- 1/2 cup nuts (pecans, walnuts, pistachio), chopped
- few drops green food coloring
Red Layer:
- 2 tsp. rum extract
- few drops red food coloring
Instructions
- Prepare Basic Dough: In a large bowl, cream together softened butter and powdered sugar until smooth. Add the egg and vanilla extract, mixing thoroughly. Gradually incorporate the all-purpose flour and mix until a uniform dough forms. Divide this dough equally into three separate portions.
- Create Chocolate Layer: To the first portion of dough, gently fold in the melted unsweetened chocolate until fully incorporated and the dough is evenly colored.
- Create Green Layer: To the second portion, mix in the chopped nuts and a few drops of green food coloring, blending well for a consistent green hue and nutty texture.
- Create Red Layer: To the third portion, add the rum extract along with a few drops of red food coloring, ensuring the dough is evenly colored and flavored.
- Shape the Dough: On waxed paper, shape each colored dough portion into an 8-inch by 3-inch rectangle. Place the green rectangle between the chocolate and red rectangles, carefully layering them together with the green in the center. Press the layers firmly to adhere into a single solid block.
- Chill the Dough: Wrap the layered dough block tightly in plastic wrap and refrigerate for 2 hours. This chilling step is essential to firm up the dough and make it easier to slice.
- Preheat Oven and Slice Cookies: Preheat your oven to 375°F (190°C). Remove the dough from the refrigerator and unwrap. Using a sharp knife, slice crosswise from the end into 1/4-inch thick cookies.
- Bake the Cookies: Place the slices onto an ungreased baking sheet, spaced evenly. Bake in the preheated oven for 9 to 11 minutes, or until the edges are set and no fingerprint indentations remain when lightly touched.
- Cool and Serve: Let the cookies cool on the baking sheet for a few minutes before transferring them to a wire rack to cool completely. Enjoy the tri-flavored delight!
Notes
- Mom used to say the cookies were done when no imprint remains after lightly touching them with a finger; this is a buttery test for doneness.
- Be sure to chill the dough thoroughly to make slicing easier and maintain the neat layers.
- You can substitute other nuts for variety but stick to chopped texture for best results.
- Store cookies in an airtight container at room temperature for up to a week for freshness.
Your email address will not be published. Required fields are marked *