

Picture this: The warm, sweet scent of peanut butter mingling with toasted sugar fills your kitchen as golden bars bake gently in the oven. That irresistible combination of creamy marshmallow fluff melting atop a rich, buttery peanut butter base is nothing short of magical. These Fluffernutter Bars are the perfect crowd-pleaser—quick to whip up, delightfully gooey, and just the right balance of sweet and salty to make your taste buds dance with joy!
Why You’ll Love This Fluffernutter Bars Recipe
- Ready in about an hour: From mixing to cooling, you can have these bars on your table in just over 60 minutes, perfect for busy days or last-minute treats.
- Uses simple, pantry-friendly ingredients: Flour, peanut butter, sugar, eggs, and fluff—ingredients you likely already have, making this recipe super convenient.
- Perfect for beginners: With straightforward steps and no fancy tools required, these bars are foolproof even if you rarely bake.
- Impressive presentation: The glossy marshmallow fluff crowned with chunks of peanut butter dough creates a tantalizing, layered look that’s guaranteed to wow.
- Customizable to your cravings: Add chocolate chips, swap peanut butter varieties, or sprinkle nuts for your own special spin.
Why This Fluffernutter Bars Recipe Works
This recipe is a beautiful marriage of texture and flavor, brought to life by just a few key elements. The softened butter beaten with brown and white sugars creates a tender, chewy peanut butter layer that’s both rich and satisfying. Adding two eggs—one whole and one yolk only—gives an extra moist and tender crumb. The trick that truly sets this recipe apart is baking the peanut butter dough twice: first to set a firm base, then topping it with marshmallow fluff and dollops of reserved dough before a final bake. This method keeps the fluff gooey yet secure and gives the bars their characteristically irresistible layers.

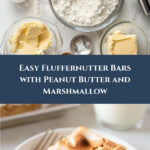
Ingredients You’ll Need
This recipe calls for a handful of simple, everyday ingredients that come together to create something truly special.
- All-purpose flour: Provides structure with just the right amount of chew.
- Baking powder: Helps your bars rise just enough without being cakey.
- Salt: Balances sweetness and enhances flavors.
- Unsalted butter (softened): Adds rich moisture and tenderness.
- Brown sugar: Gives a deep, caramel-like sweetness and moisture.
- White sugar: Adds sweetness and a slight crunch.
- Smooth peanut butter: The star ingredient, lending creamy, nutty richness.
- Egg and egg yolk: Bind ingredients and add moistness.
- Marshmallow fluff: Creates that iconic gooey, cloud-like topping.
Ingredient Substitutions & Tips
- Smooth peanut butter: Use natural peanut butter for a less sweet, more earthy flavor or try almond or cashew butter as a fun twist.
- Unsalted butter: Salted butter can be used; just reduce added salt slightly.
- Brown sugar: Light or dark brown sugar both work, just expect a slightly different depth of flavor.
- Marshmallow fluff: If you can’t find fluff, mini marshmallows melted gently in a bowl can work as a substitute.
👨🍳 Pro Tips for Perfect Results
- Use room temperature butter: Softened butter creams easier with sugars for a lighter dough.
- Measure flour carefully: Too much flour leads to dry bars; spoon and level to be precise.
- Don’t skip the parchment paper overhang: It makes lifting and slicing easier and keeps bars intact.
- Chill the dough slightly if sticky: This helps pinch and flatten the dough topping without mess.
- Let bars cool completely: This step is crucial to hold their shape when sliced.
How to Make Fluffernutter Bars Recipe
Step 1: Preheat and Prepare Your Pan
Start by preheating your oven to 350 degrees Fahrenheit and positioning your oven rack in the center for even baking. Line a 9×13-inch pan with parchment paper, leaving enough overhang on the sides to lift the bars out later. Alternatively, use aluminum foil and grease it lightly—this little prep makes cleanup and slicing a breeze.
💡 Pro Tip: If you have a non-stick spray with flour, it’s perfect for greasing instead of butter or oil to prevent sticking.
Step 2: Whisk Dry Ingredients Together
In a medium bowl, whisk together the all-purpose flour, baking powder, and salt. This ensures your leavening agent is evenly distributed so the bars rise just perfectly.
💡 Pro Tip: Sifting the flour and baking powder can help avoid lumps and heavy spots in the dough.
Step 3: Cream Butter and Sugars
In a large bowl, beat together the softened butter, brown sugar, and white sugar until light and fluffy. This step is where magic begins—the sugars dissolve into the butter, creating a luscious base for your peanut butter flavor.
💡 Pro Tip: Use an electric mixer for best results; scraping the sides ensures an even texture.
Step 4: Add Peanut Butter and Eggs
Mix the smooth peanut butter into the creamed butter and sugar until completely combined. Then add the whole egg and the extra egg yolk while mixing—this enriches the dough, giving your bars an ultra-moist, tender crumb.
💡 Pro Tip: Room temperature eggs incorporate better without cooling the butter mixture.
Step 5: Incorporate Dry Ingredients
Turn your mixer to low and gradually add the flour mixture to the peanut butter batter, half at a time, mixing gently so you don’t overwork the dough. You want a soft, slightly sticky peanut butter dough.
💡 Pro Tip: Don’t overmix here or the bars will get tough!
Step 6: Reserve Some Dough and Press Base Layer
Remove about one cup of the dough and set it aside. Press the remaining dough evenly into the prepared pan, creating a smooth base layer for baking.
💡 Pro Tip: Using your fingers, lightly grease them with butter or spray to press the dough easily without it sticking.
Step 7: Bake the Base Layer
Bake the pressed dough in your preheated oven for 25 minutes or until the surface looks set and golden. This step ensures a stable base that won’t collapse under the gooey topping.
💡 Pro Tip: Resist the urge to open the oven door early—baking at the right temperature is key here.
Step 8: Add Marshmallow Fluff and Dough Topping
Once the base is baked, carefully spread the entire jar of marshmallow fluff over it while still warm. Then, pinch off small chunks of the reserved dough, flatten them slightly, and scatter evenly on top of the fluff layer. You don’t need to cover it completely; the gaps are part of the charm.
💡 Pro Tip: Slightly wet your fingers when pinching dough pieces to prevent sticking.
Step 9: Final Bake to Set
Return the pan to the oven for another 10 minutes or until the top dough pieces have set and taken on a slight golden hue. The marshmallow fluff will remain soft and luscious, creating that perfect contrast.
💡 Pro Tip: Keep an eye on the top during the last few minutes to avoid over-browning.
Step 10: Cool Completely and Slice
Remove the bars from the oven and let them cool at room temperature for at least an hour. Using the parchment paper overhang, lift the bars out of the pan and onto a cutting board. For clean slices, lightly grease a thin, sharp knife with cooking spray before cutting.
💡 Pro Tip: Chill the bars briefly after cooling if you want firmer slices.
Common Mistakes to Avoid
Learn from these common pitfalls:
- Skipping parchment paper: Leads to sticky bars that are a nightmare to remove and slice.
- Overmixing the dough: Makes bars tough and dense instead of tender and chewy.
- Spreading marshmallow fluff on a cold base: Causes uneven layering and fluff may tear.
- Not reserving dough for topping: Changes the signature texture and visual appeal.
- Cutting bars too soon: Leads to messy, gooey slices that fall apart.
- Ignoring ingredient substitutions: Can lead to off textures or flavors, especially with peanut butter or butter choices.
Delicious Variations to Try
Once you’ve mastered the classic Fluffernutter Bars Recipe, feel free to experiment to suit your taste buds:
Chocolate Swirl
Swirl melted chocolate or chocolate ganache over the marshmallow layer before adding the dough topping for an indulgent peanut butter-chocolate combo.
Nutty Delight
Sprinkle toasted chopped peanuts or mixed nuts over the marshmallow before adding dough pieces for extra crunch and nutty depth.
Salted Caramel Twist
Drizzle salted caramel sauce on top of the marshmallow fluff to contrast sweet and salty flavors beautifully.
Fruit Infusion
Add thin slices of bananas or dried cranberries on the marshmallow layer before topping with dough bits for a fruity surprise inside your bars.
Spiced Flavor Boost
Add a pinch of cinnamon or pumpkin pie spice to the dough to warm up this classic treat for fall or winter cravings.
How to Serve Fluffernutter Bars Recipe

Garnishes
Sprinkle with flaky sea salt, dust powdered sugar lightly, or drizzle melted peanut butter or chocolate for an extra-special finish.
Side Dishes
Serve alongside a cold glass of milk, hot tea, or even coffee for a nostalgic snack or dessert experience.
Creative Ways to Present
Cut bars into bite-sized squares for parties or stack them on a dessert platter layered with fresh berries for a festive look. You can even insert colorful toothpicks to make grabbing them easy and fun!
Make Ahead and Storage
Storing Leftovers
Keep the bars in an airtight container at room temperature for up to 3 days. For longer freshness, store them in the refrigerator, tightly wrapped, for up to a week.
Freezing
Wrap bars tightly in plastic wrap and then in foil or airtight containers before freezing. They keep well for up to 2 months. Thaw overnight in the fridge before serving.
Reheating
Warm bars gently in a microwave for 10-15 seconds to revive that melty marshmallow goodness. Be careful not to overheat or the fluff can become too sticky.
FAQs
Can I use crunchy peanut butter instead of smooth?
Yes, but smooth peanut butter is recommended for the creamiest texture. Crunchy will add texture but may be a bit drier.
Is there a gluten-free version of this Fluffernutter Bars Recipe?
Absolutely! Use a 1-to-1 gluten-free flour blend and watch baking times closely as gluten-free flours behave differently.
Can I substitute the marshmallow fluff with mini marshmallows?
Yes, melt mini marshmallows gently with a bit of butter on low heat then spread over the base. The texture will be slightly different but still delicious.
Why do I need two eggs (one whole and one yolk)?
The extra yolk adds richness and moisture without additional egg whites that can dry out the bars.
Can I make these bars dairy-free?
Swap the butter for a dairy-free margarine or coconut oil, and use your favorite dairy-free peanut butter for a delicious alternative.
How thick should I press the dough in the pan?
About half an inch to three-quarters of an inch thick for the base layer works well to hold the bars together without being cakey.
Can I double this recipe?
Yes! Just bake in a larger pan or two 9×13 pans. Keep an eye on baking times, adjusting as needed.
Why did my marshmallow fluff mix blend into the dough?
Most likely the base was not baked long enough or fully cooled, causing the fluff to melt too much. Make sure the base layer is firm before spreading fluff.
Final Thoughts
These Fluffernutter Bars are like a warm hug on a plate—a perfect blend of buttery peanut butter, sweet sugar, and gooey marshmallow that feels like pure comfort. Whether you’re baking for a crowd, sending snacks to school, or just indulging yourself, this recipe is an absolute must-have in your baking repertoire. It’s so rewarding to pull them from the oven, watch the fluff puff just right, and slice into those chewy, irresistible layers.
Have you tried this Fluffernutter Bars Recipe? I’d love to hear how it turned out! Leave a comment below. If you loved this recipe, please share it with friends and family. Happy cooking! 🍪
Print
Fluffernutter Bars Recipe
- Prep Time: 20 minutes
- Cook Time: 35 minutes
- Total Time: 1 hour 5 minutes
- Yield: 15 servings 1x
- Category: Dessert
- Method: Baking
- Cuisine: American
Description
Fluffernutter Bars are a deliciously indulgent treat combining the classic flavors of peanut butter and marshmallow fluff in a rich, chewy bar. Featuring a dense peanut butter cookie base topped with a sweet layer of marshmallow fluff and dollops of peanut butter dough, these bars are perfect for dessert or snacking, delivering a perfect balance of creamy, sweet, and nutty flavors in every bite.
Ingredients
Dry Ingredients
- 2 1/4 cups all-purpose flour
- 1 teaspoon baking powder
- 1/4 teaspoon salt
Wet Ingredients
- 3/4 cup unsalted butter, softened
- 3/4 cup brown sugar
- 1/3 cup white sugar
- 1 1/2 cups smooth peanut butter
- 1 large egg
- 1 large egg yolk (in addition to the whole egg, discard the white)
- 7 oz jar marshmallow fluff
Instructions
- Preheat the oven: Set your oven to 350°F (175°C) and arrange the oven rack in the middle position to ensure even baking.
- Prepare the pan: Line a 9×13 inch baking pan with parchment paper, allowing some overhang on the sides to easily lift the bars later. Alternatively, use aluminum foil and lightly grease it.
- Mix dry ingredients: In a medium bowl, whisk together the all-purpose flour, baking powder, and salt until well combined.
- Cream butter and sugars: In a large bowl, beat the softened unsalted butter, brown sugar, and white sugar together until the mixture is soft and creamy.
- Add peanut butter and eggs: Beat in the smooth peanut butter until combined. Then mix in the whole egg and additional yolk, discarding the extra white, until the batter is smooth.
- Combine dry and wet mixtures: With the mixer on low speed, gradually add the flour mixture into the peanut butter batter, about half at a time, mixing just until combined.
- Reserve some dough: Remove approximately 1 cup of the peanut butter cookie dough and set aside for topping.
- Form the base layer: Press the remaining peanut butter dough evenly into the bottom of the prepared pan, creating a uniform layer.
- Bake the base: Bake this peanut butter layer in the preheated oven for 25 minutes or until the surface looks fully set and slightly firm to the touch.
- Add marshmallow fluff: Remove the pan from the oven but keep the oven on. Carefully spread the entire jar of marshmallow fluff evenly over the baked peanut butter base.
- Top with reserved dough: Pinch off small pieces (about 1 inch in size) from the reserved dough, flattening them slightly, then scatter them on top of the marshmallow layer, covering approximately 80-90% of the surface.
- Bake the top layer: Return the pan to the oven and bake for an additional 10 minutes or until the peanut butter dough on top is set and lightly golden.
- Cool the bars: Remove the pan from the oven and allow the bars to cool completely at room temperature for at least 1 hour to set properly.
- Remove from pan: Using the parchment paper or foil overhang, lift the entire slab of bars out of the pan and place onto a cutting board.
- Slice the bars: For clean cuts, slightly grease a thin, sharp knife with non-stick cooking spray to prevent sticking, then slice the bars into 15 servings.
Notes
- Use parchment paper with overhang to easily lift the bars out of the pan without breaking.
- If desired, you can substitute crunchy peanut butter for smooth to add texture.
- Cooling completely before slicing ensures bars hold their shape well and don’t crumble.
- Greasing the knife is optional but highly recommended for neat slices without sticking.
- Store bars in an airtight container at room temperature for up to 3 days or refrigerate for longer freshness.
Your email address will not be published. Required fields are marked *