

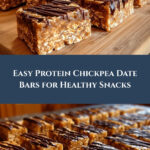
If you’re on the hunt for a wholesome, energizing bite that tastes like a treat but fuels your day, this Protein-Packed Chickpea and Date Snack Bars Recipe is about to become your new best friend. Combining the creamy richness of chickpeas with the natural sweetness of dates, along with comforting oats and nut butter, these bars deliver a delightful balance of flavors and textures. They are perfect for a quick breakfast grab, a post-workout boost, or a satisfying afternoon snack that keeps you going strong. Plus, they’re easy to customize and come together with very few ingredients, which means you can focus on enjoying rather than fussing in the kitchen.

Ingredients You’ll Need
This recipe shines because of its simplicity, using everyday pantry staples that each play an essential role. Every ingredient not only adds to the flavor but also contributes to the texture and nutritional profile, making these bars as satisfying as they are delicious.
- 1 cup Cooked Chickpeas: An excellent source of plant-based protein and fiber, giving the bars their creamy base and a subtle nuttiness.
- 1 cup Pitted Dates: Naturally sweet and sticky, they act as nature’s binder when blended with chickpeas for perfect bar consistency.
- 1/2 cup Oats: Adds chewiness and a comforting heartiness while helping to hold everything together; use certified gluten-free oats if necessary.
- 1/4 cup Peanut Butter or Almond Butter: Brings healthy fats, richness, and a silky texture; sunflower seed butter works great for nut-free options.
- 1 tablespoon Honey or Maple Syrup: Delivers a touch of extra sweetness and moisture to keep the bars from drying out.
- 1 teaspoon Vanilla Extract: Enhances the natural sweetness and adds a warm, aromatic note to the mix.
- 1/2 teaspoon Cinnamon (optional): A gentle warming spice to add depth without overpowering the other flavors.
- 1/4 teaspoon Salt: Balances sweetness and heightens the other flavors beautifully.
- 1/4 cup Dark Chocolate Chips (optional): For a decadent twist, fold these in to add bursts of bittersweet chocolate in every bite.
How to Make Protein-Packed Chickpea and Date Snack Bars Recipe
Step 1: Blend Chickpeas and Dates Until Smooth
Start by placing the cooked chickpeas and pitted dates in your food processor. Blend until you have a creamy, smooth mixture. This step is crucial because it transforms these simple ingredients into a luscious base where all the flavors can meld together seamlessly.
Step 2: Add Remaining Ingredients and Blend Again
Once your chickpea and date mixture is ready, add the oats, nut butter, honey or maple syrup, vanilla extract, cinnamon if using, and salt. Blend these together until everything is fully combined. The oats add body, while the nut butter ties the mix with healthy fats for a satisfying bite.
Step 3: Fold in Chocolate Chips
If you opted for dark chocolate chips, carefully fold them in by hand now. This keeps the chocolate chips intact so they remain distinct bursts of flavor instead of melting into the batter.
Step 4: Press the Mixture into a Baking Dish
Line an 8×8-inch baking dish with parchment paper for easy removal later. Spread the mixture evenly into the dish and press it firmly down to create a compact layer. This step ensures the bars hold their shape when chilled.
Step 5: Chill to Set
Place the dish in the refrigerator and let it chill for at least one hour. This allows the bars to firm up perfectly so they’re easy to slice and hold together when eaten.
Step 6: Slice and Enjoy
After chilling, lift the mixture out using the parchment paper and cut into 12 bars. Now you have homemade, protein-packed snack bars ready to power you through your day!
How to Serve Protein-Packed Chickpea and Date Snack Bars Recipe

Garnishes
For an extra flair of flavor and texture, sprinkle some toasted coconut flakes or a light dusting of cinnamon on top before slicing. If you enjoy a bit of crunch, crushed nuts or seeds can add a nice contrast to the soft bars.
Side Dishes
These bars shine on their own but also pair wonderfully with a creamy dollop of Greek yogurt or a fresh fruit salad for a more complete snack. They provide just the right amount of sweetness so you can complement them with tart berries or tangy citrus with no problem.
Creative Ways to Present
Want to impress friends or pack a grab-and-go snack? Wrap individual bars in parchment paper tied with twine or store in little reusable silicone bags. You can even drizzle melted chocolate on top before chilling or press some extra chocolate chips into the surface for a pretty, indulgent finish.
Make Ahead and Storage
Storing Leftovers
Once cut, store your snack bars in an airtight container in the refrigerator for up to five days. This keeps them fresh and maintains their chewy texture without drying out.
Freezing
For longer storage, these bars freeze beautifully. Wrap each bar individually in plastic wrap or parchment paper, then place in a freezer-safe bag or container. They keep up to three months and thaw quickly at room temperature.
Reheating
Though these bars are delicious cold, if you prefer them warm, simply microwave for 15-20 seconds or let sit in a warm place for a few minutes. Heating slightly brings out the nutty aromas and softens the bars just a touch.
FAQs
Can I use canned chickpeas or do they need to be freshly cooked?
Canned chickpeas work perfectly for this recipe as long as they are well rinsed and drained. Just make sure they are soft and not overly firm to get that creamy texture when blended.
Are these bars suitable for a vegan diet?
Absolutely! Simply substitute honey with maple syrup or agave syrup, and use a plant-based nut butter to keep the entire recipe vegan-friendly.
Can I replace the oats with something else?
If you need a gluten-free option or want a different texture, puffed quinoa or crushed nuts can be great alternatives, but oats are best for binding and chewiness.
How sticky are these bars? Will they hold together well?
Thanks to the natural stickiness of dates and the firmness of chickpeas, the bars hold together wonderfully once chilled. Just be sure to press the mixture firmly into the pan and refrigerate fully before slicing.
Can I add other flavors or ingredients?
Definitely! Add-ins like shredded coconut, chia seeds, or dried cranberries can add a fun twist. Just be careful not to add too much, or it might affect how well the bars bind.
Final Thoughts
Making your own Protein-Packed Chickpea and Date Snack Bars Recipe is such a rewarding way to enjoy an energizing and tasty snack that feels like a treat but is packed with wholesome goodness. Once you try these bars, you’ll be hooked on how simple and satisfying they are, and not to mention how versatile! So go ahead, gather your ingredients, and whip up a batch—you’re going to love keeping these bars on hand for whenever hunger strikes.
Print
Protein-Packed Chickpea and Date Snack Bars Recipe
- Prep Time: 15 minutes
- Cook Time: 0 minutes
- Total Time: 1 hour 15 minutes
- Yield: 12 bars 1x
- Category: Snack
- Method: No-Cook
- Cuisine: Fusion
- Diet: Vegetarian
Description
These delicious protein-packed chickpea and date snack bars are perfect for a quick energy boost. Combining creamy chickpeas, naturally sweet dates, and wholesome oats with a hint of cinnamon and vanilla, they make a nutritious and satisfying snack. Easy to prepare with no baking required, these bars are ideal for meal prepping and on-the-go bites.
Ingredients
Snack Bars Ingredients
- 1 cup Cooked Chickpeas
- 1 cup Pitted Dates (soaked if dry for smooth blending)
- 1/2 cup Oats (use certified gluten-free oats for gluten-free option)
- 1/4 cup Peanut Butter or Almond Butter (can substitute with sunflower seed butter for nut-free)
- 1 tablespoon Honey or Maple Syrup (agave syrup for vegan option)
- 1 teaspoon Vanilla Extract (can be replaced with almond extract)
- 1/2 teaspoon Cinnamon (optional)
- 1/4 teaspoon Salt (adjust to taste)
- 1/4 cup Dark Chocolate Chips (optional, can be replaced with carob chips or omitted)
Instructions
- Blend Chickpeas and Dates: Combine 1 cup of cooked chickpeas and 1 cup of pitted dates in a food processor. Blend until the mixture becomes creamy and smooth, ensuring no large chunks remain.
- Add Remaining Ingredients: To the chickpea-date mixture, add 1/2 cup oats, 1/4 cup nut butter, 1 tablespoon honey or maple syrup, 1 teaspoon vanilla extract, 1/2 teaspoon cinnamon, and 1/4 teaspoon salt. Blend again until all ingredients are fully combined and form a thick dough-like consistency.
- Fold in Chocolate Chips: If using, gently fold in 1/4 cup dark chocolate chips by hand to evenly distribute without melting them.
- Prepare Baking Dish: Line an 8×8-inch baking dish with parchment paper, ensuring the paper covers the sides for easy removal.
- Spread Mixture: Transfer the blended mixture into the prepared dish. Spread it evenly using a spatula or your hands to create a uniform layer.
- Chill to Set: Place the dish in the refrigerator and chill for at least 1 hour to allow the bars to firm up.
- Slice and Serve: Once set, remove the slab from the baking dish using the parchment paper edges. Slice into 12 bars and serve immediately or store in an airtight container for later.
Notes
- Use soaked dates if they are dry for a smoother blend.
- Substitute nut butter with sunflower seed butter for nut allergies.
- Swap honey for maple syrup or agave syrup to keep it vegan-friendly.
- Optional cinnamon adds warmth but can be omitted for a milder taste.
- For gluten-free bars, ensure oats are certified gluten-free.
- Store bars in an airtight container in the refrigerator for up to one week.
- For longer storage, freeze bars for up to one month.
Your email address will not be published. Required fields are marked *