

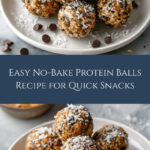
If you are searching for a wholesome, quick, and utterly delicious snack, you must try this No-Bake Protein Balls Recipe. These little powerhouses combine the rich flavors of peanut butter and chocolate with the nourishing benefits of oats, chia seeds, and protein powder, all rolled into perfectly bite-sized treats. They come together effortlessly, need no oven time, and are ideal for a post-workout boost or a midday pick-me-up. Trust me, once you make these protein balls, they will quickly become a favorite in your snack rotation.

Ingredients You’ll Need
The magic behind this No-Bake Protein Balls Recipe lies in its simple but carefully chosen ingredients. Each element plays an essential role, whether it’s adding creamy texture, balance of sweetness, or a punch of nutrition to keep you energized.
- 1 cup rolled oats: The hearty base providing texture and fiber.
- 1/2 cup natural peanut butter or almond butter: Adds creaminess and rich nutty flavor.
- 1/3 cup honey or maple syrup: A natural sweetener that binds everything together.
- 1/4 cup protein powder (any flavor of your choice): Boosts the protein content to fuel your muscles and keep you full.
- 1/4 cup chia seeds: Tiny but mighty, these provide omega-3s and a subtle crunch.
- 1/4 cup mini chocolate chips or cacao nibs: Adds bursts of chocolatey goodness.
- 1 teaspoon vanilla extract: Brings warmth and depth to the flavor profile.
- Pinch of salt: Enhances all the flavors and balances sweetness.
How to Make No-Bake Protein Balls Recipe
Step 1: Mix the Dry Ingredients
Start by combining your rolled oats, protein powder, chia seeds, mini chocolate chips, and a pinch of salt in a large mixing bowl. Stir these ingredients together until they are evenly distributed, which ensures that every bite has a perfect balance of textures and flavors.
Step 2: Warm the Wet Ingredients
Take a microwave-safe bowl and gently heat the peanut butter (or almond butter), honey (or maple syrup), and vanilla extract for about 20 to 30 seconds. The goal is to make the mixture slightly runny but not too hot, so it blends perfectly with the dry ingredients without cooking them.
Step 3: Combine Wet and Dry Ingredients
Pour the warm, melted mixture over your bowl of dry ingredients. Using a sturdy spoon or spatula, stir everything together thoroughly until all the components meld into a dough-like consistency. The mixture should be sticky enough to hold its shape when rolled.
Step 4: Form the Protein Balls
Now comes the fun part: scoop out small portions of the mixture and roll them between your palms to create smooth, 1-inch diameter balls. These bite-sized gems are the perfect grab-and-go snack when you need an energy boost.
Step 5: Chill to Set
Place your freshly rolled balls on a parchment-lined baking sheet and pop the tray into the refrigerator. Let them chill for at least 30 minutes. This step is crucial to help the protein balls firm up so they stay intact and are easier to eat.
Step 6: Store and Enjoy
Once set, transfer the protein balls into an airtight container and refrigerate. They can be kept fresh for up to a week, making it simple to enjoy a nourishing snack anytime you need one.
How to Serve No-Bake Protein Balls Recipe

Garnishes
While these protein balls are fantastic on their own, adding a light dusting of cocoa powder, a sprinkle of shredded coconut, or even a few crushed nuts can elevate their look and add a delicious twist in texture.
Side Dishes
Pair your No-Bake Protein Balls Recipe with a refreshing smoothie or a cup of herbal tea for a balanced snack break. They also work well alongside fresh fruit or a Greek yogurt parfait, creating a satisfying mini-meal.
Creative Ways to Present
If you’re bringing these protein balls to a party or gifting them, try arranging them in a cute mason jar layered with extra chocolate chips or nuts. Wrapping each ball in parchment paper and tying it with a little twine makes for an adorable, thoughtful homemade gift.
Make Ahead and Storage
Storing Leftovers
Keep your leftover protein balls in an airtight container in the fridge. This helps them retain their freshness, flavor, and chewiness for up to one week. They’re a perfect snack to prepare ahead for busy days ahead.
Freezing
If you want to stock up, these protein balls freeze beautifully. Place them in a freezer-safe container or bag with parchment paper separating layers. When you want one, just thaw for a few minutes at room temperature and enjoy the deliciousness.
Reheating
Since these are no-bake treats, they don’t exactly need reheating. However, if you prefer them a bit softer, simply let them sit out of the fridge for 10 to 15 minutes before eating or warm briefly in the microwave for a few seconds.
FAQs
Can I use any type of nut butter in this recipe?
Absolutely! Whether it’s peanut butter, almond butter, cashew butter, or even sunflower seed butter, any will work well. Just choose the one you enjoy most or have on hand.
Is it possible to make these protein balls vegan?
Yes, to make this No-Bake Protein Balls Recipe vegan, swap honey for maple syrup and use a plant-based protein powder. Everything else in the recipe is already vegan-friendly.
How much protein do these balls contain?
The protein content varies depending on the powder used, but generally, each ball packs a great punch of protein, making them ideal for post-workout snacking or sustained energy.
Can I add other mix-ins like dried fruits or nuts?
Definitely! Feel free to experiment by tossing in dried cranberries, chopped nuts, coconut flakes, or even a pinch of cinnamon to personalize your protein balls.
How long do these protein balls last outside the fridge?
Because they have nut butter and honey, they’re best kept refrigerated and should not be left out for more than a few hours to preserve freshness and prevent spoilage.
Final Thoughts
Honestly, making this No-Bake Protein Balls Recipe has been a game-changer for my snack habits. They’re quick, delicious, and so versatile, perfect for keeping hunger at bay in a wholesome way. I’m confident once you try them, you’ll be making batches again and again. So go ahead, roll up your sleeves, and treat yourself to these delightful bites—they’re love at first bite!
Print
No-Bake Protein Balls Recipe
- Prep Time: 10 minutes
- Cook Time: 0 minutes
- Total Time: 40 minutes
- Yield: 12–15 protein balls 1x
- Category: Snack
- Method: No-Cook
- Cuisine: American
- Diet: Vegetarian
Description
These no-bake protein balls are a quick, nutritious, and delicious snack packed with oats, protein powder, chia seeds, and your choice of nut butter. Perfect for an energy boost or post-workout snack, they require minimal prep and no baking, setting in the refrigerator for a convenient grab-and-go treat.
Ingredients
Dry Ingredients
- 1 cup rolled oats
- 1/4 cup protein powder (any flavor of your choice)
- 1/4 cup chia seeds
- 1/4 cup mini chocolate chips or cacao nibs
- Pinch of salt
Wet Ingredients
- 1/2 cup natural peanut butter or almond butter
- 1/3 cup honey or maple syrup
- 1 teaspoon vanilla extract
Instructions
- Mix dry ingredients: In a large mixing bowl, combine the rolled oats, protein powder, chia seeds, mini chocolate chips, and a pinch of salt. Stir thoroughly until all ingredients are evenly mixed.
- Warm wet ingredients: In a microwave-safe bowl, gently heat the peanut butter (or almond butter), honey (or maple syrup), and vanilla extract for 20 to 30 seconds or until the mixture becomes slightly runny and easy to stir.
- Combine wet and dry: Pour the warm nut butter mixture over the dry ingredient mixture in the large bowl. Stir well until the mixture forms a consistent, dough-like texture.
- Shape the balls: Scoop small portions of the mixture and roll them between your palms to form approximately 1-inch diameter balls. Arrange them on a baking sheet lined with parchment paper.
- Chill to set: Place the baking sheet with the formed balls into the refrigerator for at least 30 minutes, allowing them to firm up and hold their shape.
- Store properly: Once set, transfer the protein balls to an airtight container and store in the refrigerator for up to one week. Enjoy as a healthy snack anytime.
Notes
- For a vegan version, use maple syrup instead of honey and ensure the protein powder is plant-based.
- Customize by adding nuts, seeds, or dried fruits to your preference.
- Chilling time helps the balls hold their shape better; do not skip this step.
- Protein powder flavor can be vanilla, chocolate, or unflavored based on taste preference.
- These protein balls can be frozen for up to 3 months for longer storage.
Your email address will not be published. Required fields are marked *