Description
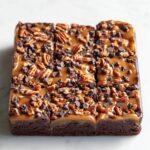
These No Bake Turtle Brownies are a delicious vegan and gluten-free treat featuring a rich walnut and almond brownie base topped with a smooth caramel layer, pecans, and chocolate chips. Perfectly chilled and easy to prepare, they make a delightful dessert or snack.
Ingredients
Units
Scale
Brownie Layer
- 1.5 cups raw walnuts
- 1.5 cups raw almonds
- 2 + 1/2 cup medjool dates, packed
- 1/2 cup cocoa powder
- 1/2 tsp vanilla extract
- 1/4 tsp salt
Caramel Layer
- 2 cups medjool dates, packed
- 2–4 tbsp water, as needed
- 1 tsp vanilla extract
- 1/8 tsp salt
- 1/2 cup crushed pecans
- 1/2 cup mini chocolate chips
Instructions
- Create the brownie layer: add walnuts, almonds, pitted medjool dates, cocoa powder, vanilla extract, and salt to a food processor. Process/pulse until a sticky brownie dough is formed.
- Line dish and press dough: Line a square baking dish with parchment paper. Use clean hands to press the brownie dough across the base of the dish.
- Create the caramel layer: add pitted medjool dates, water, vanilla extract, and salt to a food processor. Process/pulse until a smooth, caramel-like spread is formed. *See notes below.
- Assemble layers: Spread the caramel across the brownie layer. Then, add crushed pecans on top. Gently press them into the caramel layer. Next, add mini chocolate chips on top. Gently press them over the pecans.
- Freeze and serve: Freeze the turtle brownies for 1 hour. After, slice and serve.
Notes
- *For a smoother caramel, adjust the amount of water as needed while processing.
